2002 NISSAN MAXIMA ESP
[x] Cancel search: ESPPage 17 of 247
WARNING
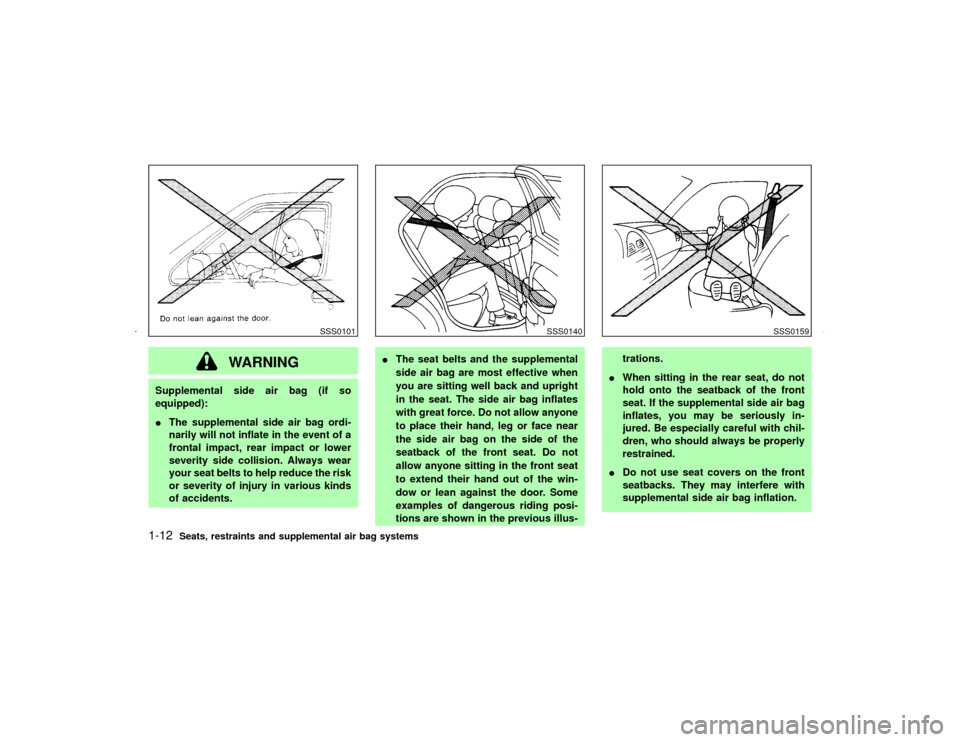
Supplemental side air bag (if so
equipped):
IThe supplemental side air bag ordi-
narily will not inflate in the event of a
frontal impact, rear impact or lower
severity side collision. Always wear
your seat belts to help reduce the risk
or severity of injury in various kinds
of accidents.IThe seat belts and the supplemental
side air bag are most effective when
you are sitting well back and upright
in the seat. The side air bag inflates
with great force. Do not allow anyone
to place their hand, leg or face near
the side air bag on the side of the
seatback of the front seat. Do not
allow anyone sitting in the front seat
to extend their hand out of the win-
dow or lean against the door. Some
examples of dangerous riding posi-
tions are shown in the previous illus-trations.
IWhen sitting in the rear seat, do not
hold onto the seatback of the front
seat. If the supplemental side air bag
inflates, you may be seriously in-
jured. Be especially careful with chil-
dren, who should always be properly
restrained.
IDo not use seat covers on the front
seatbacks. They may interfere with
supplemental side air bag inflation.
SSS0101
SSS0140
SSS0159
1-12
Seats, restraints and supplemental air bag systems
Z
01.9.21/A33-D/V5.0
X
Page 27 of 247
CHILD SAFETYChildren need adults to help protect them.
They need to be properly restrained.
The proper restraint depends on the child's
size. Generally, infants (up to about 1 year and
less than 20 lb (9 kg) should be placed in rear
facing child restraints. Front facing child re-
straints are available for children who outgrow
rear facing child restraints.
WARNING
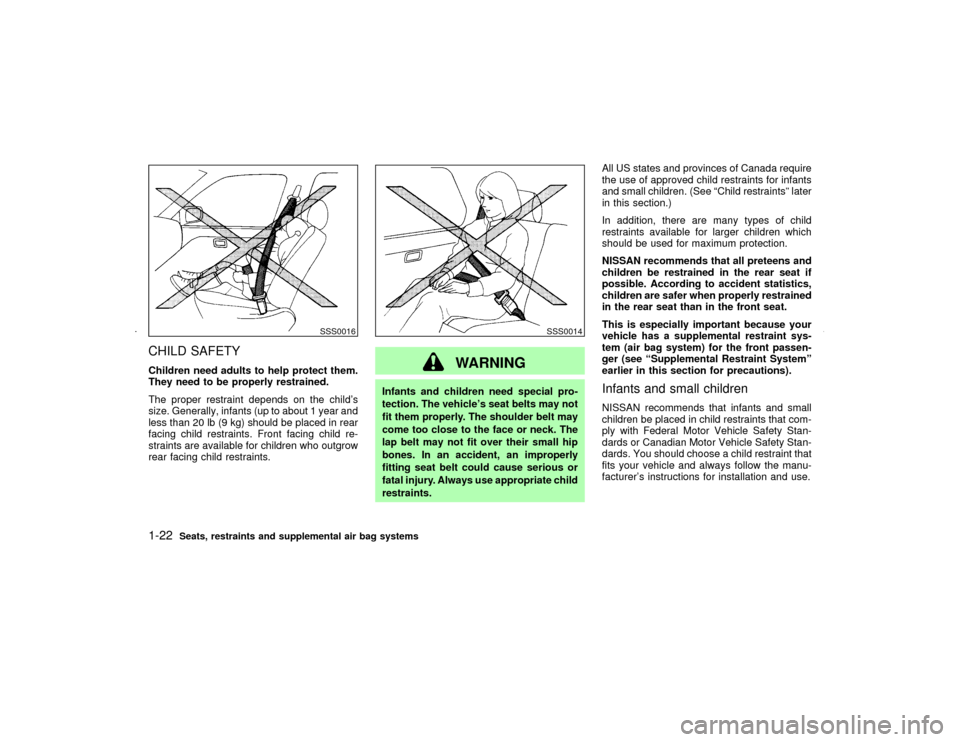
Infants and children need special pro-
tection. The vehicle's seat belts may not
fit them properly. The shoulder belt may
come too close to the face or neck. The
lap belt may not fit over their small hip
bones. In an accident, an improperly
fitting seat belt could cause serious or
fatal injury. Always use appropriate child
restraints.All US states and provinces of Canada require
the use of approved child restraints for infants
and small children. (See ªChild restraintsº later
in this section.)
In addition, there are many types of child
restraints available for larger children which
should be used for maximum protection.
NISSAN recommends that all preteens and
children be restrained in the rear seat if
possible. According to accident statistics,
children are safer when properly restrained
in the rear seat than in the front seat.
This is especially important because your
vehicle has a supplemental restraint sys-
tem (air bag system) for the front passen-
ger (see ªSupplemental Restraint Systemº
earlier in this section for precautions).
Infants and small childrenNISSAN recommends that infants and small
children be placed in child restraints that com-
ply with Federal Motor Vehicle Safety Stan-
dards or Canadian Motor Vehicle Safety Stan-
dards. You should choose a child restraint that
fits your vehicle and always follow the manu-
facturer's instructions for installation and use.
SSS0016
SSS0014
1-22
Seats, restraints and supplemental air bag systems
Z
01.9.21/A33-D/V5.0
X
Page 73 of 247
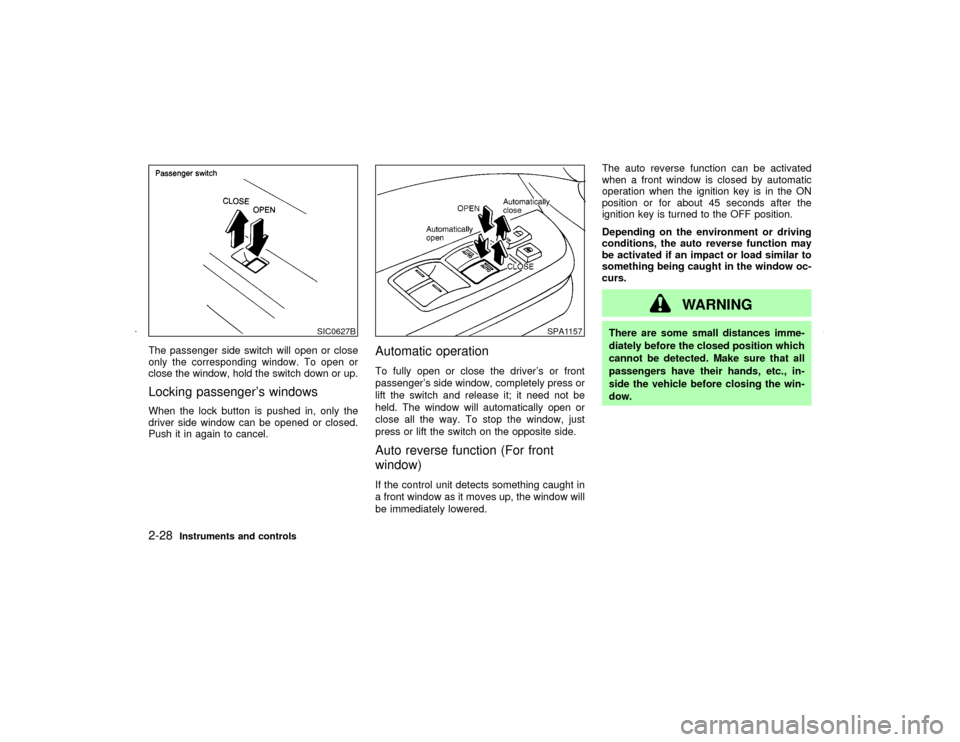
The passenger side switch will open or close
only the corresponding window. To open or
close the window, hold the switch down or up.Locking passenger's windowsWhen the lock button is pushed in, only the
driver side window can be opened or closed.
Push it in again to cancel.
Automatic operationTo fully open or close the driver's or front
passenger's side window, completely press or
lift the switch and release it; it need not be
held. The window will automatically open or
close all the way. To stop the window, just
press or lift the switch on the opposite side.Auto reverse function (For front
window)If the control unit detects something caught in
a front window as it moves up, the window will
be immediately lowered.The auto reverse function can be activated
when a front window is closed by automatic
operation when the ignition key is in the ON
position or for about 45 seconds after the
ignition key is turned to the OFF position.
Depending on the environment or driving
conditions, the auto reverse function may
be activated if an impact or load similar to
something being caught in the window oc-
curs.
WARNING
There are some small distances imme-
diately before the closed position which
cannot be detected. Make sure that all
passengers have their hands, etc., in-
side the vehicle before closing the win-
dow.
SIC0627B
SPA1157
2-28
Instruments and controls
Z
01.9.21/A33-D/V5.0
X
Page 83 of 247

2. When the indicator light begins to flash
slowly (after 20 seconds), position the
hand-held transmitter 2 to 5 inches (50 to
127 mm) away from the HomeLink
sur-
face.
3. Press and hold the hand-held transmitter
button.
4. The HomeLink
indicator light will flash,
first slowly and then rapidly. When the
indicator light begins to flash rapidly, re-
lease both buttons.
The HomeLink
Universal Transceiver button
has now been reprogrammed. The new device
can be activated by pushing the HomeLink
button that was just programmed. This proce-
dure will not affect any other programmed
HomeLink
buttons.
IF YOUR VEHICLE IS STOLENIf your vehicle is stolen, you should change the
codes of any non-rolling code device that has
been programmed into HomeLink
. Consult
the Owner's Manual of each device or call the
manufacturer or dealer of those devices for
additional information.
When your vehicle is recovered, you will
need to reprogram the HomeLinkUniver-
sal Transceiver with your new transmitter
information.FCC Notice:
This device complies with FCC rules part
15. Operation is subject to the following
two conditions: (1) This device may not
cause harmful interference and (2) This
device must accept any interference that
may be received, including interference
that may cause undesired operation.
The transmitter has been tested and com-
plies with FCC and DOC/MDC rules.
Changes or modifications not expressly
approved by the party responsible for com-
pliance could void the user's authority to
operate the device.
DOC: ISTC 1763K1313
FCC I.D.: CB2V67690
2-38
Instruments and controls
Z
01.9.21/A33-D/V5.0
X
Page 89 of 247
LOCKING WITH POWER DOOR
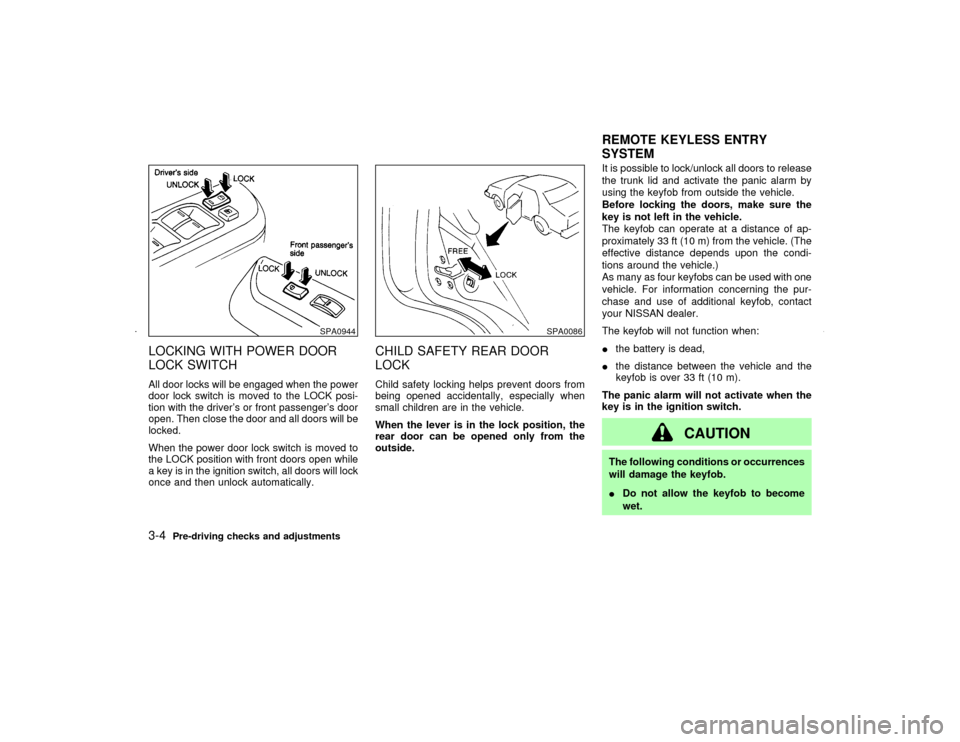
LOCK SWITCHAll door locks will be engaged when the power
door lock switch is moved to the LOCK posi-
tion with the driver's or front passenger's door
open. Then close the door and all doors will be
locked.
When the power door lock switch is moved to
the LOCK position with front doors open while
a key is in the ignition switch, all doors will lock
once and then unlock automatically.
CHILD SAFETY REAR DOOR
LOCKChild safety locking helps prevent doors from
being opened accidentally, especially when
small children are in the vehicle.
When the lever is in the lock position, the
rear door can be opened only from the
outside.It is possible to lock/unlock all doors to release
the trunk lid and activate the panic alarm by
using the keyfob from outside the vehicle.
Before locking the doors, make sure the
key is not left in the vehicle.
The keyfob can operate at a distance of ap-
proximately 33 ft (10 m) from the vehicle. (The
effective distance depends upon the condi-
tions around the vehicle.)
As many as four keyfobs can be used with one
vehicle. For information concerning the pur-
chase and use of additional keyfob, contact
your NISSAN dealer.
The keyfob will not function when:
Ithe battery is dead,
Ithe distance between the vehicle and the
keyfob is over 33 ft (10 m).
The panic alarm will not activate when the
key is in the ignition switch.
CAUTION
The following conditions or occurrences
will damage the keyfob.
IDo not allow the keyfob to become
wet.
SPA0944
SPA0086
REMOTE KEYLESS ENTRY
SYSTEM
3-4
Pre-driving checks and adjustments
Z
01.9.21/A33-D/V5.0
X
Page 118 of 247

FM RADIO RECEPTIONRange: FM range is normally limited to 25 to
30 miles (40 to 48 km), with monaural (single
channel) FM having slightly more range than
stereo FM. External influences may some-
times interfere with FM station reception even
if the FM station is within 25 miles (40 km). The
strength of the FM signal is directly related to
the distance between the transmitter and re-
ceiver. FM signals follow a line-of-sight path,
exhibiting many of the same characteristics as
light. For example they will reflect off objects.
Fade and drift: As your vehicle moves awayfrom a station transmitter, the signals will tend
to fade and/or drift.
Static and flutter: During signal interference
from buildings, large hills or due to antenna
position, usually in conjunction with increased
distance from the station transmitter, static or
flutter can be heard. This can be reduced by
adjusting the treble control counterclockwise
to reduce treble response.
Multipath reception: Because of the reflective
characteristics of FM signals, direct and re-
flected signals reach the receiver at the same
time. The signals may cancel each other,
resulting in momentary flutter or loss of sound.
AM RADIO RECEPTIONAM signals, because of their low frequency,
can bend around objects and skip along the
ground. In addition, the signals can be
bounced off the ionosphere and bent back to
earth. Because of these characteristics. AM
signals are also subject to interference as they
travel from transmitter to receiver.
Fading: Occurs while the vehicle is passing
through freeway underpasses or in areas with
many tall buildings. It can also occur for sev-
eral seconds during ionospheric turbulence
even in areas where no obstacles exist.
Static: Caused by thunderstorms, electricalpower lines, electric signs and even traffic
lights.
AUDIO OPERATION
PRECAUTIONS
Cassette playerITo maintain good quality sound,
NISSAN recommends using cassette
tapes of 60 minutes or shorter in length.
ICassette tapes should be removed from
the player when not in use. Store cas-
settes in their protective cases and away
from direct sunlight, heat, dust, mois-
ture and magnetic sources.
IDirect sunlight can cause the cassette to
become deformed. The use of deformed
cassettes may cause the cassette to jam
in the player.
IDo not use cassettes with labels which
are peeling and loose. If used, the label
could jam in the player.
IIf a cassette has loose tape, insert a
pencil through one of the cassette hubs
and rewind the tape firmly around the
hubs. Loose tape may cause tape jam-
ming and wavering sound quality.
IOver a period of time, the playback
SAA0306
Heater, air conditioner and audio systems
4-13
Z
01.9.21/A33-D/V5.0
X
Page 133 of 247
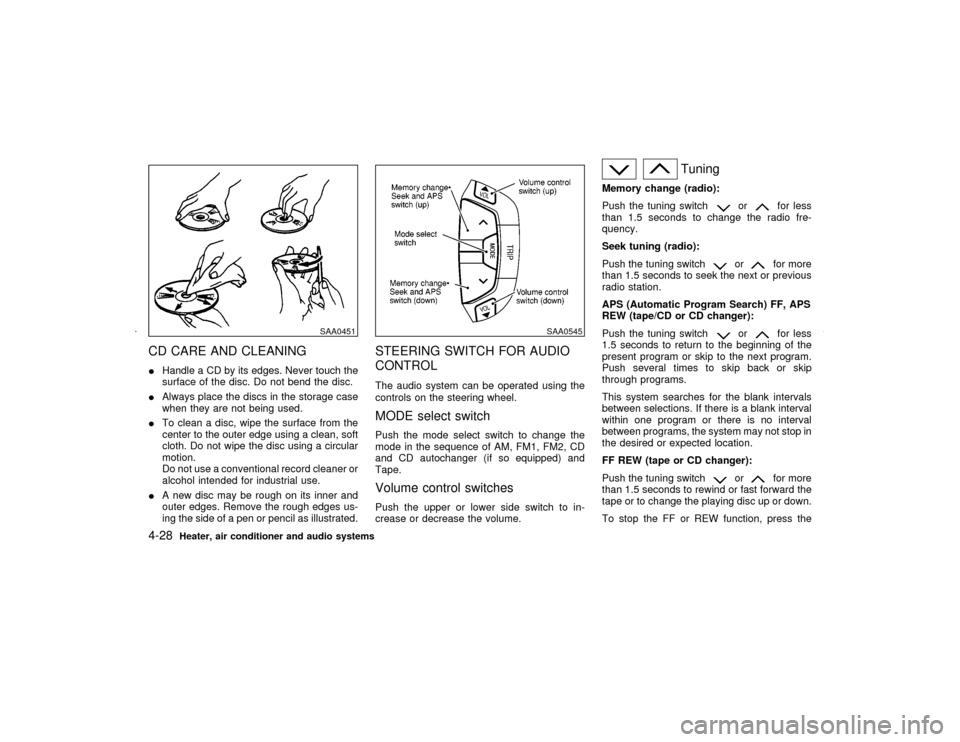
CD CARE AND CLEANINGIHandle a CD by its edges. Never touch the
surface of the disc. Do not bend the disc.
IAlways place the discs in the storage case
when they are not being used.
ITo clean a disc, wipe the surface from the
center to the outer edge using a clean, soft
cloth. Do not wipe the disc using a circular
motion.
Do not use a conventional record cleaner or
alcohol intended for industrial use.
IA new disc may be rough on its inner and
outer edges. Remove the rough edges us-
ing the side of a pen or pencil as illustrated.
STEERING SWITCH FOR AUDIO
CONTROLThe audio system can be operated using the
controls on the steering wheel.MODE select switchPush the mode select switch to change the
mode in the sequence of AM, FM1, FM2, CD
and CD autochanger (if so equipped) and
Tape.Volume control switchesPush the upper or lower side switch to in-
crease or decrease the volume.
Tuning
Memory change (radio):
Push the tuning switch
or
for less
than 1.5 seconds to change the radio fre-
quency.
Seek tuning (radio):
Push the tuning switch
or
for more
than 1.5 seconds to seek the next or previous
radio station.
APS (Automatic Program Search) FF, APS
REW (tape/CD or CD changer):
Push the tuning switch
or
for less
1.5 seconds to return to the beginning of the
present program or skip to the next program.
Push several times to skip back or skip
through programs.
This system searches for the blank intervals
between selections. If there is a blank interval
within one program or there is no interval
between programs, the system may not stop in
the desired or expected location.
FF REW (tape or CD changer):
Push the tuning switch
or
for more
than 1.5 seconds to rewind or fast forward the
tape or to change the playing disc up or down.
To stop the FF or REW function, press the
SAA0451
SAA0545
4-28
Heater, air conditioner and audio systems
Z
01.9.21/A33-D/V5.0
X
Page 142 of 247
IMake sure the area around the vehicle is
clear.
IMaintenance items should be checked pe-
riodically, e.g., each time you check engine
oil.
ICheck that all windows and lights are clean.
IVisually inspect tires for their appearance
and condition. Also, check tires for proper
inflation.
ILock all doors.
IPosition seat and adjust head restraints.
IAdjust inside and outside mirrors.
IFasten seat belts and ask all passengers to
do likewise.
ICheck the operation of warning lights when
key is turned to the ON (3) position.1. Apply the parking brake.
2.Automatic transmission:
Move the selector lever to P (Park) or N
(Neutral). (P preferred.)
The starter is designed not to operate if the
selector lever is in one of the driving posi-
tions.
Manual transmission:
Move the shift lever to N (Neutral) position,
and depress the clutch pedal to the floor
while cranking the engine.
The starter is designed not to operate un-
less the clutch pedal is fully depressed.
3. Crank the enginewith your foot off the
accelerator pedalby turning the ignition
key to START. Release the key when the
engine starts. If the engine starts, but fails
to run, repeat the above procedure.
IIf the engine is very hard to start in
extremely cold or hot weather, de-
press the accelerator pedal and hold it
to help start the engine.
CAUTION
Do not operate the starter for more than
15 seconds at a time. If the engine does
not start, turn the key off and wait 10
seconds before cranking again, other-
wise the starter could be damaged.
4.Warm-up
Allow the engine to idle for at least 30
seconds after starting. Drive at moderate
speed for a short distance first, especially in
cold weather.
BEFORE STARTING THE ENGINE STARTING THE ENGINE
Starting and driving
5-7
Z
01.9.21/A33-D/V5.0
X