2002 NISSAN MAXIMA lights
[x] Cancel search: lightsPage 93 of 247

To stop lowering the windows, release the
UNLOCK button.
To start lowering the windows, press the UN-
LOCK button again for 3 more seconds.
This function will operate after the ignition
switch is off and 45 seconds passed or either
the front door is opened.Releasing the trunk lid1. Push the TRUNK button on the keyfob for
longer than 0.5 seconds with the key re-
moved from the ignition key cylinder.
2. The trunk lid opens.
The trunk lid will not open when the trunk lid
cancel lever is in the CANCEL position.
It can be opened only with the key.
See ªTrunk lidº later in this section for cancel
lever.Using the panic alarmIf you are near your vehicle and feel threat-
ened, you may activate the alarm to call atten-
tion as follows:
1. Push the PANIC button on the keyfob for
longer than 0.5 secondswith the key
removed from the ignition key cylinder.
2. The theft warning alarm and headlights willstay on for 30 seconds.
3. The panic alarm stops when:
IIt has run for 30 seconds, or
IThe LOCK or the UNLOCK button is
pressed, or
IThe panic button or the trunk lid release
button is pushed on the keyfob for longer
than 0.5 seconds.
BATTERY REPLACEMENTReplace the battery as follows:
1. Open the lid using a suitable tool.
2. Replace the battery with a new one.
SPA1374
3-8
Pre-driving checks and adjustments
Z
01.9.21/A33-D/V5.0
X
Page 100 of 247

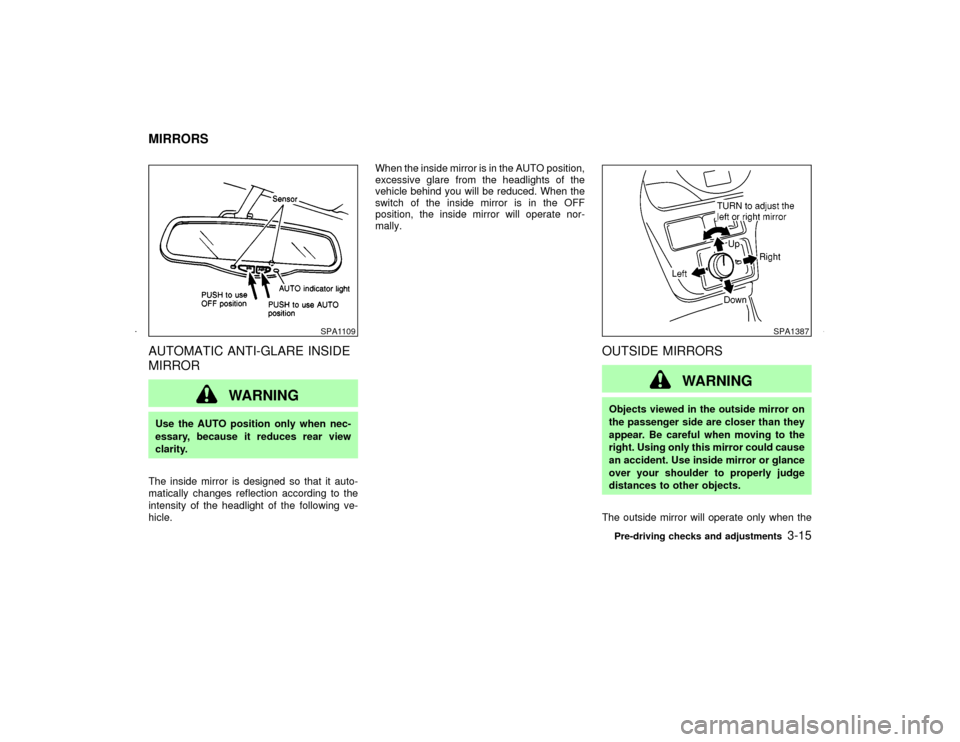
AUTOMATIC ANTI-GLARE INSIDE
MIRROR
WARNING
Use the AUTO position only when nec-
essary, because it reduces rear view
clarity.
The inside mirror is designed so that it auto-
matically changes reflection according to the
intensity of the headlight of the following ve-
hicle.When the inside mirror is in the AUTO position,
excessive glare from the headlights of the
vehicle behind you will be reduced. When the
switch of the inside mirror is in the OFF
position, the inside mirror will operate nor-
mally.
OUTSIDE MIRRORS
WARNING
Objects viewed in the outside mirror on
the passenger side are closer than they
appear. Be careful when moving to the
right. Using only this mirror could cause
an accident. Use inside mirror or glance
over your shoulder to properly judge
distances to other objects.
The outside mirror will operate only when the
SPA1109
SPA1387
MIRRORS
Pre-driving checks and adjustments
3-15
Z
01.9.21/A33-D/V5.0
X
Page 109 of 247

indicator and air recirculation lights will turn on.Air recirculation buttonOFF position:
Outside air is drawn into the passenger com-
partment.
Use the off position for normal heater, or air
conditioner operation.
ON position (Indicator light ON):
Interior air is recirculated inside the vehicle.
Push the air recirculation button to the ON
position when driving on a dusty road or to
avoid traffic fumes and for maximum cooling
when using the air conditioner.Air conditioning buttonStart the engine, move the fan control dial to
the desired (1 to 4) position and push the air
conditioning button to turn on the air condi-
tioner. The indicator light will come on when
the air conditioner is on. To stop the air con-
ditioner, push the switch again to return it to
the original position.
The air conditioner cooling function oper-
ates only when the engine is running.
HEATER OPERATION
HeatingThis mode is used to direct hot air from the
floor outlets. Some air will also come from the
defrost vents.
1. Push the air recirculation button to the OFF
position for normal heating.
2. Push the
button in.
3. Turn on the fan control dial.
4. Move the temperature control lever to the
desired position between the middle and
the HOT position.
For quick heating, move the air recirculation
button to the ON position. Be sure to return the
air recirculation button to the OFF position for
normal heating.
VentilationThis mode directs outside air from the side and
center vents.
1. Push the air recirculation button to the OFF
position.
2. Push the
button in.
3. Turn on the fan control dial.4. Move the temperature control lever to the
desired position.
Defrosting or defoggingThis mode is used to defrost/defog the win-
dows.
1. Push the
button in.
2. Turn on the fan control dial.
3. Move the temperature control lever to the
desired position between the middle and
the HOT position.
ITo quickly remove ice or fog from the
windows, turn on the fan control dial to 4
and the temperature control lever to the full
HOT position.
IWhen thebutton is pushed, the air
conditioner will automatically be turned on
to defog the windshield, and the air recircu-
late mode will automatically be turned off.
Outside air is drawn into the passenger
compartment to improve the defogging per-
formance.
4-4
Heater, air conditioner and audio systems
Z
01.9.21/A33-D/V5.0
X
Page 118 of 247

FM RADIO RECEPTIONRange: FM range is normally limited to 25 to
30 miles (40 to 48 km), with monaural (single
channel) FM having slightly more range than
stereo FM. External influences may some-
times interfere with FM station reception even
if the FM station is within 25 miles (40 km). The
strength of the FM signal is directly related to
the distance between the transmitter and re-
ceiver. FM signals follow a line-of-sight path,
exhibiting many of the same characteristics as
light. For example they will reflect off objects.
Fade and drift: As your vehicle moves awayfrom a station transmitter, the signals will tend
to fade and/or drift.
Static and flutter: During signal interference
from buildings, large hills or due to antenna
position, usually in conjunction with increased
distance from the station transmitter, static or
flutter can be heard. This can be reduced by
adjusting the treble control counterclockwise
to reduce treble response.
Multipath reception: Because of the reflective
characteristics of FM signals, direct and re-
flected signals reach the receiver at the same
time. The signals may cancel each other,
resulting in momentary flutter or loss of sound.
AM RADIO RECEPTIONAM signals, because of their low frequency,
can bend around objects and skip along the
ground. In addition, the signals can be
bounced off the ionosphere and bent back to
earth. Because of these characteristics. AM
signals are also subject to interference as they
travel from transmitter to receiver.
Fading: Occurs while the vehicle is passing
through freeway underpasses or in areas with
many tall buildings. It can also occur for sev-
eral seconds during ionospheric turbulence
even in areas where no obstacles exist.
Static: Caused by thunderstorms, electricalpower lines, electric signs and even traffic
lights.
AUDIO OPERATION
PRECAUTIONS
Cassette playerITo maintain good quality sound,
NISSAN recommends using cassette
tapes of 60 minutes or shorter in length.
ICassette tapes should be removed from
the player when not in use. Store cas-
settes in their protective cases and away
from direct sunlight, heat, dust, mois-
ture and magnetic sources.
IDirect sunlight can cause the cassette to
become deformed. The use of deformed
cassettes may cause the cassette to jam
in the player.
IDo not use cassettes with labels which
are peeling and loose. If used, the label
could jam in the player.
IIf a cassette has loose tape, insert a
pencil through one of the cassette hubs
and rewind the tape firmly around the
hubs. Loose tape may cause tape jam-
ming and wavering sound quality.
IOver a period of time, the playback
SAA0306
Heater, air conditioner and audio systems
4-13
Z
01.9.21/A33-D/V5.0
X
Page 142 of 247

IMake sure the area around the vehicle is
clear.
IMaintenance items should be checked pe-
riodically, e.g., each time you check engine
oil.
ICheck that all windows and lights are clean.
IVisually inspect tires for their appearance
and condition. Also, check tires for proper
inflation.
ILock all doors.
IPosition seat and adjust head restraints.
IAdjust inside and outside mirrors.
IFasten seat belts and ask all passengers to
do likewise.
ICheck the operation of warning lights when
key is turned to the ON (3) position.1. Apply the parking brake.
2.Automatic transmission:
Move the selector lever to P (Park) or N
(Neutral). (P preferred.)
The starter is designed not to operate if the
selector lever is in one of the driving posi-
tions.
Manual transmission:
Move the shift lever to N (Neutral) position,
and depress the clutch pedal to the floor
while cranking the engine.
The starter is designed not to operate un-
less the clutch pedal is fully depressed.
3. Crank the enginewith your foot off the
accelerator pedalby turning the ignition
key to START. Release the key when the
engine starts. If the engine starts, but fails
to run, repeat the above procedure.
IIf the engine is very hard to start in
extremely cold or hot weather, de-
press the accelerator pedal and hold it
to help start the engine.
CAUTION
Do not operate the starter for more than
15 seconds at a time. If the engine does
not start, turn the key off and wait 10
seconds before cranking again, other-
wise the starter could be damaged.
4.Warm-up
Allow the engine to idle for at least 30
seconds after starting. Drive at moderate
speed for a short distance first, especially in
cold weather.
BEFORE STARTING THE ENGINE STARTING THE ENGINE
Starting and driving
5-7
Z
01.9.21/A33-D/V5.0
X
Page 143 of 247

AUTOMATIC TRANSMISSION
Gate type shiftThe automatic transmission in your vehicle is
electronically controlled by a transmission con-
trol module to produce maximum power and
smooth operation.
Shown on the following pages are the recom-
mended operating procedures for this trans-
mission. Follow these procedures for maxi-
mum vehicle performance and driving
enjoyment.Starting the vehicleAfter starting the engine, fully depress the foot
brake pedal before shifting the selector lever to
the R (Reverse), N (Neutral), D (Drive), 3, 2 or
1 position. Be sure the vehicle is fully stopped
before attempting to shift the selector lever.
This automatic transmission model is de-
signed so that the foot brake pedal must be
depressed before shifting from P (Park) to
any drive position while the ignition switch
is ON.
The selector lever cannot be moved out of
P (Park) position and into any of the other
gear positions if the ignition key is turned
to the LOCK, OFF or ACC position or if the
key is removed from the switch.1. Keep the foot brake pedal depressed and
shift into a driving gear.
2. Release the parking brake and foot brake,
then gradually start the vehicle in motion.
WARNING
IDo not depress the accelerator pedal
while shifting from P or N to R, D or
manual shift mode. Always depress
the brake pedal until shifting is com-
pleted. Failure to do so could cause
you to lose control and have an acci-
dent.
ICold engine idle speed is high, so use
caution when shifting into a forward
or reverse gear before the engine has
warmed up.
IOn slippery roads, do not downshift.
This may cause a loss of control.
INever shift to P or R while vehicle is
moving. This could cause an acci-
dent.
IIf the selector lever cannot be moved
from the P position while the engineis running and the brake pedal is
depressed, the stoplights may not
work. Malfunctioning stoplights
could cause an accident injuring
yourself and others.
CAUTION
When stopping the vehicle on an uphill
grade, do not hold the vehicle by de-
pressing the accelerator pedal. The foot
brakes should be used for this purpose.
DRIVING THE VEHICLE5-8
Starting and driving
Z
01.9.21/A33-D/V5.0
X
Page 145 of 247

3 (Third gear):
For driving up or down long slopes where
engine braking would be advantageous.
2 (Second gear):
Use for hill climbing or engine braking on
downhill grades.
Do not exceed 68 MPH (110 km/h) in the 2
(Second gear) position.
1 (Low gear):
Use this position when climbing steep hills
slowly or driving slowly through deep snow,
sand or mud, or for maximum engine braking
on steep downhill grades.
Do not exceed 37 MPH (60 km/h) in the 1 (Low
gear) position.
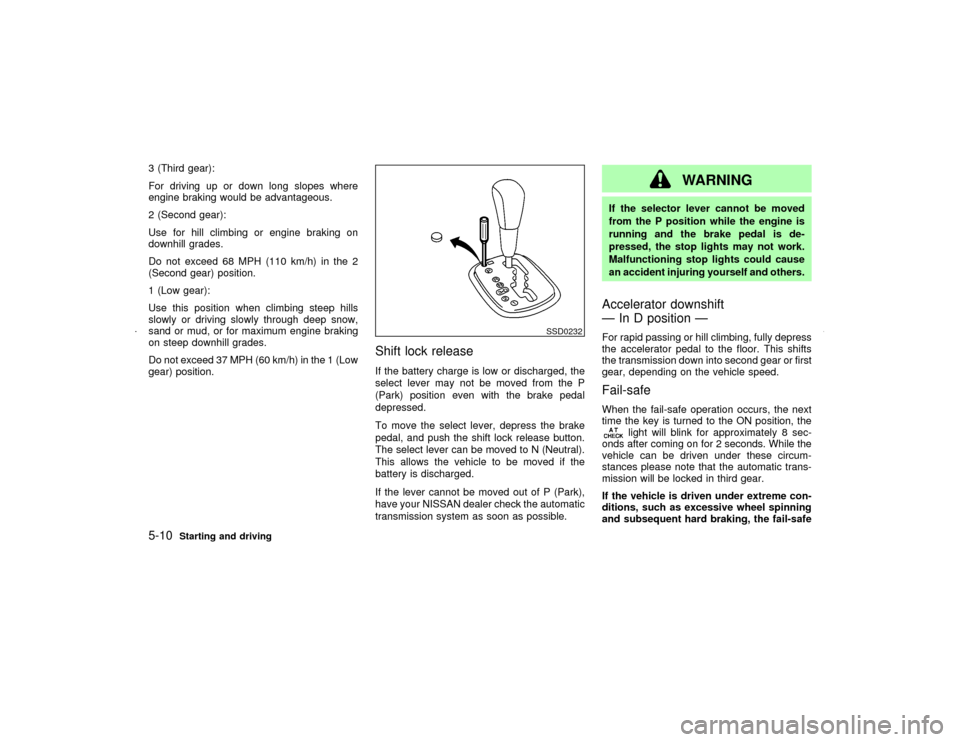
Shift lock releaseIf the battery charge is low or discharged, the
select lever may not be moved from the P
(Park) position even with the brake pedal
depressed.
To move the select lever, depress the brake
pedal, and push the shift lock release button.
The select lever can be moved to N (Neutral).
This allows the vehicle to be moved if the
battery is discharged.
If the lever cannot be moved out of P (Park),
have your NISSAN dealer check the automatic
transmission system as soon as possible.
WARNING
If the selector lever cannot be moved
from the P position while the engine is
running and the brake pedal is de-
pressed, the stop lights may not work.
Malfunctioning stop lights could cause
an accident injuring yourself and others.Accelerator downshift
Ð In D position ÐFor rapid passing or hill climbing, fully depress
the accelerator pedal to the floor. This shifts
the transmission down into second gear or first
gear, depending on the vehicle speed.Fail-safeWhen the fail-safe operation occurs, the next
time the key is turned to the ON position, the
light will blink for approximately 8 sec-
onds after coming on for 2 seconds. While the
vehicle can be driven under these circum-
stances please note that the automatic trans-
mission will be locked in third gear.
If the vehicle is driven under extreme con-
ditions, such as excessive wheel spinning
and subsequent hard braking, the fail-safe
SSD0232
5-10
Starting and driving
Z
01.9.21/A33-D/V5.0
X
Page 149 of 247

CRUISE CONTROL OPERATIONSThe cruise control allows driving at a speed
between 25 to 89 MPH (40 to 144 km/h)
without keeping your foot on the accelerator
pedal.
To turn on the cruise control,push the main
switch on. The CRUISE indicator light on the
meter panel will come on.
To set at cruising speed,accelerate your
vehicle to the desired speed, push the
COAST/SET switch and release it. (The SET
indicator light will come on.) Take your foot off
the accelerator pedal. Your vehicle will main-
tain the set speed.ITo pass another vehicle,depress the
accelerator pedal. When you release the
pedal, the vehicle will return to the previ-
ously set speed.
IThe vehicle may not maintain the set speed
when going up or down steep hills. If this
happens, drive without the cruise control.
To cancel the preset speed,follow either of
these three methods:
a) Push the cancel switch; The SET indicator
light will go out.
b) Tap the brake pedal; The SET indicator
light will go out.
c) Turn the main switch off. Both the CRUISE
indicator and SET indicator lights will go
out.
IIf you depress the brake pedal while push-
ing the RES/ACCEL set switch and reset at
the cruising speed, turn the main switch off
once and then turn it on again.
IThe cruise control will automatically be can-
celled if the vehicle slows down below
approximately 8 MPH (13 km/h).
IDepress the clutch pedal (manual transmis-
sion), or move the selector lever to N (Neu-
tral) position (automatic transmission). The
SET indicator light will go out.To reset at a faster cruising speed,use one
of the following three methods:
a) Depress the accelerator pedal. When the
vehicle attains the desired speed, push and
release the COAST/SET switch.
b) Push and hold the RES/ACCEL set switch.
When the vehicle attains the speed you
desire, release the switch.
c) Push, then quickly release the RES/ACCEL
set switch. Each time you do this, the set
speed will increase by about 1 MPH (1.6
km/h).
To reset at a slower cruising speed,use one
of the following three methods:
a) Lightly tap the brake pedal. When the ve-
hicle attains the desired speed, push the
COAST/SET switch and release it.
b) Push and hold the COAST/SET switch.
Release the switch when the vehicle slows
down to the desired speed.
c) Push, then quickly release the COAST/
SET switch. Each time you do this, the set
speed will decrease by about 1 MPH (1.6
km/h).
To resume the preset speed,push and re-
lease the RES/ACCEL set switch. The vehicle
will resume the last set cruising speed when
SSD0193
5-14
Starting and driving
Z
01.9.21/A33-D/V5.0
X