2002 NISSAN FRONTIER height
[x] Cancel search: heightPage 30 of 273

Unfastening the seat belt
To unfasten the seat belt, press the button
on the buckle. The seat belt automatically
retracts.
Checking seat belt operation
Seat belt retractors are designed to lock
seat belt movement by two separate meth-
ods:
1) When the seat belt is pulled quickly from
the retractor.
2) When the vehicle slows down rapidly.
To increase your confidence in the seatbelts, check the operation as follows.
cGrasp the shoulder belt and pull quickly
forward. The retractor should lock and
restrict further belt movement.
If the retractor does not lock during this
check, or if you have any questions about
seat belt operation, see an authorized
NISSAN dealer.
Shoulder belt height adjustment
(For front seats)
The shoulder belt anchor height should be
adjusted to the position best for you. (See
``Precautions on seat belt usage'' earlier in
this section.) To adjust, pull out the adjust-
ment button and move the shoulder belt
anchor to the desired position, so the belt
passes over the center of the shoulder. The
belt should be away from your face and
neck, but not falling off of your shoulder.
Release the adjustment button to lock the
shoulder belt anchor into position.
ARS1054WRS0112
Seats, restraints and supplemental air bag systems1-23
ZX
Page 31 of 273
WARNING
cAfter adjustment, release the adjust-
ment button and try to move the
shoulder belt anchor up and down to
make sure it is securely fixed in
position.
cThe shoulder belt anchor height
should be adjusted to the position
best for you. Failure to do so may
reduce the effectiveness of the en-
tire restraint system and increase
the chance or severity of injury in an
accident.
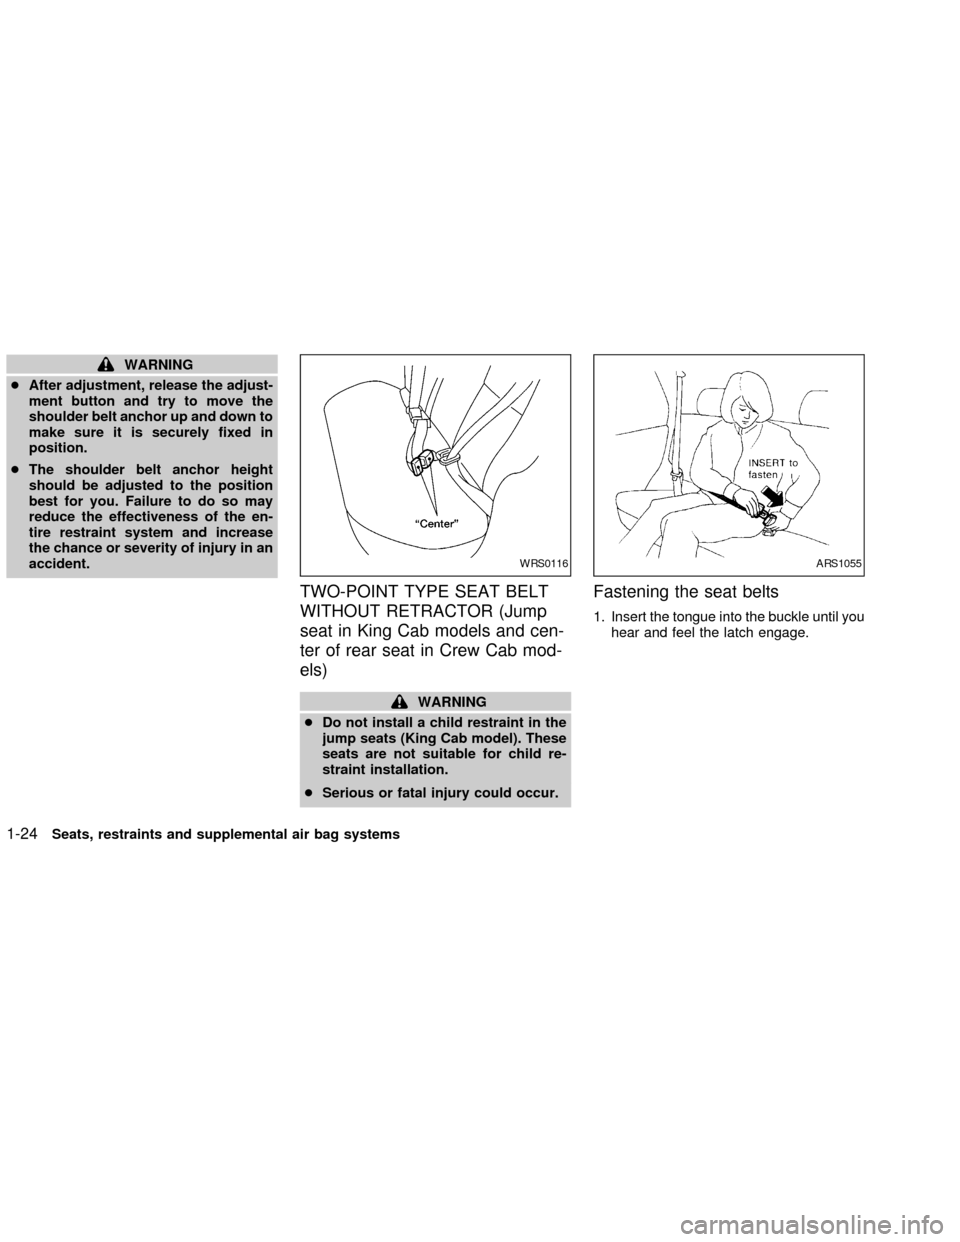
TWO-POINT TYPE SEAT BELT
WITHOUT RETRACTOR (Jump
seat in King Cab models and cen-
ter of rear seat in Crew Cab mod-
els)
WARNING
cDo not install a child restraint in the
jump seats (King Cab model). These
seats are not suitable for child re-
straint installation.
cSerious or fatal injury could occur.
Fastening the seat belts
1. Insert the tongue into the buckle until you
hear and feel the latch engage.
WRS0116ARS1055
1-24Seats, restraints and supplemental air bag systems
ZX
Page 216 of 273
Distance A:
Manual
TransmissionAutomatic
Transmission
Rear
Wheel ABS4 1/8 in.
(105mm)4 1/2 in.
(115mm)
Four Wheel
ABS4 in.
(100mm)4 1/4 in.
(110mm)
If it is out of the range shown above, see an
authorized NISSAN dealer.
Self-adjusting brakes
Your vehicle is equipped with self-adjusting
brakes.
The front disc-type brakes self-adjust every
time the brake pedal is applied. The rear
drum-type brakes on two-wheel drive trucks
self-adjust every time the parking brake is
applied. The rear drum-type brakes on four-
wheel drive trucks self-adjust every time the
brake pedal is applied. If the brake pedal
goes down farther than normal, it may be
due to a lack of adjustment of the rear drum
brakes. Apply the parking brake several
times.
WARNING
If the brake pedal height does not re-
turn to normal, see an authorized
NISSAN dealer and have it checked.
Brake pad wear indicators
The disc brake pads on your vehicle have
audible wear indicators. When a brake pad
requires replacement, it will make a high
pitched scraping or screeching sound when
the vehicle is in motion whether or not the
brake pedal is depressed. Have the brakes
checked as soon as possible if the wear
indicator sound is heard.
Under some driving or climate conditions,
occasional brake squeak, squeal or other
noise may be heard. Occasional brake
noise during light to moderate stops is nor-
mal and does not affect the function or
performance of the brake system.
The rear drum brakes (if so equipped) do
not have audible wear indicators. Should
you ever hear an unusually loud noise from
the rear drum brakes, have them inspected
as soon as possible by an authorized
NISSAN dealer.Proper brake inspection intervals should
be followed.For more information regard-
ing brake inspections, see the appropriate
maintenance schedule information in the
``NISSAN Service and Maintenance Guide.''
BRAKE BOOSTER
Check the brake booster function with the
following steps:
1. With the engine off, press and release
the brake pedal several times. When
brake pedal movement (distance of
travel) remains the same from one pedal
application to the next, continue on to
next step.
2. While depressing the brake pedal, start
the engine. The pedal height should drop
a little.
3. With the brake pedal depressed, stop the
engine. Keeping the pedal depressed for
about 30 seconds, the pedal height
should not change.
4. Run the engine for one minute without
depressing the brake pedal, then turn it
off. Depress the brake pedal several
times. The pedal travel distance will de-
Maintenance and do-it-yourself
8-27
ZX
Page 221 of 273
cAiming is not necessary after replac-
ing the bulb. When aiming adjust-
ment is necessary, contact an autho-
rized NISSAN dealer.
cDo not leave the bulb out of the
headlight reflector for a long period
of time as dust, moisture, and smoke
may enter the headlight body and
affect the performance of the head-
light.
Replacing the headlight bulb
1. Open the hood.
2. Disconnect the negative (2) battery
cable.
3 Disconnect the electrical connector from
the rear end of the bulb.
4. Turn the bulb retaining ring counterclock-
wise until it is free from the headlamp
reflector and then remove it.
5. Carefully remove the headlight bulb. Do
not shake or rotate the bulb when remov-
ing it.
DO NOT TOUCH THE BULB.6. Install the new bulb in the reverse order
of removal.
cBe sure the lip of the bulb socket
contacts the headlight body.
Adjusting the headlight aim
Before performing aiming adjustment, make
sure of the following:
a. Use an aiming wall screen.
b. Keep all of the tires inflated to the correct
pressure.
c. Place the vehicle and screen on level
ground.
d. See that the vehicle is unloaded (except
for full levels of coolant, engine oil and
fuel, and that the spare tire, jack, and
tools are stored). Have the driver or an
equivalent weight placed in the driver's
seat.
1. Open the hood. Turn headlight low beam
on.
2. Adjust the vertical aim by turning the
adjustment screw.cCover the opposite headlight and ensure
the fog lights (if so equipped) are turned
off.
cAdjust beam pattern until cutoff line is
positioned at the same height off ground
as bulb center (on H-line).
8-32Maintenance and do-it-yourself
ZX
Page 230 of 273
Tire wear and damage
WARNING
cTires should be periodically in-
spected for wear, cracking, bulging
or objects caught in the tread. If
excessive wear, cracks, bulging or
deep cuts are found, the tire(s)
should be replaced.
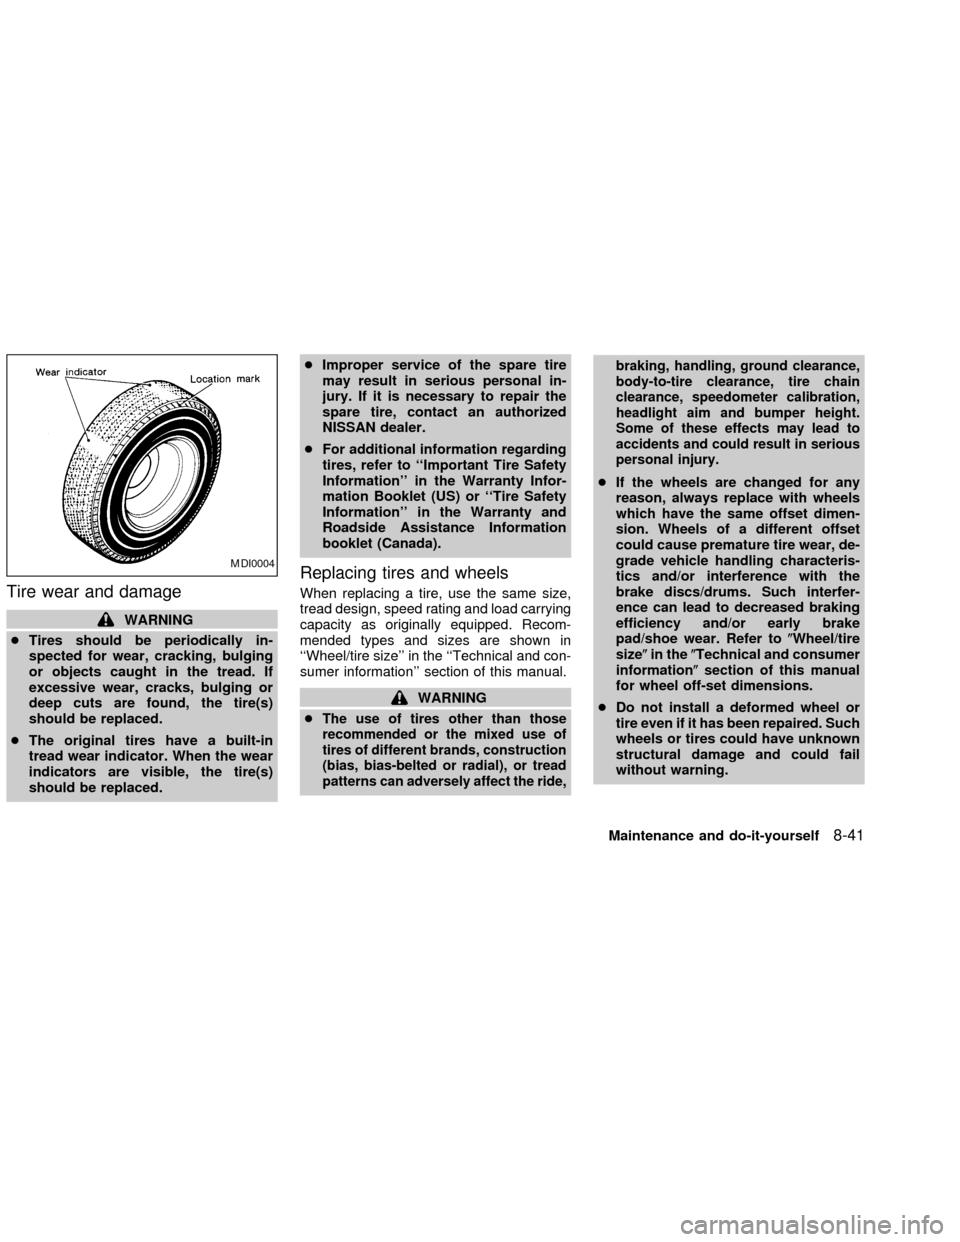
cThe original tires have a built-in
tread wear indicator. When the wear
indicators are visible, the tire(s)
should be replaced.cImproper service of the spare tire
may result in serious personal in-
jury. If it is necessary to repair the
spare tire, contact an authorized
NISSAN dealer.
cFor additional information regarding
tires, refer to ``Important Tire Safety
Information'' in the Warranty Infor-
mation Booklet (US) or ``Tire Safety
Information'' in the Warranty and
Roadside Assistance Information
booklet (Canada).
Replacing tires and wheels
When replacing a tire, use the same size,
tread design, speed rating and load carrying
capacity as originally equipped. Recom-
mended types and sizes are shown in
``Wheel/tire size'' in the ``Technical and con-
sumer information'' section of this manual.
WARNING
c
The use of tires other than those
recommended or the mixed use of
tires of different brands, construction
(bias, bias-belted or radial), or tread
patterns can adversely affect the ride,braking, handling, ground clearance,
body-to-tire clearance, tire chain
clearance, speedometer calibration,
headlight aim and bumper height.
Some of these effects may lead to
accidents and could result in serious
personal injury.
cIf the wheels are changed for any
reason, always replace with wheels
which have the same offset dimen-
sion. Wheels of a different offset
could cause premature tire wear, de-
grade vehicle handling characteris-
tics and/or interference with the
brake discs/drums. Such interfer-
ence can lead to decreased braking
efficiency and/or early brake
pad/shoe wear. Refer to(Wheel/tire
size(in the(Technical and consumer
information(section of this manual
for wheel off-set dimensions.
cDo not install a deformed wheel or
tire even if it has been repaired. Such
wheels or tires could have unknown
structural damage and could fail
without warning.
MDI0004
Maintenance and do-it-yourself8-41
ZX
Page 244 of 273
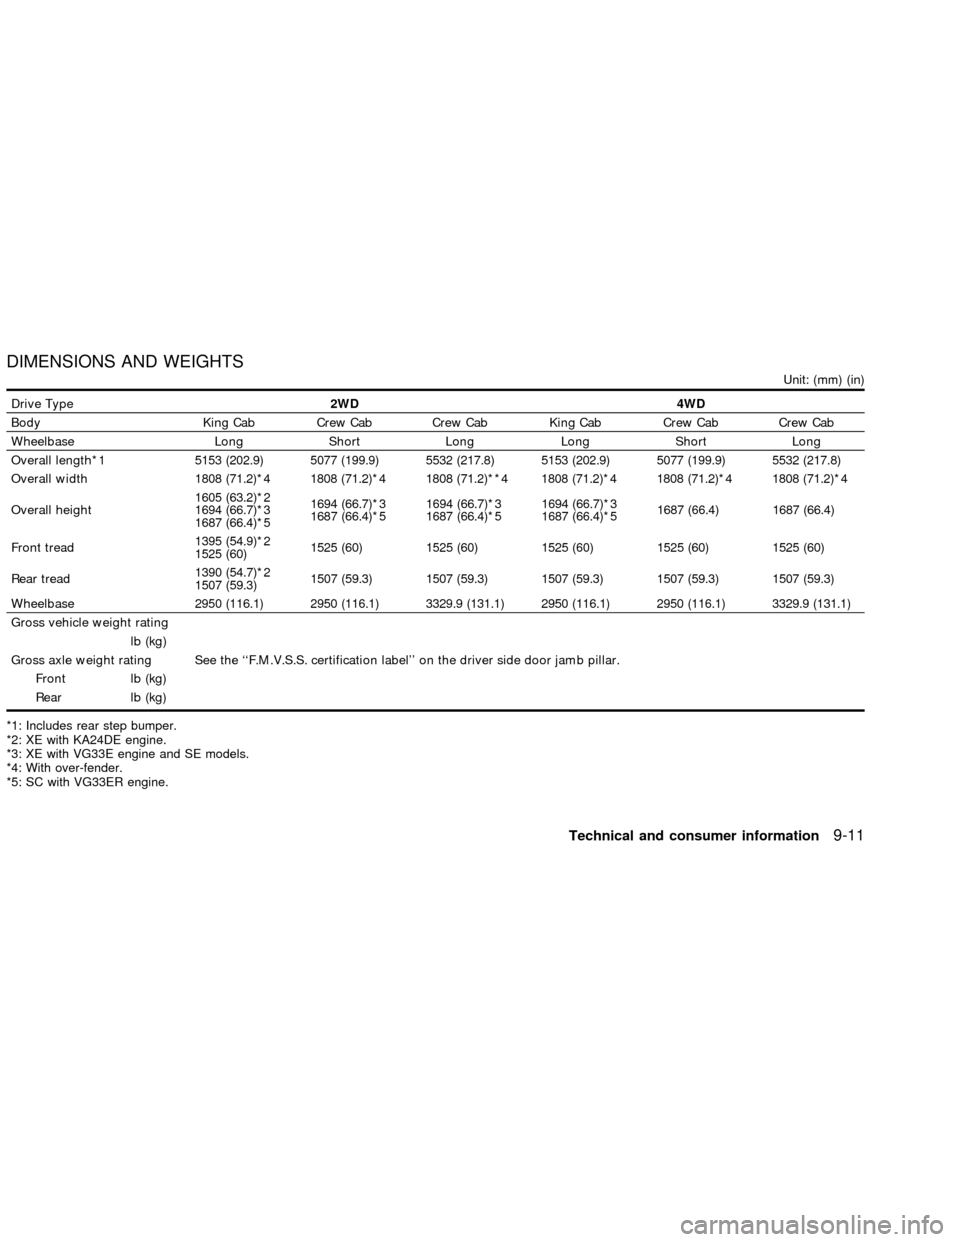
DIMENSIONS AND WEIGHTS
Unit: (mm) (in)
Drive Type2WD 4WD
Body King Cab Crew Cab Crew Cab King Cab Crew Cab Crew Cab
Wheelbase Long Short Long Long Short Long
Overall length*1 5153 (202.9) 5077 (199.9) 5532 (217.8) 5153 (202.9) 5077 (199.9) 5532 (217.8)
Overall width 1808 (71.2)*4 1808 (71.2)*4 1808 (71.2)**4 1808 (71.2)*4 1808 (71.2)*4 1808 (71.2)*4
Overall height1605 (63.2)*2
1694 (66.7)*3
1687 (66.4)*51694 (66.7)*3
1687 (66.4)*51694 (66.7)*3
1687 (66.4)*51694 (66.7)*3
1687 (66.4)*51687 (66.4) 1687 (66.4)
Front tread1395 (54.9)*2
1525 (60)1525 (60) 1525 (60) 1525 (60) 1525 (60) 1525 (60)
Rear tread1390 (54.7)*2
1507 (59.3)1507 (59.3) 1507 (59.3) 1507 (59.3) 1507 (59.3) 1507 (59.3)
Wheelbase 2950 (116.1) 2950 (116.1) 3329.9 (131.1) 2950 (116.1) 2950 (116.1) 3329.9 (131.1)
Gross vehicle weight rating
lb (kg)
Gross axle weight rating See the ``F.M.V.S.S. certification label'' on the driver side door jamb pillar.
Front lb (kg)
Rear lb (kg)
*1: Includes rear step bumper.
*2: XE with KA24DE engine.
*3: XE with VG33E engine and SE models.
*4: With over-fender.
*5: SC with VG33ER engine.
Technical and consumer information9-11
ZX