2002 NISSAN FRONTIER parking brake
[x] Cancel search: parking brakePage 169 of 273
CHANGING A FLAT TIRE
If you have a flat tire, follow the instructions
below:
Stopping the vehicle
1. Safely move the vehicle off the road and
away from traffic.
2. Turn on the hazard warning flashers.
3. Park on a level surface and apply the
parking brake. Shift the manual transmis-
sion into R (Reverse), or the automatic
transmission into P (Park).
WARNING
c
The transfer control lever
must be in the 2H, 4H or 4L position.
c
Do not leave the transfer control le-
ver in the N (Neutral) position. Other-
wise, the vehicle could roll unexpect-
edly even if the manual transmission
is in any gear or the automatic trans-
mission is in the P (Park) position.
This could result in serious personal
injury or property damage.
4. Turn off the engine.5. Raise the hood to warn other traffic and
to signal professional road assistance
personnel that you require assistance.
6. Have all passengers get out of the ve-
hicle and stand in a safe place away from
traffic and clear of the vehicle.
WARNING
cMake sure the parking brake is se-
curely applied and the manual trans-
mission is shifted into R (Reverse),
or the automatic transmission into P
(Park).
cNever change tires when the vehicle
is on a slope, ice or slippery areas.
This is hazardous.
cNever change tires if oncoming traf-
fic is close to your vehicle. Wait for
professional road assistance.
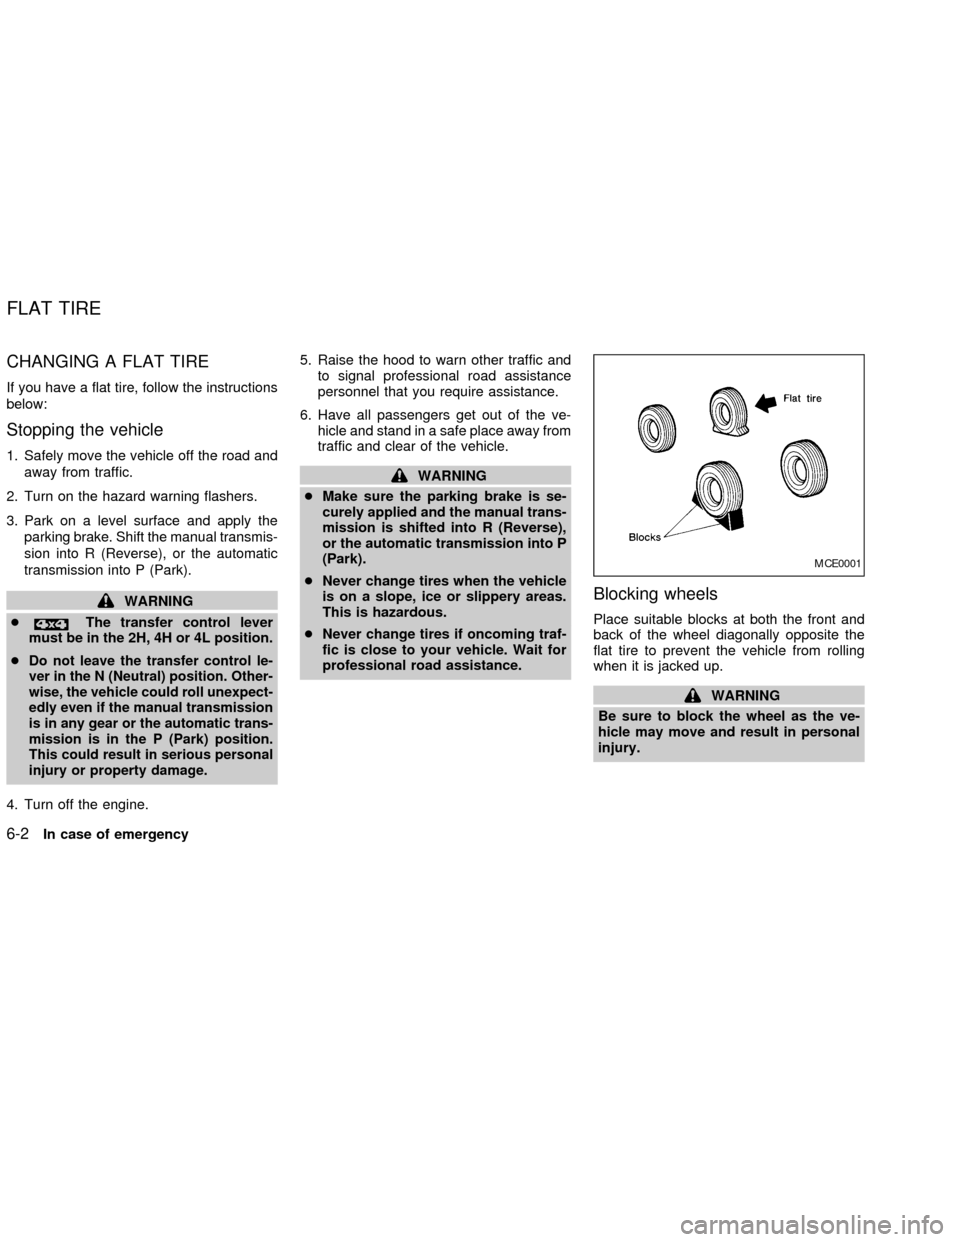
Blocking wheels
Place suitable blocks at both the front and
back of the wheel diagonally opposite the
flat tire to prevent the vehicle from rolling
when it is jacked up.
WARNING
Be sure to block the wheel as the ve-
hicle may move and result in personal
injury.
MCE0001
FLAT TIRE
6-2In case of emergency
ZX
Page 176 of 273
batteries into close proximity to each other.
Do not allow the two vehicles to touch.
2. Apply the parking brake. Move the shift
lever to N (Neutral) (on automatic trans-
mission models, move the selector lever
to P (Park)). Switch off all unnecessary
electrical systems (lights, heater, air con-
ditioner, etc.).
3. Remove vent caps on the battery (if so
equipped). Cover the battery with an old
cloth to reduce explosion hazard.
4. Connect jumper cables in the sequence
as illustrated.
CAUTION
cAlways connect positive (+) to posi-
tive (+) and negative (þ) to body
ground (for example, engine lift
bracket, etc.)Ðnot to the battery.
cMake sure the jumper cables do not
touch moving parts in the engine
compartment and that the cable
clamps do not contact any other
metal.
5. Start the engine of the booster vehicle
and let it run for a few minutes.6. Keep the engine speed of the booster
vehicle at about 2,000 r/min, and start the
engine of the vehicle being jump started.
CAUTION
Do not keep the starter motor engaged
for more than 10 seconds. If the engine
does not start right away, turn the key
off and wait 3 to 4 seconds before
trying again.
7. After starting your engine, carefully dis-
connect the negative cable and then the
positive cable.
8. Replace the vent caps (if so equipped).
Be sure to dispose of the cloth used to
cover the vent holes as it may be con-
taminated with corrosive acid.
CAUTION
cAutomatic transmission models can-
not be push started. This may cause
transmission damage.
cThree-way catalyst equipped models
should not be started by pushing.
The three-way catalyst may be dam-
aged.
cNever try to start the vehicle by tow-
ing it. When the engine starts, the
forward surge could cause the ve-
hicle to collide with the tow vehicle.
PUSH STARTING
In case of emergency6-9
ZX
Page 177 of 273
If your vehicle is overheating (indicated by
an extremely high temperature gauge read-
ing), or if you feel a lack of engine power, or
detect abnormal noise, etc., take the follow-
ing steps:
WARNING
cDo not continue to drive if your ve-
hicle overheats. Doing so could
cause a vehicle fire.
cTo avoid the danger of being
scalded, never remove the radiator
cap while the engine is still hot.
When the radiator cap is removed,
pressurized hot water will spurt out,
possibly causing serious injury.
cDo not open the hood if steam is
coming out.
1. Move the vehicle safely off the road,
apply the parking brake and move the
shift lever to N (Neutral). On automatic
transmission models, move the selector
lever to P (Park).
Do not stop the engine.
2.
Turn off the air conditioner (if so
equipped). Open all of the windows,move the heater or air conditioner tem-
perature control to maximum hot and fan
control to high speed.
3. If engine overheating is caused by climb-
ing a long hill on a hot day, run the engine
at a fast idle (approximately 1,500 r/min)
until the temperature gauge indicator re-
turns to normal.
4. Get out of the vehicle. Look and listen for
steam or coolant escaping from the ra-
diator before opening the hood. Wait until
no steam or coolant can be seen before
proceeding.
5. Open the hood.
WARNING
If steam or water is coming from the
engine, stand clear to prevent getting
burned.
6. Visually check drive belts for damage or
looseness. Also check if the cooling fan
is running. The radiator hoses and radia-
tor should not leak water. If coolant is
leaking, or the water pump belt is missing
or loose, or the cooling fan does not run,
stop the engine.
WARNING
Be careful not to allow your hands, hair,
jewelry or clothing to come into contact
with, or to get caught in, engine belts or
the engine cooling fan. The engine
cooling fan can start at any time when
the coolant temperature is high.
7. After the engine cools down, check the
coolant level in the reservoir tank with the
engine running. Add coolant to the res-
ervoir tank if necessary. Have your ve-
hicle repaired at an authorized NISSAN
dealer.
IF YOUR VEHICLE
OVERHEATS
6-10In case of emergency
ZX
Page 179 of 273
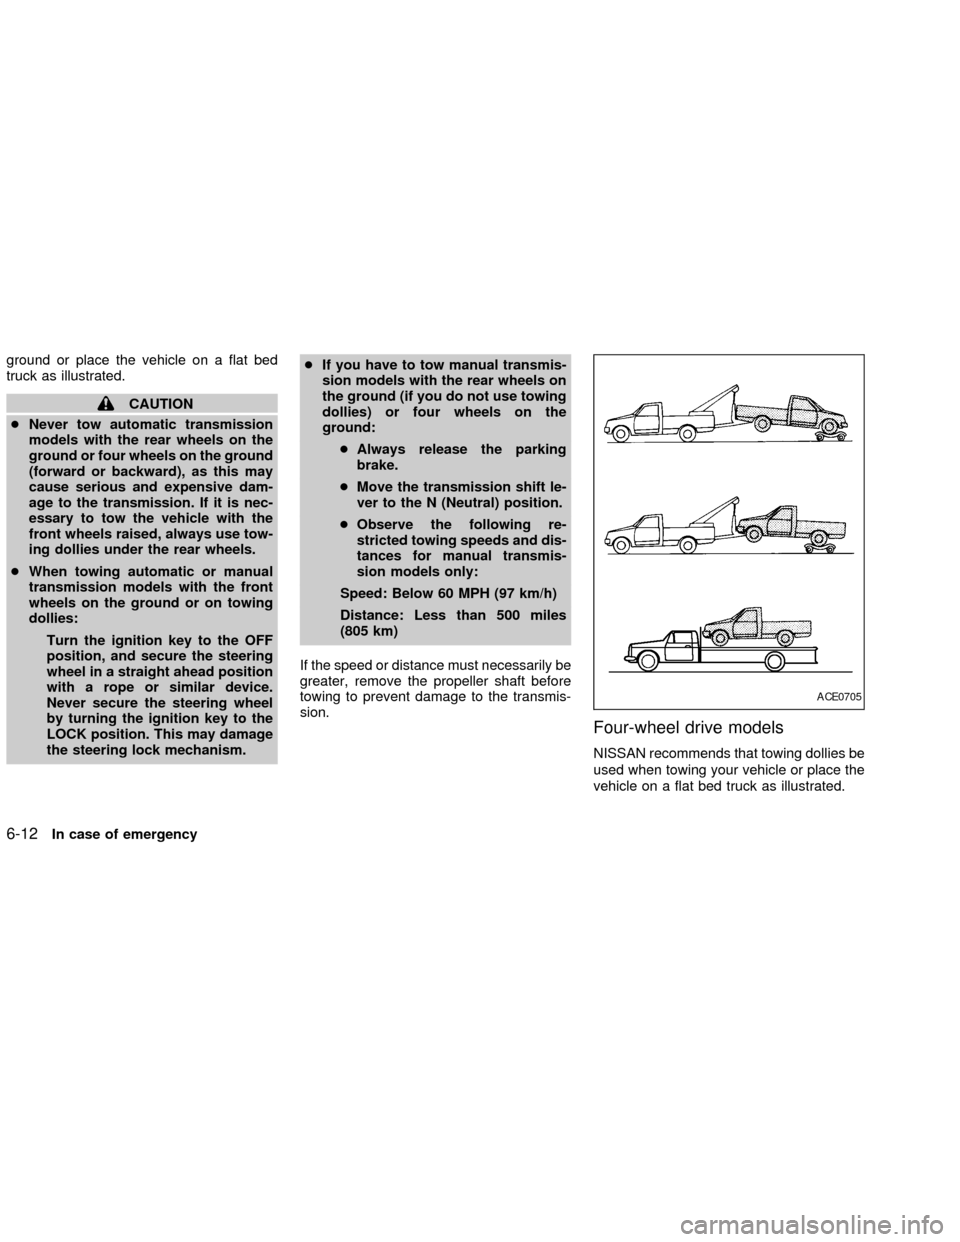
ground or place the vehicle on a flat bed
truck as illustrated.
CAUTION
cNever tow automatic transmission
models with the rear wheels on the
ground or four wheels on the ground
(forward or backward), as this may
cause serious and expensive dam-
age to the transmission. If it is nec-
essary to tow the vehicle with the
front wheels raised, always use tow-
ing dollies under the rear wheels.
cWhen towing automatic or manual
transmission models with the front
wheels on the ground or on towing
dollies:
Turn the ignition key to the OFF
position, and secure the steering
wheel in a straight ahead position
with a rope or similar device.
Never secure the steering wheel
by turning the ignition key to the
LOCK position. This may damage
the steering lock mechanism.cIf you have to tow manual transmis-
sion models with the rear wheels on
the ground (if you do not use towing
dollies) or four wheels on the
ground:
cAlways release the parking
brake.
cMove the transmission shift le-
ver to the N (Neutral) position.
cObserve the following re-
stricted towing speeds and dis-
tances for manual transmis-
sion models only:
Speed: Below 60 MPH (97 km/h)
Distance: Less than 500 miles
(805 km)
If the speed or distance must necessarily be
greater, remove the propeller shaft before
towing to prevent damage to the transmis-
sion.
Four-wheel drive models
NISSAN recommends that towing dollies be
used when towing your vehicle or place the
vehicle on a flat bed truck as illustrated.
ACE0705
6-12In case of emergency
ZX
Page 180 of 273
CAUTION
c
Never tow automatic transmission
models with the rear wheels on the
ground or four wheels on the ground,
as this may cause serious and expen-
sive damage to the transmission. If it
is necessary to tow the vehicle with
the front wheels raised, always use
towing dollies under the rear wheels.
cWhen towing automatic or manual
transmission models with the front
wheels on the ground or on towing
dollies:
cTo disengage auto-lock free-
running hubs see the ªStarting
and drivingº section for details.
cMove the transfer case shift le-
ver to the 2H position.
cTurn the ignition key to the OFF
position, and secure the steer-
ing wheel in a straight ahead
position with a rope or similar
device. Never secure the steer-
ing wheel by turning the igni-
tion key to the LOCK position.
This may damage the steeringlock mechanism.
cIf you have to tow manual transmis-
sion models with the rear wheels on
the ground (if you do not use towing
dollies) or four wheels on the
ground:
cTo disengage auto-lock free-
running hubs see the ªStarting
and drivingº section for details.
cMove the transfer case shift le-
ver to the 2H position.
cMove the transmission shift le-
ver to the N (Neutral) position.
cAlways release the parking
brake.
cObserve the following re-
stricted towing speeds and dis-
tances for manual transmis-
sion models only:
Speed: Below 60 MPH (97 km/h)
Distance: Less than 500 miles
(805 km)
If the speed or distance must necessarily be
greater, remove the front and rear propellershafts before towing to prevent damage to
the transmission.
VEHICLE RECOVERY (freeing a
stuck vehicle)
cTow chains or cables must be attached
only to the main structural members of
the vehicle.
cPulling devices should be routed so they
do not touch any part of the suspension,
steering, brake or cooling systems.
cAlways pull the cable straight out from
the front or rear of the vehicle. Never pull
the vehicle at an angle.
cPulling devices such as ropes or canvas
straps are not recommended for use in
vehicle towing or recovery.
cStand clear of a stuck vehicle.
WARNING
Do not spin your tires at high speed.
This could cause them to explode and
result in serious injury. Parts of your
vehicle could also overheat and be
damaged.
In case of emergency
6-13
ZX
Page 189 of 273

8 Maintenance and do-it-yourself
Maintenance requirements .....................................8-2
General maintenance .............................................8-3
Explanation of general maintenance
items ..................................................................8-3
Exterior maintenance.........................................8-3
Interior maintenance ..........................................8-3
Maintenance precautions .......................................8-5
Engine compartment check locations ....................8-7
Engine cooling system .........................................8-10
Checking engine coolant level ........................8-10
Changing engine coolant ................................8-11
Engine oil .............................................................8-11
Checking engine oil level ................................8-11
Changing engine oil ........................................8-13
Changing engine oil filter.................................8-14
Automatic transmission fluid ................................8-15
Temperature conditions for checking ..............8-15
Power steering fluid..............................................8-17
Brake and clutch fluid...........................................8-17
Window washer fluid ............................................8-18
Window washer fluid reservoir ........................8-18
Battery ..................................................................8-18Jump starting ...................................................8-20
Drive belts ............................................................8-20
Spark plugs ..........................................................8-21
Replacing spark plugs
(except supercharger) .....................................8-22
Replacing spark plugs
(with supercharger)..........................................8-23
Air cleaner ............................................................8-23
Windshield wiper blades ......................................8-25
Cleaning ..........................................................8-25
Replacing .........................................................8-25
Parking brake and brake pedal ............................8-26
Checking parking brake...................................8-26
Checking brake pedal .....................................8-26
Brake booster ..................................................8-27
Clutch pedal .........................................................8-28
Checking clutch pedal .....................................8-28
Fuses ....................................................................8-29
Passenger compartment .................................8-29
Keyfob battery replacement .................................8-30
Lights ....................................................................8-31
Headlights ........................................................8-31
ZX
Page 193 of 273

Additional information on the following
items with an ``*'' is found later in this
section.
Warning lights and chimesMake sure all
warning lights and chimes are operating
properly.
Windshield wiper and washer*Check that
the wipers and washer operate properly and
that the wipers do not streak.
Windshield defrosterCheck that the air
comes out of the defroster outlets properly
and in sufficient quantity when operating the
heater or air conditioner.
Steering wheelCheck for changes in the
steering conditions, such as excessive free-
play, hard steering or strange noises.
SeatsCheck seat position controls such as
seat adjusters, seatback recliner, etc. to
ensure they operate smoothly and all
latches lock securely in every position.
Check that the head restraints move up and
down smoothly and the locks (if so
equipped) hold securely in all latched posi-
tions.
Seat beltsCheck that all parts of the seat
belt system (e.g., buckles, anchors, adjust-ers and retractors) operate properly and
smoothly, and are installed securely. Check
the belt webbing for cuts, fraying, wear or
damage.
Accelerator pedalCheck the pedal for
smooth operation and make sure the pedal
does not catch or require uneven effort.
Keep the floor mat away from the pedal.
Clutch pedal*Make sure the pedal oper-
ates smoothly and check that it has the
proper free travel.
BrakesCheck that the brakes do not pull
the vehicle to one side when applied.
Brake pedal and booster*Check the pedal
for smooth operation and make sure it has
the proper distance under it when de-
pressed fully. Check the brake booster func-
tion. Be certain to keep the floor mat away
from the pedal.
Parking brake*Check that the lever has
the proper travel and confirm that your
vehicle is held securely on a fairly steep hill
with only the parking brake applied.
Automatic transmission P (Park) posi-
tion mechanismCheck that the lock re-
lease button on the selector lever operatesproperly and smoothly. On a fairly steep hill
check that your vehicle is held securely with
the selector lever in the P position without
applying any brakes.
Under the hood and vehicle
The maintenance items listed here should
be checked periodically (e.g., each time you
check the engine oil or refuel).
Additional information on the following
items with an ``*'' is found later in this
section.
Windshield washer fluid*Check that there
is adequate fluid in the reservoir.
Engine oil level*Check the level after
parking the vehicle on a level surface with
the engine off. Wait a few minutes for the oil
to drain back into the oil pan.
Brake and clutch fluid levels*Make sure
that the brake and clutch fluid level is be-
tween the MIN and MAX lines on the reser-
voir.
Power steering fluid level* and lines
Check the level when the fluid is cold, with
the engine off. Check the lines for proper
attachment, leaks, cracks, etc.
8-4Maintenance and do-it-yourself
ZX
Page 194 of 273
Automatic transmission fluid level*
Check the level after putting the selector
lever in P with the engine idling at operating
temperature.
Engine coolant level*Check the coolant
level when the engine is cold.
Radiator and hosesCheck the front of the
radiator and clean off any dirt, insects,
leaves, etc., that may have accumulated.
Make sure the hoses have no cracks, de-
formation, rot or loose connections.
Engine drive belts*Make sure the drive
belts are not frayed, worn, cracked or oily.
Battery*Check the fluid level in each cell. It
should be between the MAX and MIN lines.
Vehicles operated in high temperatures or
under severe conditions require frequent
checks of the battery fluid level.
Exhaust systemMake sure there are no
loose supports, cracks or holes. If the sound
of the exhaust seems unusual or there is a
smell of exhaust fumes, immediately have
the exhaust system inspected by an autho-
rized NISSAN dealer. See the carbon mon-
oxide warning in the ``Starting and driving''
section of this manual.UnderbodyThe underbody is frequently
exposed to corrosive substances such as
those used on icy roads or to control dust. It
is very important to remove these sub-
stances from the underbody, otherwise rust
may form on the floor pan, frame, fuel lines
and exhaust system. At the end of winter,
the underbody should be thoroughly flushed
with plain water, in those areas where mud
and dirt may have accumulated. See the
``Appearance and care'' section of this
manual.
Fluid leaksCheck under the vehicle for
fuel, oil, water or other fluid leaks after the
vehicle has been parked for a while. Water
dripping from the air conditioner after use is
normal. If you should notice any leaks or if
gasoline fumes are evident, check for the
cause and have it corrected immediately.When performing any inspection or mainte-
nance work on your vehicle, always take
care to prevent serious accidental injury to
yourself or damage to the vehicle. The
following are general precautions which
should be closely observed.
WARNING
cPark the vehicle on a level surface,
apply the parking brake securely and
block the wheels to prevent the ve-
hicle from moving. For manual trans-
mission models, move the shift lever
to N (Neutral). For automatic trans-
mission models, move the selector
lever to P (Park).
cBe sure the ignition key is in the OFF
or LOCK position when performing
any parts replacement or repairs.
cNever leave the engine or automatic
transmission related component
harnesses disconnected while the
ignition switch is in the ON position.
cNever connect or disconnect the bat-
tery or any transistorized compo-
nent while the ignition switch is in
the ON position.
MAINTENANCE
PRECAUTIONS
Maintenance and do-it-yourself8-5
ZX