2002 MINI Hardtop 2 Door clutch
[x] Cancel search: clutchPage 44 of 140

42
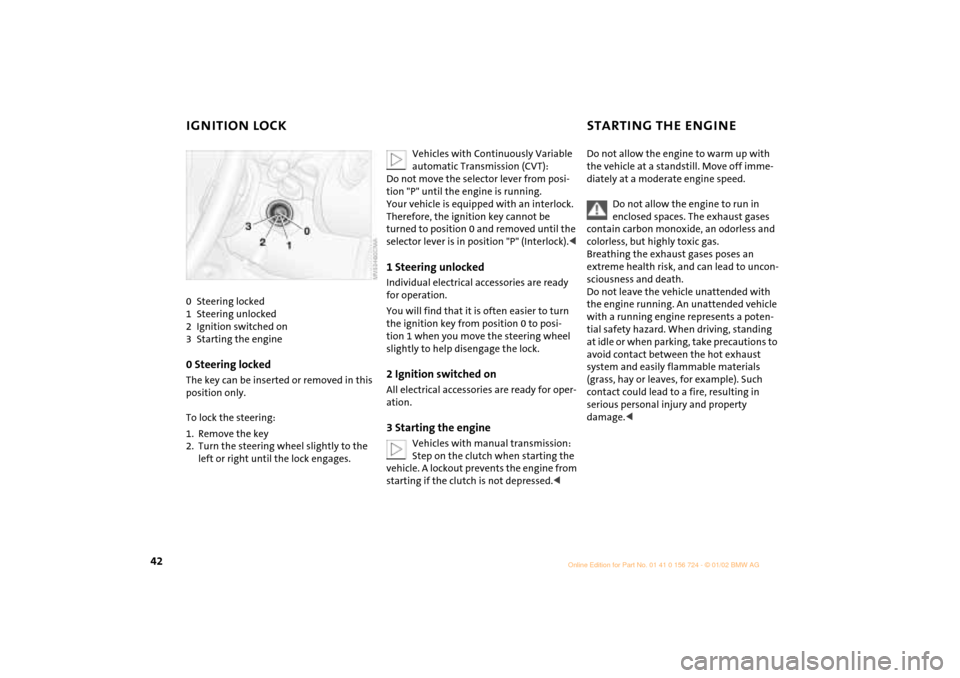
IGNITION LOCK STARTING THE ENGINE 0 Steering locked
1 Steering unlocked
2 Ignition switched on
3 Starting the engine0 Steering locked The key can be inserted or removed in this
position only.
To lock the steering:
1. Remove the key
2. Turn the steering wheel slightly to the
left or right until the lock engages.
Vehicles with Continuously Variable
automatic Transmission (CVT):
Do not move the selector lever from posi-
tion "P" until the engine is running.
Your vehicle is equipped with an interlock.
Therefore, the ignition key cannot be
turned to position 0 and removed until the
selector lever is in position "P" (Interlock).<
1 Steering unlocked Individual electrical accessories are ready
for operation.
You will find that it is often easier to turn
the ignition key from position 0 to posi-
tion 1 when you move the steering wheel
slightly to help disengage the lock.2 Ignition switched onAll electrical accessories are ready for oper-
ation.3 Starting the engine
Vehicles with manual transmission:
Step on the clutch when starting the
vehicle. A lockout prevents the engine from
starting if the clutch is not depressed.<
Do not allow the engine to warm up with
the vehicle at a standstill. Move off imme-
diately at a moderate engine speed.
Do not allow the engine to run in
enclosed spaces. The exhaust gases
contain carbon monoxide, an odorless and
colorless, but highly toxic gas.
Breathing the exhaust gases poses an
extreme health risk, and can lead to uncon-
sciousness and death.
Do not leave the vehicle unattended with
the engine running. An unattended vehicle
with a running engine represents a poten-
tial safety hazard. When driving, standing
at idle or when parking, take precautions to
avoid contact between the hot exhaust
system and easily flammable materials
(grass, hay or leaves, for example). Such
contact could lead to a fire, resulting in
serious personal injury and property
damage.<
Page 45 of 140

43
OVERVIEW REPAIRS OPERATIONCONTROLS DATA INDEX
STARTING THE ENGINE SWITCHING OFF THE ENGINE StartingWhen starting the engine, do not press the
accelerator pedal.
Do not actuate the starter for too
short a time. Do not turn it for more
than approx. 20 seconds. Release the igni-
tion key immediately when the engine
starts.
Extended starting attempts, characterized
by excessively frequent or long periods
with the starter engaged, can lead to
damage in the catalytic converter.<
If the engine does not start on the first
attempt (the engine is very hot or cold, for
instance):
>Press the accelerator pedal halfway
down while engaging the starter.
Cold starts at extremely low temperatures
(as of approx. +5 7(Ð15 6)):
>Press the accelerator pedal halfway
down while engaging the starter
>For the initial start attempt, allow the
starter to remain engaged somewhat
longer (approx. 10 seconds).
Manual transmission1. Engage the parking brake
2. Put the manual gearshift lever in neutral
3. Press the clutch pedal
4. Start the engine.Continuously Variable automatic
Transmission (CVT)*1. Press the footbrake
2. Put the selector lever in position P or N
3. Starting the engine.
Move the selector lever to position N
and engage the parking brake before
leaving your vehicle with the engine
running.
Do not leave the vehicle with the engine
running. An unattended vehicle with a
running engine represents a potential
safety hazard.<
You should never remove the ignition
key when the vehicle is in motion, as
the steering lock could engage.
When you leave the vehicle, always remove
the ignition key and engage the steering
lock.
When you park on downward slopes,
engage the parking brake.<
Manual transmissionTurn the ignition key to position 1 or 0.Continuously Variable automatic
Transmission (CVT)*Engage selector lever position P, turn the
ignition key to position 1 or 0.
Page 47 of 140

45
OVERVIEW REPAIRS OPERATIONCONTROLS DATA INDEX
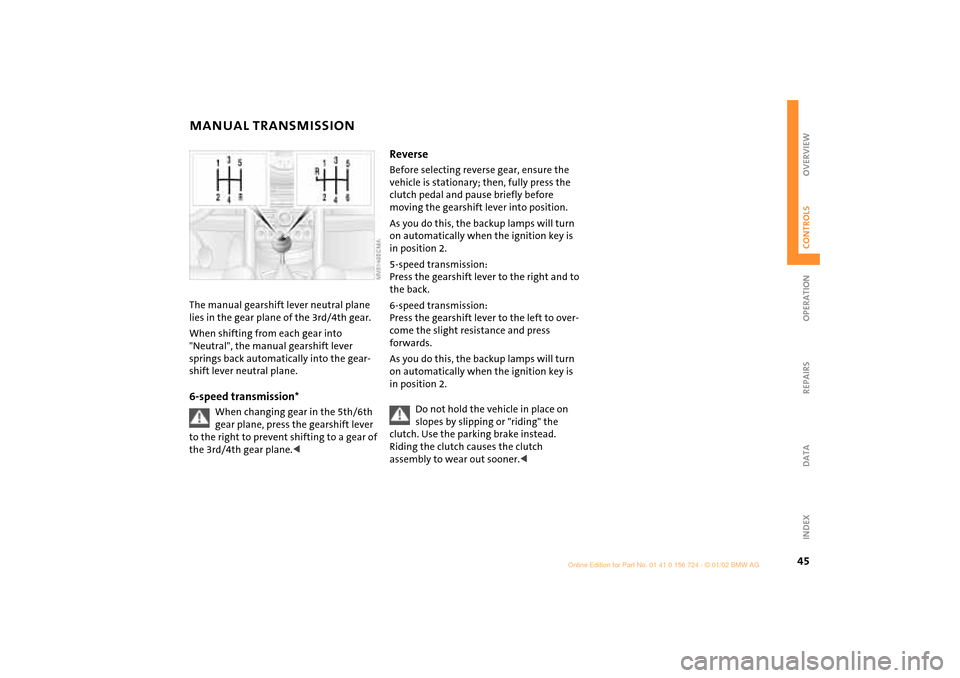
MANUAL TRANSMISSION The manual gearshift lever neutral plane
lies in the gear plane of the 3rd/4th gear.
When shifting from each gear into
"Neutral", the manual gearshift lever
springs back automatically into the gear-
shift lever neutral plane.6-speed transmission*
When changing gear in the 5th/6th
gear plane, press the gearshift lever
to the right to prevent shifting to a gear of
the 3rd/4th gear plane.<
Reverse Before selecting reverse gear, ensure the
vehicle is stationary; then, fully press the
clutch pedal and pause briefly before
moving the gearshift lever into position.
As you do this, the backup lamps will turn
on automatically when the ignition key is
in position 2.
5-speed transmission:
Press the gearshift lever to the right and to
the back.
6-speed transmission:
Press the gearshift lever to the left to over-
come the slight resistance and press
forwards.
As you do this, the backup lamps will turn
on automatically when the ignition key is
in position 2.
Do not hold the vehicle in place on
slopes by slipping or "riding" the
clutch. Use the parking brake instead.
Riding the clutch causes the clutch
assembly to wear out sooner.<
Page 56 of 140

54
CRUISE CONTROL
*
To cancel the cruise control When the system is activated, press
button 2.
The indicator lamp stays lit.
You can use the cruise control again as
required.
In addition, cruise control is canceled auto-
matically
>if the brakes are applied
>when you apply pressure to the clutch
pedal, or when you move the CVT
selector lever from D to P, N or R
>or if the cruise speed is either exceeded
or not met for an extended length of
time (if you press the accelerator pedal
and exceed the stored speed, for
example).
To continue cruise controlPress button 1.
The vehicle accelerates to and maintains
the last speed stored. If you turn the igni-
tion key to position 0, the stored speed is
deleted and the system is deactivated.To deactivate the systemWith cancelled cruise control, press
button 2 once again.
The indicator lamp goes out and the stored
speed is deleted.
Page 78 of 140

76
BREAK-IN PROCEDURES GENERAL DRIVING NOTES To ensure that your vehicle provides
maximum economy throughout a long
service life, we request that you comply
with the following information: EngineUp to 1,200 miles (2,000 km):
Attempt to constantly vary both vehicle
and engine speed during these initial miles
while remembering to avoid engine speeds
in excess of 4,500 rpm and/or vehicle
speeds of over 95 mph (150 km/h).
Absolutely avoid using the full-throttle or
kickdown position for the accelerator.
Once you have driven 1,200 miles
(2,000 km), both the engine and vehicle
speed can be gradually increased.
You should also comply with these break-in
procedures if the engine has to be replaced
at a later point.
TiresDue to technical factors associated with
their manufacture, tires do not achieve
their full traction potential until after an
initial break-in period. We therefore ask
you to drive with extra care during the first
200 miles (300 km).Brake systemApprox. 300 miles (500 km) must be driven
before the brake pads and rotors achieve
the optimum pad-surface and wear
patterns required for trouble-free opera-
tion and an extended service life.ClutchRoughly 300 miles (500 km) must be driven
before the clutch starts to operate at
optimum efficiency. Remember to engage
the clutch carefully during this initial
period.
Parking the vehicleCondensation forms in the air conditioner
system during operation, and then exits
under the vehicle. Traces of condensed
water under the vehicle are therefore
normal.Brakes
Do not rest your foot on the brake
pedal while driving. Even light but
consistent pedal pressure can lead to high
temperatures, brake wear and possibly
even brake failure.<
Hydroplaning
When driving on wet or slushy roads,
reduce road speed. If you do not, a
wedge of water can form between tires and
road surface. This phenomenon is charac-
terized by a partial or complete loss of
contact between the tires and the road
surface. The ultimate results are loss of
steering and braking control.<
Page 81 of 140

79
OVERVIEW REPAIRSOPERATIONCONTROLS DATA INDEX
BRAKE SYSTEMBrake fluid level If the brake fluid level is too low and brake
pedal travel has become longer, there may
be a defect in one of the brake system's
hydraulic circuits.
Proceed to the nearest MINI center.
Higher brake application pressure
may be necessary under these conditions,
there may be slight "pull" to one side, and
brake pedal travel may be longer. Please
remember to adapt your driving style
accordingly.
vehicle is not used at all, and in operating
conditions where brake applications are
less frequent, there is an increased
tendency for corrosion of the brake rotors
and accumulation of contamination on the
brake pads. This occurs because the
minimal pressure that must be exerted by
the pads to clean the rotors by brake appli-
cations is not reached.
Corrosion on brake rotors is signaled by a
running or pulsation during braking; even
extended subsequent braking will not cure
this phenomenon.
It is a good idea to periodically dry the
brakes with a gentle application when
driving in rain and on wet roads.
Monitor traffic conditions to ensure that
this maneuver does not endanger other
road users. The heat generated in this
process helps dry the brake pads and rotors
to ensure that your brake system will
respond with undiminished efficiency
when you need it.
Extended or steep mountain descents
should be driven in the gear or in the
driving position in which only minimal peri-
odic brake application is required. This
helps avoid placing excessive loads on the
brake system. Stay within the allowable
speed range, refer to page 55.
Do not coast with the clutch pressed
or with the transmission or selector
lever in Neutral. Do not coast with the
engine switched off. The engine provides
no braking effect when the transmisson is
in neutral and there is no power-assist for
braking when the engine is switched off.<
Brake pads
For your own safety: use only brake
pads that the manufacturer has
released for your particular vehicle model.
The manufacturer cannot evaluate non-
approved brake pads to determine if they
are suited for use, and therefore cannot
ensure the operating safety of the vehicle
if they are installed.<
Page 118 of 140

116
TOW-STARTING AND TOWINGTow-starting
On vehicles with Continuously Vari-
able automatic Transmission (CVT), it
is not permitted to start the engine by tow-
starting. The transmission could be
damaged.
For jump-starting, see page 113
.<
Only tow-start vehicles with a catalytic
converter when the engine is cold, other-
wise, unburned fuel in the catalytic
converter could catch fire. It is better to use
jumper cables.
1. Switch on the hazard warning flashers
(comply with national regulations)
2. Ignition key in position 2
3. Engage 3rd gear
4. Tow-start with the clutch pedal pressed
5. Slowly release the clutch
6. When the engine starts, press the clutch
pedal again
7. Switch off the hazard warning flashers.
Have the cause of the starting problems
rectified by your MINI center.
Towing
Only tow vehicles with Continuously
Variable automatic Transmission
(CVT) with the front wheels raised or on a
special transport vehicle, otherwise the
transmission can be damaged.<
1 Ignition key in position 1:
The brake lamps, turn signals, horn and
windshield wipers can be operated
2 Switch on the hazard warning flashers
(comply with national regulations).
If the electrical system has failed, place
some kind of warning on the towed vehicle,
e. g. a sign or warning triangle in the rear
window.
Ensure that if the electrical system
has failed the ignition key is in posi-
tion 1, otherwise the steering lock could
engage and make it impossible to steer the
vehicle.
When the engine is not running, there is no
power-assist. This means that greater
effort is required for braking and
steering.<
Towing with a commercial tow truck >Do not tow with sling-type equipment
>Use a wheel-lift or flatbed carrier
>Please comply with applicable towing
laws.
Never allow passengers to ride in a
towed vehicle for any reason.<
Page 131 of 140

EVERYTHING FROM A TO Z
129
OVERVIEW REPAIRS OPERATION CONTROLS DATA INDEX
C
California Proposition 65
Warning 97
Can holder, see Beverage
holder 70
Car wash 94
Car-care products 94
Care
chrome parts 94
floor mats 95
imitation leather 95
leather 95
light-alloy wheels 94
of upholstery 94
plastic parts 95
rubber parts 95
safety belts 95
special parts 94
windshield wipers 95
Cargo 72
securing 72
stowing 72
Caring for your vehicle 94
Cassette player, see separate
Owner's Manual
CD changer, see separate
Owner's Manual CD player, see separate
Owner's Manual
Center (high-mount) brake
lamp
bulb replacement 104
Central locking system 23,
26
Changing tires
space-saver spare tire 106
Child seat 38
Child-restraint systems 38
Chrome parts 94
Cigarette lighter 70
socket 70
Cleaning rear window 52
Cleaning windshield 52
Clock 58
Closing
from inside 26
from outside 23
Clothes hooks 77
Clutch 76
Cockpit 12
Combination of wheels/
tires 84
Compact Disc player, see
separate Owner's Manual
Compression ratio 120 Computer 58
average fuel
consumption 59
average speed 59
cruising range 59
exterior temperature 59
Condensation 65,
68
Consumption 59
Consumption display 55
Contents 2
Continuously Variable
automatic Transmission
(CVT)
electronic transmission
control module (EP) 48
gear display 48
ignition 42
interlock 42
manual mode 47
parking 47
reverse gear 47
selector lever
shiftlock 42,
46
shiftlock 46
Sport program 47
Steptronic 46
towing 116
tow-starting 116
transmission fault 48 Control elements 12
Convenience feature
sliding/tilt sunroof 25
windows 25
Convenience operation
via central locking
system 26
Coolant 91
Coolant level 91
Coolant temperature
gauge 56
Cooling 65,
68
Copyright notice 6
Correct sitting posture with
airbags 31
safety belt 31
Cruise control 17,
18,
53
Cruising range 59
Cup holder, see Beverage
holder 70
Curb weight 122
Currency of the Owner's
Manual 7
Cylinders 120