2002 Mercury Villager warning
[x] Cancel search: warningPage 160 of 256

ABS warning lampABS
TheABSwarning lamp in the instrument cluster momentarily illuminates
when the ignition is turned to the ON position. If the light does not
illuminate momentarily at start up, remains on or continues to flash, the
ABS needs to be serviced.
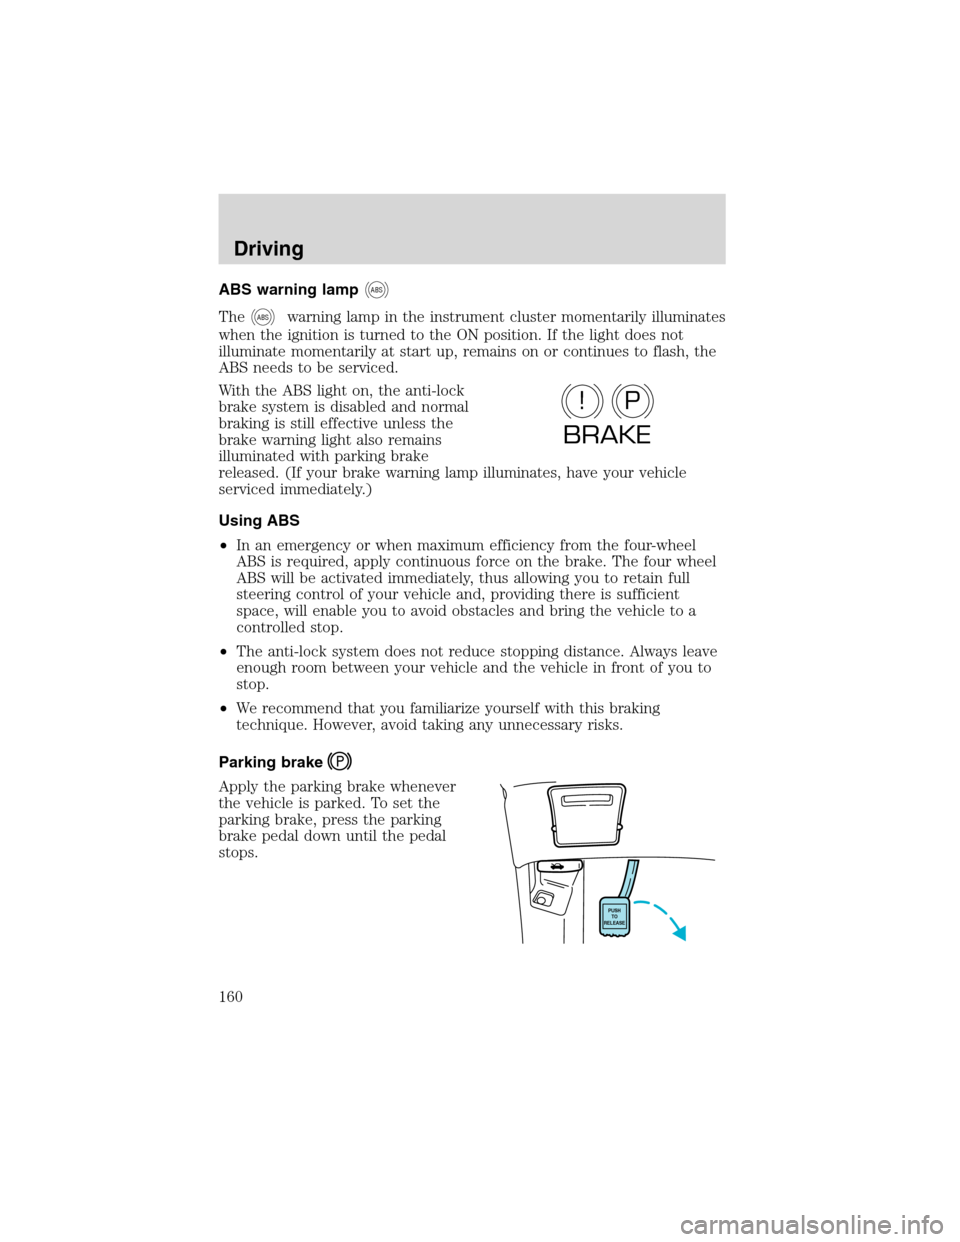
With the ABS light on, the anti-lock
brake system is disabled and normal
braking is still effective unless the
brake warning light also remains
illuminated with parking brake
released. (If your brake warning lamp illuminates, have your vehicle
serviced immediately.)
Using ABS
•In an emergency or when maximum efficiency from the four-wheel
ABS is required, apply continuous force on the brake. The four wheel
ABS will be activated immediately, thus allowing you to retain full
steering control of your vehicle and, providing there is sufficient
space, will enable you to avoid obstacles and bring the vehicle to a
controlled stop.
•The anti-lock system does not reduce stopping distance. Always leave
enough room between your vehicle and the vehicle in front of you to
stop.
•We recommend that you familiarize yourself with this braking
technique. However, avoid taking any unnecessary risks.
Parking brake
Apply the parking brake whenever
the vehicle is parked. To set the
parking brake, press the parking
brake pedal down until the pedal
stops.
P!
BRAKE
PUSH
TO
RELEASE
Driving
160
Page 161 of 256

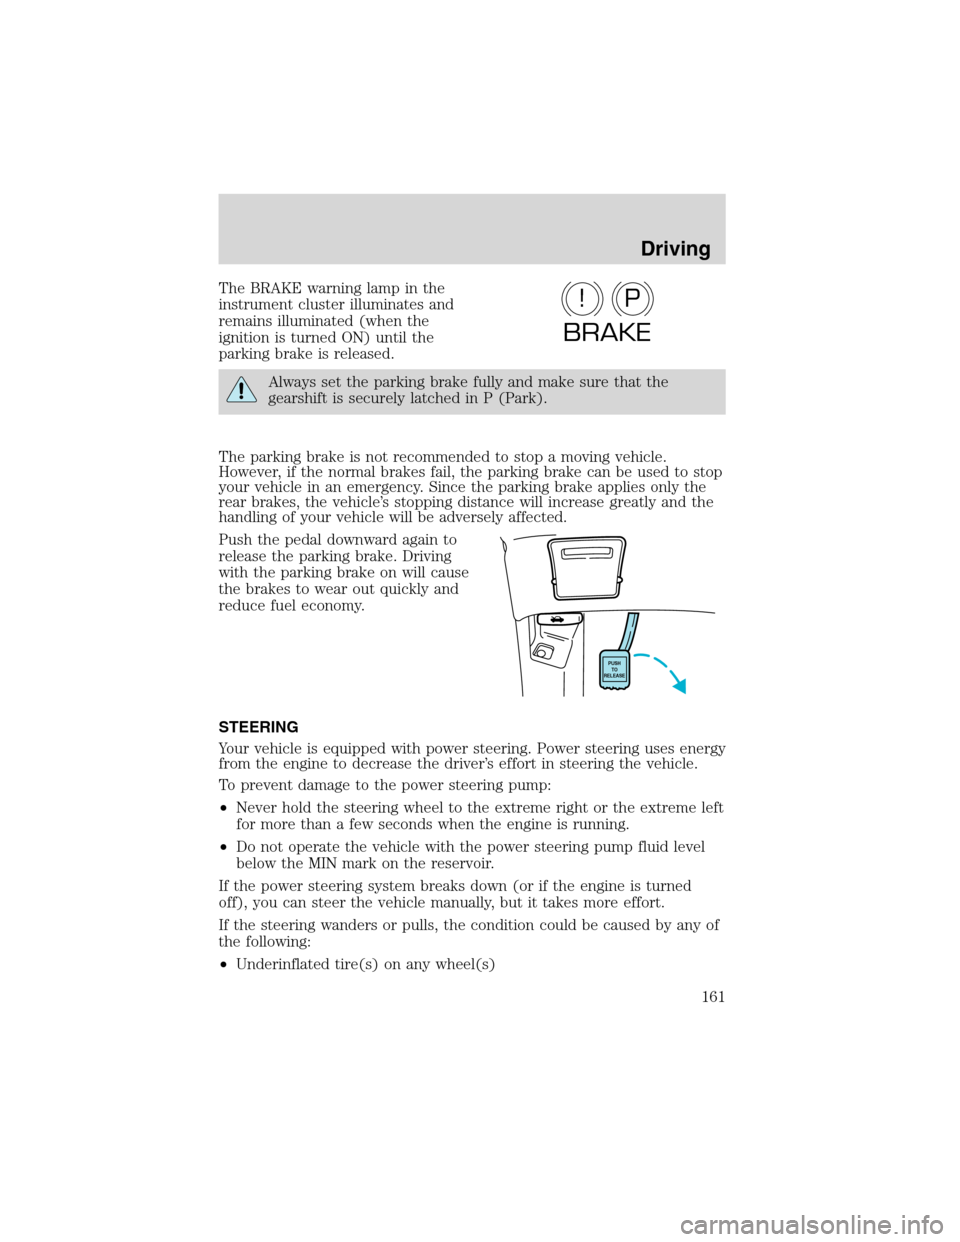
The BRAKE warning lamp in the
instrument cluster illuminates and
remains illuminated (when the
ignition is turned ON) until the
parking brake is released.
Always set the parking brake fully and make sure that the
gearshift is securely latched in P (Park).
The parking brake is not recommended to stop a moving vehicle.
However, if the normal brakes fail, the parking brake can be used to stop
your vehicle in an emergency. Since the parking brake applies only the
rear brakes, the vehicle’s stopping distance will increase greatly and the
handling of your vehicle will be adversely affected.
Push the pedal downward again to
release the parking brake. Driving
with the parking brake on will cause
the brakes to wear out quickly and
reduce fuel economy.
STEERING
Your vehicle is equipped with power steering. Power steering uses energy
from the engine to decrease the driver’s effort in steering the vehicle.
To prevent damage to the power steering pump:
•Never hold the steering wheel to the extreme right or the extreme left
for more than a few seconds when the engine is running.
•Do not operate the vehicle with the power steering pump fluid level
below the MIN mark on the reservoir.
If the power steering system breaks down (or if the engine is turned
off), you can steer the vehicle manually, but it takes more effort.
If the steering wanders or pulls, the condition could be caused by any of
the following:
•Underinflated tire(s) on any wheel(s)
P!
BRAKE
PUSH
TO
RELEASE
Driving
161
Page 163 of 256

If the parking brake is fully released, but the brake warning lamp
remains illuminated, the brakes may not be working properly.
See your dealer or a qualified service technician.
Understanding gearshift positions
Your automatic transaxle electronically controls the shift feel by using an
adaptive learning strategy. This feature is designed to optimize shift
smoothness. It is normal for your transaxle to shift firmly during the first
few hundred kilometers (miles) of operation until the adaptive strategy
has been learned. The adaptive learning strategy is maintained by power
from the battery. When the battery is disconnected or a new battery is
installed, the transaxle must relearn its adaptive strategy. Optimal
shifting will resume within a few hundred kilometers (miles) of
operation.
P (Park)
Always come to a complete stop
before shifting into P (Park). Make
sure the gearshift lever is securely
latched in P (Park). This locks the transaxle and prevents the front
wheels from rotating.
Always set the parking brake fully and make sure the gearshift is
latched in P (Park). Turn the ignition to the LOCK position and
remove the key whenever you leave your vehicle.
R (Reverse)
With the gearshift lever in R
(Reverse), the vehicle will move
backward. You should always come
to a complete stop before shifting into and out of R (Reverse).
N (Neutral)
With the gearshift lever in the N
(Neutral) position, the vehicle can
be started and is free to roll. Hold
the brake pedal down while in this position.
P RND21
P RND21
P RND21
Driving
163
Page 178 of 256

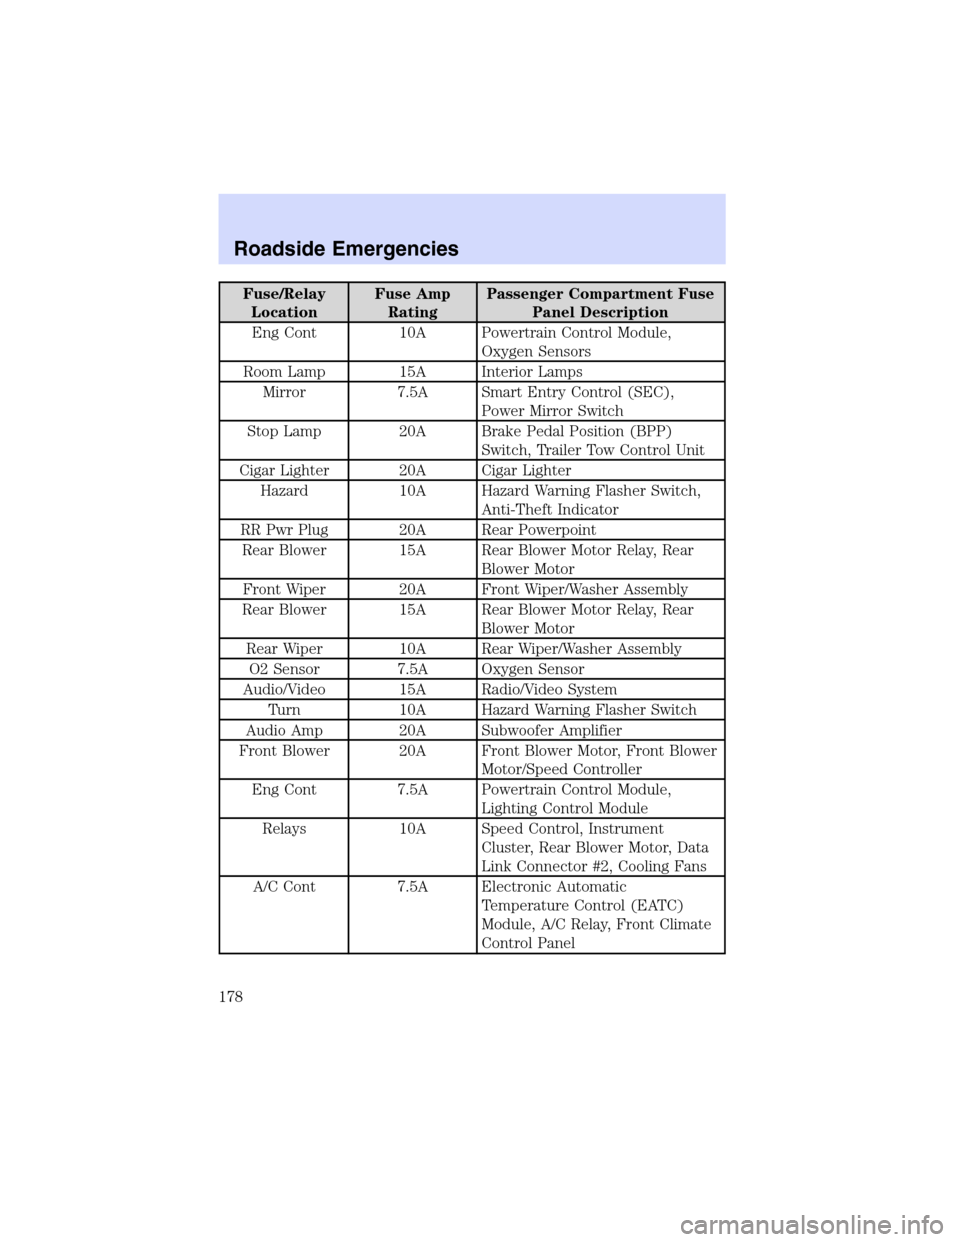
Fuse/Relay
LocationFuse Amp
RatingPassenger Compartment Fuse
Panel Description
Eng Cont 10A Powertrain Control Module,
Oxygen Sensors
Room Lamp 15A Interior Lamps
Mirror 7.5A Smart Entry Control (SEC),
Power Mirror Switch
Stop Lamp 20A Brake Pedal Position (BPP)
Switch, Trailer Tow Control Unit
Cigar Lighter 20A Cigar Lighter
Hazard 10A Hazard Warning Flasher Switch,
Anti-Theft Indicator
RR Pwr Plug 20A Rear Powerpoint
Rear Blower 15A Rear Blower Motor Relay, Rear
Blower Motor
Front Wiper 20A Front Wiper/Washer Assembly
Rear Blower 15A Rear Blower Motor Relay, Rear
Blower Motor
Rear Wiper 10A Rear Wiper/Washer Assembly
O2 Sensor 7.5A Oxygen Sensor
Audio/Video 15A Radio/Video System
Turn 10A Hazard Warning Flasher Switch
Audio Amp 20A Subwoofer Amplifier
Front Blower 20A Front Blower Motor, Front Blower
Motor/Speed Controller
Eng Cont 7.5A Powertrain Control Module,
Lighting Control Module
Relays 10A Speed Control, Instrument
Cluster, Rear Blower Motor, Data
Link Connector #2, Cooling Fans
A/C Cont 7.5A Electronic Automatic
Temperature Control (EATC)
Module, A/C Relay, Front Climate
Control Panel
Roadside Emergencies
178
Page 219 of 256

•DO NOT USE alcohol or methanol antifreeze or any engine
coolants mixed with alcohol or methanol antifreeze.
•DO NOT USE supplemental coolant additives in your vehicle.
These additives may harm your engine’s cooling system.
•DO NOT MIX recycled coolant and conventional coolant
together in your vehicle. Mixing of engine coolants may harm
your engine’s cooling system.
•The use of an improper coolant may harm engine and cooling
system components and may void the warranty of your vehicle’s
engine cooling system. If you are unsure which type of coolant
your vehicle requires, contact your local dealer.
Do not put engine coolant in the windshield washer fluid
reservoir. If engine coolant is sprayed onto the windshield, it
could make it difficult to see through the windshield.
When the engine is cool, add a50/50 mixtureof engine coolant and
distilled water to the engine coolant reservoir, until the coolant is at the
“cold fill level”or within the“cold fill range”as listed in the engine
coolant reservoir (depending upon application).
•NEVER increase the coolant concentration above 60%.
•NEVER decrease the coolant concentration below 40%.
•Engine coolant concentrations above 60% or below 40% will
decrease the freeze protection characteristics of the engine
coolant and may cause engine damage.
Plain water may be added in an emergency, but youmustreplace it with
a 50/50 mixture of engine coolant and distilled water as soon as possible.
Check the coolant level in the reservoir before you drive your vehicle the
next few times (with the engine cool). If necessary, add a50/50
mixtureof engine coolant and distilled water to the engine coolant
reservoir until the coolant level is at the“cold fill level”or within the
“cold fill range”as listed on the reservoir (depending upon application).
Have your dealer check the engine cooling system for leaks if you have
to add more than 1.0 liter (1.0 quart) of engine coolant per month.
To avoid scalding hot steam or coolant from being released from
the engine cooling system, never remove the radiator cap while
the engine is running or hot. Failure to follow this warning may result
in damage to the engine’s cooling system and possible severe personal
injury.
Maintenance and Specifications
219
Page 229 of 256

EMISSION CONTROL SYSTEM
Your vehicle is equipped with various emission control components and a
catalytic converter which will enable your vehicle to comply with applicable
exhaust emission standards. To make sure that the catalytic converter and
other emission control components continue to work properly:
•Use only the specified fuel listed.
•Avoid running out of fuel.
•Do not turn off the ignition while your vehicle is moving, especially at
high speeds.
•Have the items listed in your scheduled maintenance guide performed
according to the specified schedule.
The scheduled maintenance items listed in the scheduled maintenance
guide are essential to the life and performance of your vehicle and to its
emissions system.
If other than Ford, Motorcraft or Ford-authorized parts are used for
maintenance replacements or for service of components affecting
emission control, such non-Ford parts should be equivalent to genuine
Ford Motor Company parts in performance and durability.
Do not park, idle, or drive your vehicle in dry grass or other dry
ground cover. The emission system heats up the engine
compartment and exhaust system, which can start a fire.
Illumination of the“Service Engine Soon”light, charging system warning
light or the temperature warning light, fluid leaks, strange odors, smoke
or loss of engine power, could indicate that the emission control system
is not working properly.
Exhaust leaks may result in entry of harmful and potentially
lethal fumes into the passenger compartment.
Do not make any unauthorized changes to your vehicle or engine. By law,
vehicle owners and anyone who manufactures, repairs, services, sells,
leases, trades vehicles, or supervises a fleet of vehicles are not permitted to
intentionally remove an emission control device or prevent it from working.
Information about your vehicle’s emission system is on the Vehicle
Emission Control Information Decal located on or near the engine. This
decal identifies engine displacement and gives some tune up specifications.
Please consult yourWarranty Guidefor complete emission warranty
information.
Maintenance and Specifications
229
Page 230 of 256

Readiness for Inspection/Maintenance (I/M) testing
In some localities, it may be a legal requirement to pass an I/M test of
the on-board diagnostics system. If your“Check Engine/Service Engine
Soon”light is on, refer to the description in theWarning lights and
chimessection of theInstrument Clusterchapter. Your vehicle may not
pass the I/M test with the“Check Engine/Service Engine Soon”light on.
If the vehicle’s powertrain system or its battery has just been serviced,
the on-board diagnostics system is reset to a“not ready for I/M test”
condition. To ready the on-board diagnostics system for I/M testing,
follow the procedure described below:
1. Allow the engine to cool to ambient temperature (the engine coolant
temperature gauge indicator will point to C).
2. Start the engine and let it run until it reaches normal operating
temperature (the engine coolant temperature gauge indicator will be
near the center of the normal area between H and C).
3. Accelerate the vehicle to 88 km/h (55 mph), then quickly release the
accelerator pedal completely for at least six seconds.
4. Quickly depress the accelerator pedal for a moment, then drive the
vehicle at a speed of 86 to 96 km/h (53 to 60 mph) for at least five
minutes.
5. Bring the vehicle to a complete stop.
6. Accelerate the vehicle to 55 km/h (35 mph), and maintain the speed
for 20 seconds.
7. Repeat steps five and six at least three times.
8. Accelerate the vehicle to 88 km/h (55 mph), and maintain the speed
for at least three minutes.
9. Bring the vehicle to a complete stop and turn the engine off.
10. Repeat steps one through nine at least one more time.
If step one through eight are interrupted, repeat the preceding step. Any
safe driving mode is acceptable between steps. Once started, do not turn
off the engine until step seven is completed.
Maintenance and Specifications
230
Page 248 of 256

A
ABS (see Brakes) .....................159
Accessory delay ..........................88
Air bag supplemental restraint
system ................................136–137
and child safety seats ............138
description ..............................137
disposal ....................................140
driver air bag ..........................139
indicator light ...................12, 140
operation .................................139
passenger air bag ...................139
Air cleaner filter ...............234, 239
Air conditioning
automatic temperature
control system ..........................63
manual heating and air
conditioning system .................58
rear seat controls ...............61, 69
Air filter, cabin ............................73
Antifreeze (see Engine
coolant) .....................................217
Anti-lock brake system
(see Brakes) ......................159–160
Anti-theft system ......................112
arming the system ..................113
disarming a triggered
system .....................................114
disarming an untriggered
system .....................................114
Audio system (see Radio) .........20
Automatic transaxle
driving with .............................163
fluid, adding ............................232
fluid, checking ........................232
fluid, refill capacities ..............239
fluid, specification ..................241
Auxiliary power point .................86Axle
lubricant specifications ..........240
B
Battery .......................................215
acid, treating emergencies .....215
charging system warning
light ............................................13
jumping a disabled battery ....188
maintenance-free ....................215
replacement, specifications ...239
servicing ..................................215
Brakes ........................................158
anti-lock ...........................159–160
anti-lock brake system
(ABS) warning light .........12, 160
brake warning light ..................11
fluid, checking and adding ....231
fluid, refill capacities ..............239
fluid, specifications .........240–241
lubricant specifications ..240–241
parking ....................................160
shift interlock ..........................162
Break-in period .............................6
Bulbs ............................................77
C
Capacities for refilling fluids ....239
Cargo cover ...............................106
Cargo net ...........................105–106
CD changer .................................53
Certification Label ....................243
Changing a tire .........................182
Child safety restraints ..............141
child safety belts ....................141
Child safety seats ......................144
attaching with tether straps ..149
Index
248