Page 18 of 312

Usually, when something affects the compass readings, the compass will
correct itself after a few days of operating your vehicle in normal
conditions. If the compass still appears to be inaccurate, a manual
calibration may be necessary. Refer toCompass calibration
adjustment.
Most geographic areas (zones) have a magnetic north compass point that
varies slightly from the northerly direction on maps. This variation is four
degrees between adjacent zones and will become noticeable as the
vehicle crosses multiple zones. A correct zone setting will eliminate this
error. Refer toCompass zone adjustment.
Compass zone adjustment
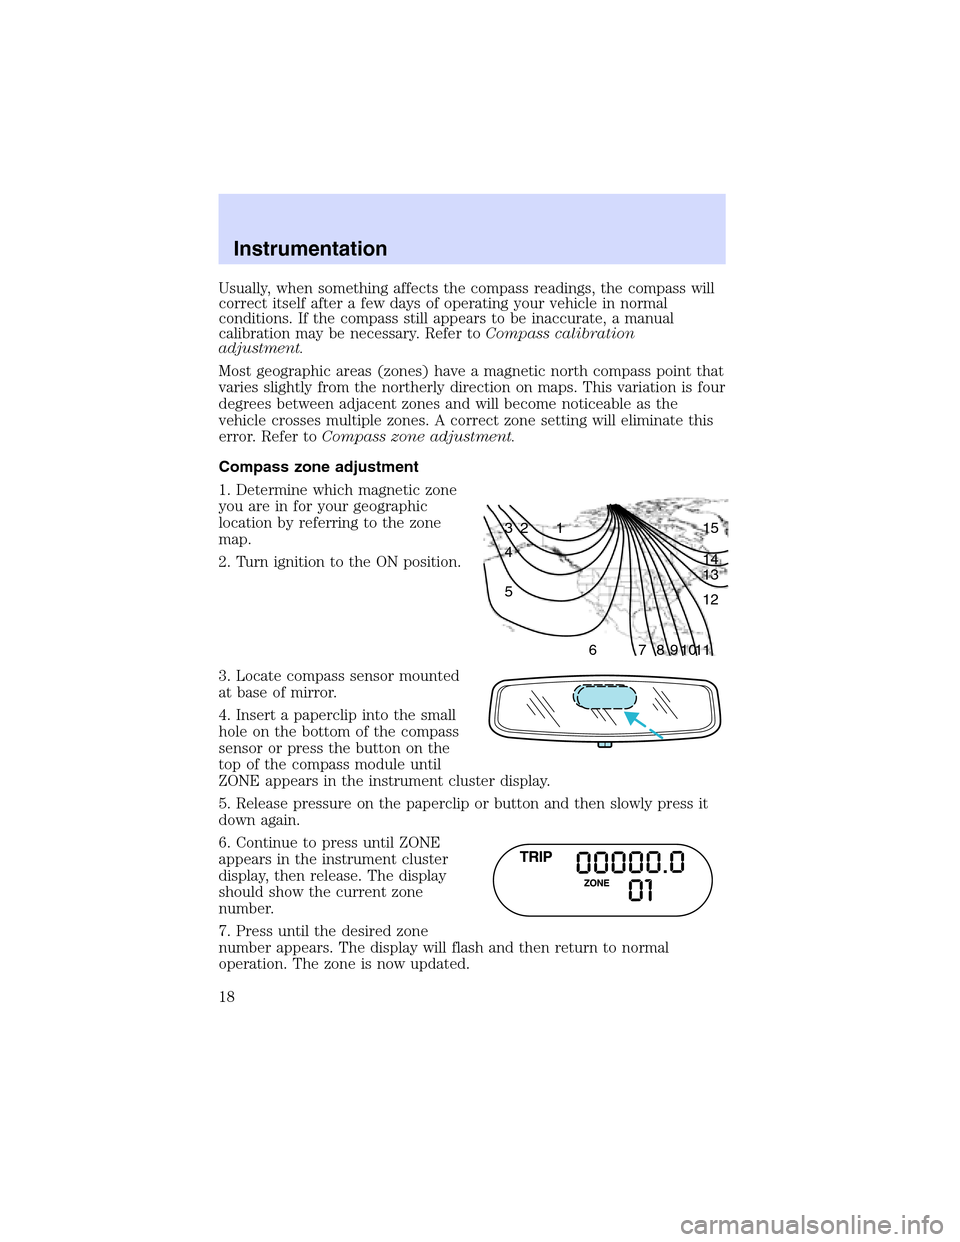
1. Determine which magnetic zone
you are in for your geographic
location by referring to the zone
map.
2. Turn ignition to the ON position.
3. Locate compass sensor mounted
at base of mirror.
4. Insert a paperclip into the small
hole on the bottom of the compass
sensor or press the button on the
top of the compass module until
ZONE appears in the instrument cluster display.
5. Release pressure on the paperclip or button and then slowly press it
down again.
6. Continue to press until ZONE
appears in the instrument cluster
display, then release. The display
should show the current zone
number.
7. Press until the desired zone
number appears. The display will flash and then return to normal
operation. The zone is now updated.
1 2 3
4
5
6 7 8 9 101112 13 14 15
Instrumentation
18
Page 20 of 312

Selectablefeatures
Reset
Press this control to select and reset
functions shown in the INFO menu
and SETUP menu.
Info menu
This control displays the following
control displays:
•Odometer/Compass
•Trip odometer/Odometer/Compass
•Average Fuel Economy
•Trip Elapsed Drive Time
•Distance to Empty
Odometer/Trip odometer
Refer toGaugesin this chapter.
Compass display
The compass reading may be affected when you drive near large
buildings, bridges, power lines and powerful broadcast antenna. Magnetic
or metallic objects placed in, on or near the vehicle may also affect
compass accuracy.
Usually, when something affects the compass readings, the compass will
correct itself after a few days of operating your vehicle in normal
conditions. If the compass still appears to be inaccurate, a manual
calibration may be necessary. Refer toCompass zone/calibration
adjustment.
Most geographic areas (zones) have a magnetic north compass point that
varies slightly from the northerly direction on maps. This variation is four
Instrumentation
20
Page 31 of 312

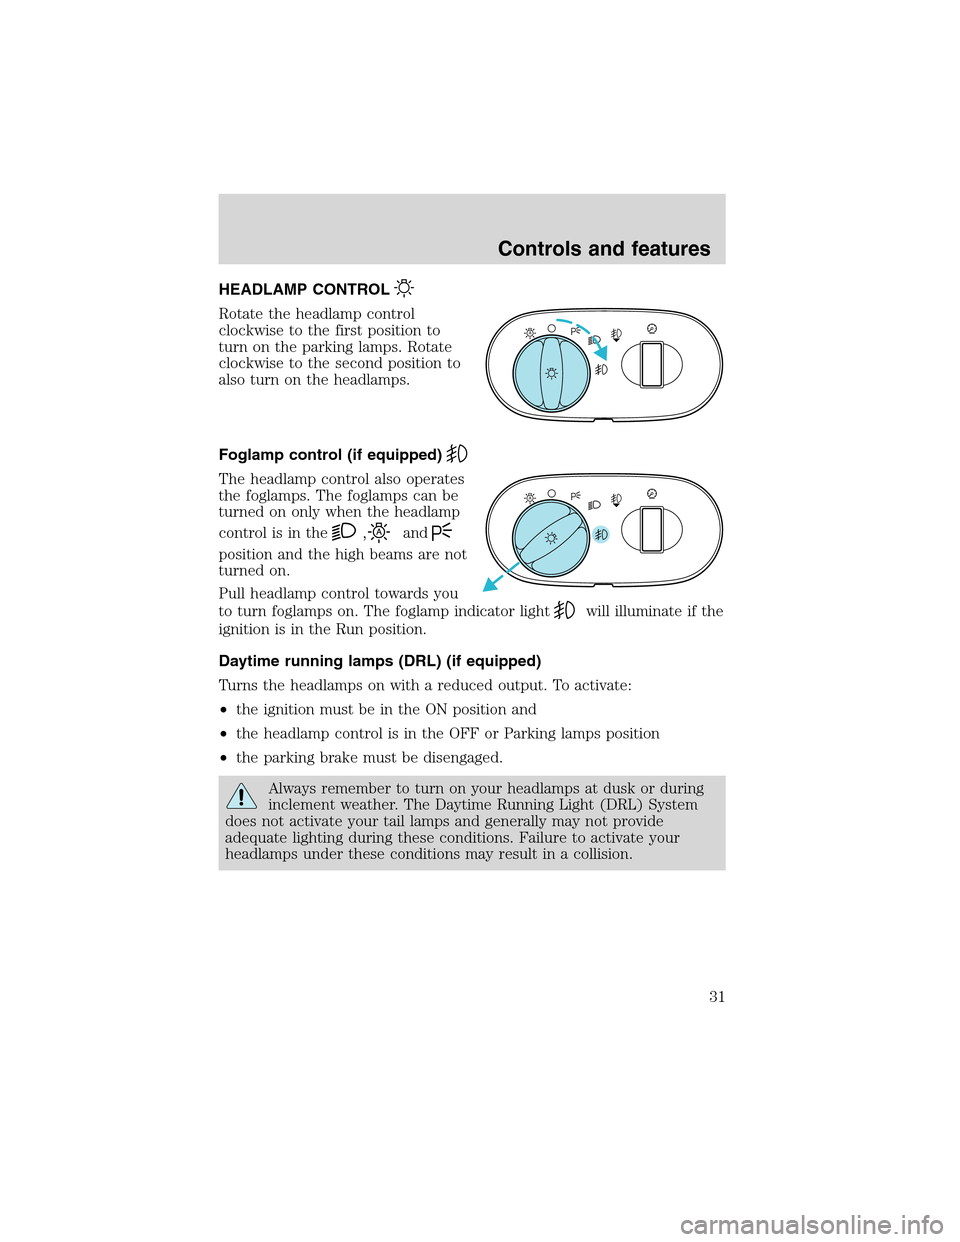
HEADLAMP CONTROL
Rotate the headlamp control
clockwise to the first position to
turn on the parking lamps. Rotate
clockwise to the second position to
also turn on the headlamps.
Foglamp control (if equipped)
The headlamp control also operates
the foglamps. The foglamps can be
turned on only when the headlamp
control is in the
,and
position and the high beams are not
turned on.
Pull headlamp control towards you
to turn foglamps on. The foglamp indicator light
will illuminate if the
ignition is in the Run position.
Daytime running lamps (DRL) (if equipped)
Turns the headlamps on with a reduced output. To activate:
•the ignition must be in the ON position and
•the headlamp control is in the OFF or Parking lamps position
•the parking brake must be disengaged.
Always remember to turn on your headlamps at dusk or during
inclement weather. The Daytime Running Light (DRL) System
does not activate your tail lamps and generally may not provide
adequate lighting during these conditions. Failure to activate your
headlamps under these conditions may result in a collision.
A
A
Controls and features
31
Page 32 of 312
High beams
Push the lever toward the
instrument panel to activate. Pull
the lever towards you to deactivate.
Flash to pass
Pull toward you slightly to activate
and release to deactivate.
PANEL DIMMER CONTROL
Use to adjust the brightness of the
instrument panel during headlamp
parklamp operation.
•Rotate up to brighten.
•Rotate down to dim.
•Rotate to full up position (past
detent/dome defeat) to turn on
interior lamps.
•Rotate to full down position (past detent/dome defeat) to turn off the
interior lamps, approach lamps, and will also disable the illuminated
entry feature.
A
Controls and features
32
Page 33 of 312

AUTOLAMP CONTROL
The autolamp system provides light
sensitive automatic on-off control of
the exterior lights normally
controlled by the headlamp control.
The autolamp system also keeps the
lights on for approximately 20
seconds or a programmed time
delay after the ignition switch is
turned to the OFF position.
•To turn autolamps on, rotate the control counterclockwise.
•To turn autolamps off, rotate the control clockwise to the OFF
psoition.
POWER ADJUSTABLE FOOT PEDALS
The accelerator and brake pedal
should only be adjusted when the
vehicle is stopped and the gearshift
lever is in the P(Park) position.
Press and hold the rocker control to
adjust accelerator and brake pedal
toward you or away from you.
The adjustment allows for approximately 76 mm (3 inches) of maximum
travel.
Never adjust the accelerator and brake pedal with feet on pedals
or while the vehicle is moving.
REVERSE SENSING SYSTEM (IF EQUIPPED)
The Reverse Sensing System (RSS) sounds a tone to warn the driver of
obstacles near the rear bumper when R (Reverse) is selected. The RSS
will assist the driver in detecting certain objects while:
•the vehicle is moving toward a stationary object at a speed of 5 km/h
(3 mph) or less.
•the vehicle is in R (Reverse) but not moving backward (the brake
pedal is depressed or the parking brake is applied), and a moving
object is approaching the rear of the vehicle at a speed of 5 km/h
(3 mph) or less.
A
Controls and features
33
Page 37 of 312

Since the air conditioner removes considerable moisture from the air
during operation, it is normal if clear water drips on the ground under
the air conditioner drain while the system is working and even after you
have stopped the vehicle.
•MAX A/C-Uses recirculated air to cool the vehicle. MAX A/C is noisier
than A/C but more economical and will cool the inside of the vehicle
faster. Airflow will be restricted to instrument panel registers. This
mode can also be used to prevent undesirable odors from entering the
vehicle. When placed in MAX A/C, the A/C indicator will be
illuminated and cannot be manually disabled.
•
(Panel)-Distributes outside air through the instrument panel
registers. Heating and air conditioning capabilities are provided in this
mode. Push the A/C control in order to cool the vehicle below the
outside temperature. For added customer comfort, the system will
allow some airflow through the floor ducts in this mode.
•OFF (0)-Outside air is shut out and the fan will not operate. For short
periods of time only, use this mode to prevent undesirable odors from
entering the vehicle.
•
(Panel and floor)-Distributes outside air through the instrument
panel registers and the floor ducts. Heating and air conditioning
capabilities are provided in this mode. Push the A/C control in order
to cool the vehicle below the outside temperature. For added
customer comfort, when the temperature control knob is anywhere in
between the full hot and full cold positions, the air distributed through
the floor ducts will be slightly warmer than the air sent to the
instrument panel registers.
•
(Floor)-Distributes outside air through the floor ducts. Heating
and air conditioning capabilities are provided in this mode. Push the
A/C control in order to cool the vehicle below the outside
temperature.
•
(Floor and defrost)-Distributes outside air through the windshield
defroster ducts and the floor ducts. Heating and air conditioning
capabilities are provided in this mode. For added customer comfort,
when the temperature control knob is anywhere in between the full
hot and full cold positions, the air distributed through the floor ducts
will be slightly warmer than the air sent to the windshield defrost
ducts. If the outside temperature is about 6°C (43°F) or higher, the air
conditioner will automatically dehumidify the air to reduce fogging.
(Note that the A/C indicator does not illuminate when this mode is
selected.)
Controls and features
37
Page 38 of 312

•(Defrost)-Distributes outside air through the windshield defroster
ducts. It can be used to clear ice or fog from the windshield. If the
outside temperature is about 6°C (43°F) or higher, the air conditioner
will automatically dehumidify the air to reduce fogging. (Note that the
A/C indicator does not illuminate when this mode is selected.) For
added customer comfort, the system will allow some airflow through
the floor ducts in this mode.
Cooling your vehicle with outside air
Cooling your vehicle with air conditioned outside air is quieter but less
economical than using recirculated air. It also has less cooling capacity.
In order to cool your vehicle using outside air:
1. Turn the mode selector to
,or.
2. Press
A/C. (The indicator light will illuminate.)
3. Turn the temperature control knob to the left.
4. Turn the fan speed control to the position of your choice.
During periods of high humidity, vapor may be emitted from the air
outlets when using the A/C system with outside air. This can be
corrected by using MAX A/C to cool the vehicle.
•A/C control
This control is used to manually enable or disable the operation of the
air conditioning in all modes except
,and MAX A/C.
When manual A/C is selected (ON) the indicator will be lit. When manual
A/C is selected (OFF) the indicator will not be lit.
In
and, if the outside temperature is about 6°C (43°F) or
higher, the air conditioner will automatically dehumidify the air to reduce
fogging. However, the A/C indicator will not illuminate.
When placed in MAX A/C, the A/C indicator will illuminate automatically
and cannot be manually disabled.
•Defrost control
Refer toRear window defroster.
A/C
Controls and features
38
Page 41 of 312

Turning the DEATC system on
Press AUTO, any of the override controls, the fan speed control, or
either of the temperature selection controls. The DEATC system will
only operate when the ignition is in the ON position.
Turning the DEATC system off
Press OFF. The outside temperature
(EXT) function (if selected) will
continue to operate until the
ignition is turned off.
DEATC automatic operation
Press AUTO and select the desired
temperature. The selected
temperature will appear in the
display window, and an indicator
above the AUTO control will light.
The DEATC system will either heat
or cool the vehicle to achieve the
selected temperature. The system
will automatically determine the fan
speed, airflow location and whether outside or recirculated air is
required.
When in AUTO mode and the weather is cool, the DEATC directs the
majority of the airflow to the floor area. The system will allow some
airflow out the windshield defroster ducts and the demister outlets to
AUTO OFFDUAL A/C
R EXT
F C
FF
AUTO OFFEXT
F C
AUTO OFFEXT
F C
F
Controls and features
41