2002 MERCEDES-BENZ SLK320 Side mirrors
[x] Cancel search: Side mirrorsPage 44 of 290

41 Seats
Te ch n i c a l
data Instruments
and controlsOperationDrivingInstrument
cluster displayPractical hints Car care Index Important!
Prior to operating the vehicle, the driver should adjust
the seat height for proper vision as well as fore / aft
placement and backrest angle to insure adequate
control, reach, operation, and comfort. The head
restraint should also be adjusted for proper height. See
also airbag section for proper seat positioning.
In addition also adjust the steering wheel to ensure
adequate control, reach, operation, and comfort.Both the inside and outside rear view mirrors should be
adjusted for adequate rearward vision.
Fasten seat belts. Infants and small children should be
seated in a properly secured restraint system that
complies with U.S. Federal Motor Vehicle Safety
Standard 213 and Canadian Motor Vehicle Safety
Standard 213.1.
All seat, head restraint, steering wheel and rear view
mirror adjustments as well as fastening of seat belts
should be done before the vehicle is put into motion.
Page 69 of 290

66 Rear view mirrors
Te ch n i c a l
data Instruments
and controlsOperationDrivingInstrument
cluster displayPractical hints Car care Index
Rear view mirrors
Inside rear view mirror
Manually adjust the inside rear view mirror.
Use your inside rear view mirror to determine the size
and distance of objects seen in the passenger-side
exterior mirror.
Inside rear view mirror, antiglare mode
With the key in steering lock position 2, the mirror
reflection brightness responds to changes in light
sensitivity.
With gear selector lever (manual transmission: gearshift
lever) in position “R”, or with the interior lamp switched
on, the mirror brightness does not respond to changes
in light sensitivity.Note:
The automatic antiglare function does not react, if
incoming light is not aimed directly at sensors in the
inside rear view mirror.
The automatic antiglare function will not react for
example, if the wind screen is installed.
Wa r n i n g !
In the case of an accident liquid electrolyte may
escape the mirror housing when the mirror glass
breaks.Electrolyte has an irritating effect. Do not allow the
liquid to come into contact with eyes, skin,
clothing, or respiratory system. In cases it does,
immediately flush affected area with water, and
seek medical help if necessary.
Page 70 of 290

67 Rear view mirrors
Te ch n i c a l
data Instruments
and controlsOperationDrivingInstrument
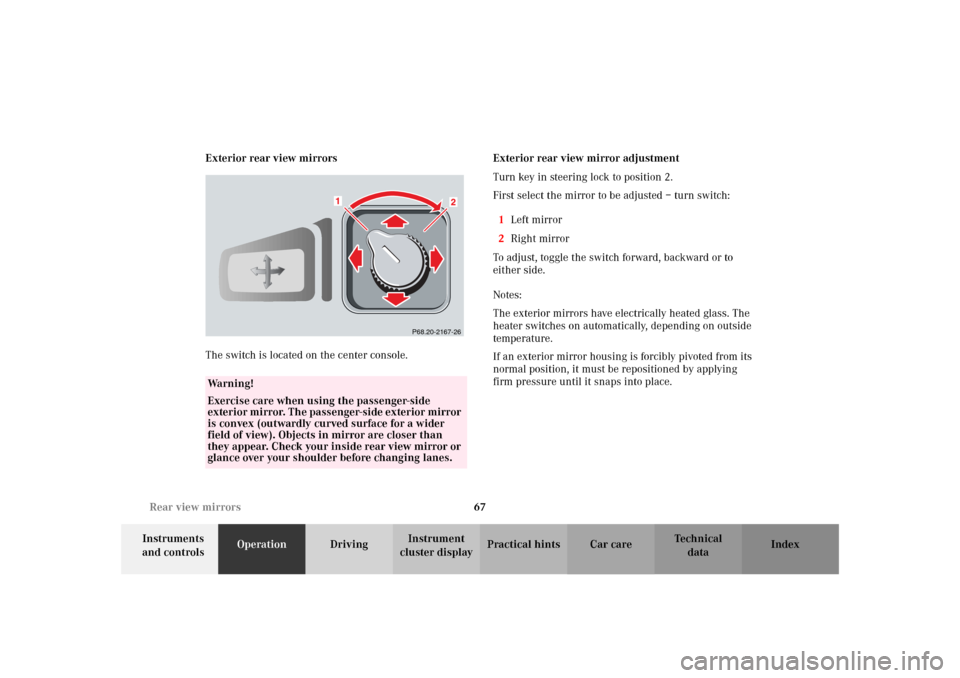
cluster displayPractical hints Car care Index Exterior rear view mirrors
The switch is located on the center console.Exterior rear view mirror adjustment
Turn key in steering lock to position 2.
First select the mirror to be adjusted – turn switch:
1Left mirror
2Right mirror
To adjust, toggle the switch forward, backward or to
either side.
Notes:
The exterior mirrors have electrically heated glass. The
heater switches on automatically, depending on outside
temperature.
If an exterior mirror housing is forcibly pivoted from its
normal position, it must be repositioned by applying
firm pressure until it snaps into place.
Wa r n i n g !
Exercise care when using the passenger-side
exterior mirror. The passenger-side exterior mirror
is convex (outwardly curved surface for a wider
field of view). Objects in mirror are closer than
they appear. Check your inside rear view mirror or
glance over your shoulder before changing lanes.
P68.20-2167-26
Page 71 of 290

68 Rear view mirrors
Te ch n i c a l
data Instruments
and controlsOperationDrivingInstrument
cluster displayPractical hints Car care Index
Driver’ s side exterior rear view mirror, antiglare
mode
With the key in steering lock position 2, the driver’s
side mirror reflection brightness responds to changes in
light sensitivity.
With gear selector lever (manual transmission: gearshift
lever) in position “R”, or with the interior lamp switched
on, the driver’s side mirror brightness does not respond
to changes in light sensitivity.Note:
The automatic antiglare function does not react, if
incoming light is not aimed directly at sensors in the
inside rear view mirror.
The automatic antiglare function will not react for
example, if the wind screen is installed.
Page 238 of 290

235 Exterior lamps
Te ch n i c a l
data Instruments
and controlsOperation DrivingInstrument
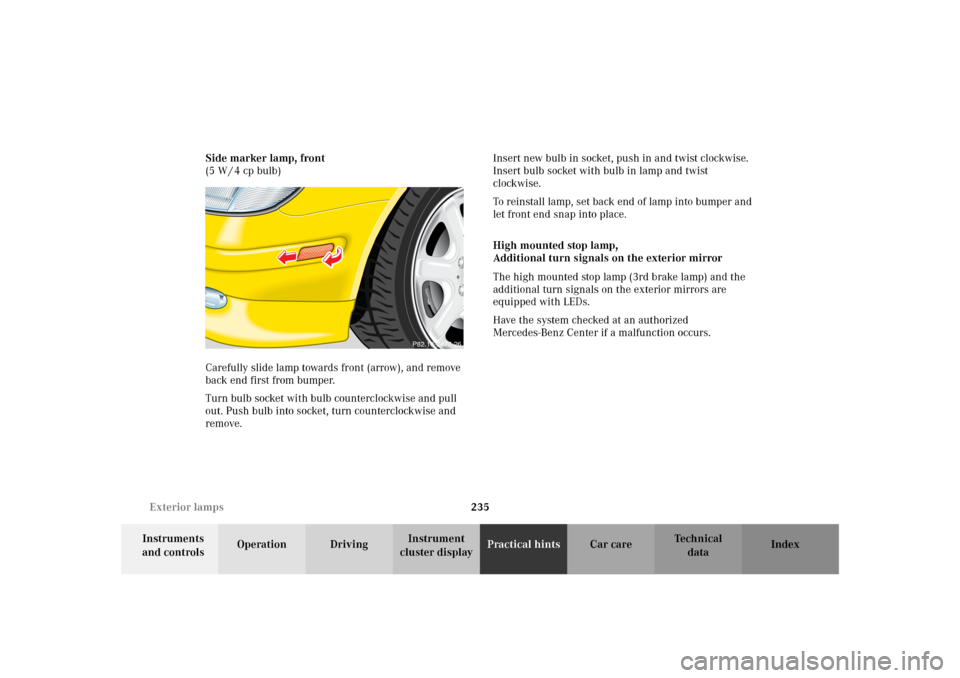
cluster displayPractical hintsCar care Index Side marker lamp, front
(5 W / 4 cp bulb)
Carefully slide lamp towards front (arrow), and remove
back end first from bumper.
Turn bulb socket with bulb counterclockwise and pull
out. Push bulb into socket, turn counterclockwise and
remove.Insert new bulb in socket, push in and twist clockwise.
Insert bulb socket with bulb in lamp and twist
clockwise.
To reinstall lamp, set back end of lamp into bumper and
let front end snap into place.
High mounted stop lamp,
Additional turn signals on the exterior mirror
The high mounted stop lamp (3rd brake lamp) and the
additional turn signals on the exterior mirrors are
equipped with LEDs.
Have the system checked at an authorized
Mercedes-Benz Center if a malfunction occurs.
P82.10-2477-26
Page 251 of 290

248 Cleaning and care of the vehicle
Te ch n i c a l
data Instruments
and controlsOperation DrivingInstrument
cluster displayPractical hintsCar careIndex
Engine cleaning
Prior to cleaning the engine compartment make sure to
protect electrical components and connectors from the
intrusion of water and cleaning agents.
Corrosion protection, such as MB Anticorrosion Wax
should be applied to the engine compartment after
every engine cleaning. Before applying, all control
linkage bushings and joints should be lubricated. The
poly-V-belt and all pulleys should be protected from any
wax.Ve h i c l e w a s h i n g
Do not use hot water or wash your vehicle in direct
sunlight. Use only a mild car wash detergent, such as
Mercedes-Benz approved Car Shampoo.
Thoroughly spray the vehicle with a diffused jet of
water. Direct only a very weak spray towards the
ventilation intake. Use plenty of water and rinse the
sponge and chamois frequently.
Rinse with clear water and thoroughly wipe dry with a
chamois. Do not allow cleaning agents to dry on the
finish.
Due to the width of the vehicle, prior to running the
vehicle through an automatic car wash, fold back the
outside mirrors to prevent them from getting damaged.
In the winter, thoroughly remove all traces of road salt
as soon as possible.
When washing the underbody, do not forget to clean the
inner sides of the wheels.
Page 283 of 290

280 Index
Te ch n i c a l
data Instruments
and controlsOperation DrivingInstrument
cluster displayPractical hints Car careIndex
NNight security illumination ..........................................112OOn-board diagnostic system ......................................... 182
Operator’s manual ............................................................. 6
Outside temperature indicator ...................................... 75
Overhead control panel ................................................... 19PPanic button ...................................................................... 26
Parcel net in passenger footwell ..................................118
Parking ............................................................................ 159
Parking brake ............................... 156, 158, 159, 174, 183
Power assistance ............................................................ 158
Power seats ....................................................................... 38
Power windows ................................................................ 111
Express opening ........................................................ 111
Operate with hard top switch ................................. 122
Problems with your vehicle ........................................... 12
Product information .......................................................... 5
RRadio
See Radio mode ........................................................... 99
Radio and telephone ...................................................... 130
Radio transmitters ......................................................... 130
Rear view mirrors ............................................................ 66
Exterior ......................................................................... 67
Inside ............................................................................66
Rear window defroster .................................................... 90
Remote control ................................................................. 22
Battery replacement ................................................ 236
Synchronizing .......................................................... 237
Replacing bulbs ............................................................. 230
Replacing wiper blade insert ...................................... 243
Reporting safety defects ................................................. 13
Residual Engine Heat Utilization (REST) ..................... 91
Retractable hardtop .......................................................122
Roadside assistance ........................................................... 8
Roadside assistance call
See Tele Aid ............................................................... 132