2002 MERCEDES-BENZ SLK320 check oil
[x] Cancel search: check oilPage 181 of 290
178 What you should know at the gas station
Te ch n i c a l
data Instruments
and controlsOperationDrivingInstrument
cluster displayPractical hints Car care Index
Engine oil
Engine oil level check, see page 197.
Fill quantity between upper and lower dipstick marking
level: 2.1 US qt (2.0 l).
Recommended engine oils, see Approved Service
Products sheet.
Coolant
For normal replenishing, use water (potable water
quality).
For further information (e.g. anticorrosion / antifreeze),
see page 270.
Spark plugs
Approved spark plugs, see page 264.
Tire pressure
For tire pressure, refer to tire pressure label inside the
fuel filler flap.Air conditioner
R-134a refrigerant and special PAG lubricant, see
page 266.
Bulbs
High and low beams (Halogen): H7 (55 W),
fog lamps: H1 (55 W),
turn signal lamps, parking and standing lamps, front:
2357 NA (28.5 / 8.3 W / 30 / 2.2 cp),
side marker lamps, front: 5 W / 4 cp
stop lamps: 1154 21 W / 32 cp,
backup lamps: 1154 21 W / 32 cp,
turn signal lamps, rear: 1156 NA 21 W / 24cp,
tail, parking and standing lamps: 67 5 W / 4cp,
rear fog lamp, driver´s side: 1155 21 W / 32 cp,
license plate lamps: C 5 W
Xenon bulb for low beam: D2R (35 W)
Page 182 of 290

179 Check regularly and before a long trip
Te ch n i c a l
data Instruments
and controlsOperationDrivingInstrument
cluster displayPractical hints Car care Index Check regularly and before a long trip
SLK 230 Kompressor shown1Windshield washer and
headlamp cleaning system
For refilling reservoir, see page 199.
2Coolant level
See “Adding coolant” on page 198.
3Engine oil level
See “Checking engine oil level” on page 197 and
“Engine oil level indicator” on page 79.
4Brake fluid
See “Brake fluid” on page 268.
Opening hood, see page 194.
Ve h i c l e l i g h t i n g : Check function and cleanliness. For
replacement of light bulbs, see “Exterior lamps” on
page 230.
Exterior lamp switch, see page 81.
Page 184 of 290
181 Contents - Instrument cluster display
Te ch n i c a l
data Instruments
and controlsOperation DrivingInstrument
cluster displayPractical hints Car care Index
Instrument cluster displayMalfunction and
indicator lamps in the
instrument cluster .................... 182
On-board diagnostic system ..... 182
Check engine malfunction
indicator lamp ............................. 182
Brake warning lamp .................. 183
Brake pad wear
indicator lamp ............................. 184
Seat belt nonusage
warning lamp .............................. 184Supplemental restraint system
(SRS) indicator lamp ..................184
Fuel reserve and fuel cap
placement warning ....................185
Electronic stability program
(ESP) — warning lamp ................185
BAS / ESP malfunction
indicator lamp .............................185
ABS malfunction
indicator lamp .............................186
Telescoping steering column
warning lamp ..............................186
Low engine coolant level
warning lamp ..............................187Low windshield and headlamp
washer system fluid level
warning lamp .............................. 187
Low engine oil level
warning lamp .............................. 188
Charge indicator lamp ............... 188
Exterior lamp failure i
ndicator lamp .............................. 189
Additional function
indicator lamps
(in the odometer display) .......... 189
Malfunction and indicator lamp
in the center console ................ 190
AIRBAG OFF indicator lamp ..... 190
Page 191 of 290
188 Malfunction and indicator lamps
Te ch n i c a l
data Instruments
and controlsOperation DrivingInstrument
cluster displayPractical hints Car care Index
Low engine oil level warning lamp
With the key in steering lock position 2, the
oil level warning lamp comes on. It should
go out immediately when the engine is
running.
If the warning lamp does not go out after starting the
engine, or comes on with the engine running and at
operating temperature, the engine oil level has dropped
to approximately the minimum mark on the dipstick.
When this occurs, the warning lamp will first come on
intermittently and then stay on if the oil level drops
further.
If no leaks are noted, continue to drive to the nearest
service station where the engine oil should be topped to
the “full” mark on the dipstick with an approved oil.
The low engine oil level warning light should not be
ignored. Extended driving with the light illuminated
could result in serious engine damage that is not
covered by the Mercedes-Benz Limited Warranty.
In addition to the warning lamp, the engine oil level
should be periodically checked with the dipstick, for
example during a fuel stop, or before a long trip, see
page 197.Charge indicator lamp
Should the charge indicator lamp fail to
come on prior to starting when the key is in
steering lock position 2 or should it fail to go
out after starting or during operation, this indicates a
malfunction which must be repaired immediately at an
authorized Mercedes-Benz Center.
If the charge indicator lamp comes on, or a loss of power
steering assistance is noticeable while the engine is
running, this may indicate that one of the two poly-V-
belts has broken. Should this condition occur, the poly-
V-belt must be replaced before continuing to operate the
vehicle. Otherwise, the engine may overheat due to an
inoperative water pump which may result in damage to
the engine.
Do not continue to drive the vehicle with the charge
indicator lamp illuminated. Doing so could result in
serious engine damage that is not covered by the
Mercedes-Benz Limited Warranty.
Page 194 of 290

191 Contents - Practical hints
Te ch n i c a l
data Instruments
and controlsOperation DrivingInstrument
cluster displayPractical hintsCar care Index
Practical hintsFirst aid kit ..................................... 192
Stowing items in the vehicle ........ 192
Fuses ................................................ 192
Hood ................................................. 194
Automatic transmission
fluid level ................................... 196
Checking engine oil level ............. 197
Coolant level ................................... 198
Adding coolant ........................... 198
Windshield and
headlamp washer system ........ 199
Air pump, spare wheel,
vehicle tools,
storage compartment
(except SLK 32 AMG) ...............200Ve h i c l e j a c k
(except SLK 32 AMG) .............. 201
Storage box, TIREFIT-Kit,
air pump, Vehicle tools
(SLK 32 AMG only) .................. 202
Wheels ............................................ 203
Tire replacement ....................... 203
Rotating wheels ......................... 204
Spare wheel .................................... 205
Spare wheel bolts ...................... 206
Changing wheels ........................... 207
Inflating the collapsible
spare tire ......................................212
Storing spare wheel in
wheel well ....................................213
TIREFIT ............................................214
Tire inflation pressure .................. 219Battery .............................................220
Jump starting ..................................222
Towing the vehicle .........................224
Transmission selector lever,
manually unlocking ..................229
Exterior lamps ................................230
Headlamp assembly ................... 231
Taillamp assemblies ..................234
Changing batteries in
the remote control ....................236
Synchronizing
remote control ............................237
Raising hardtop manually ............238
Replacing wiper blade insert .......243
Antenna ...........................................244
Manual release
of fuel filler flap ........................244
Page 200 of 290
197 Checking engine oil level
Te ch n i c a l
data Instruments
and controlsOperation DrivingInstrument
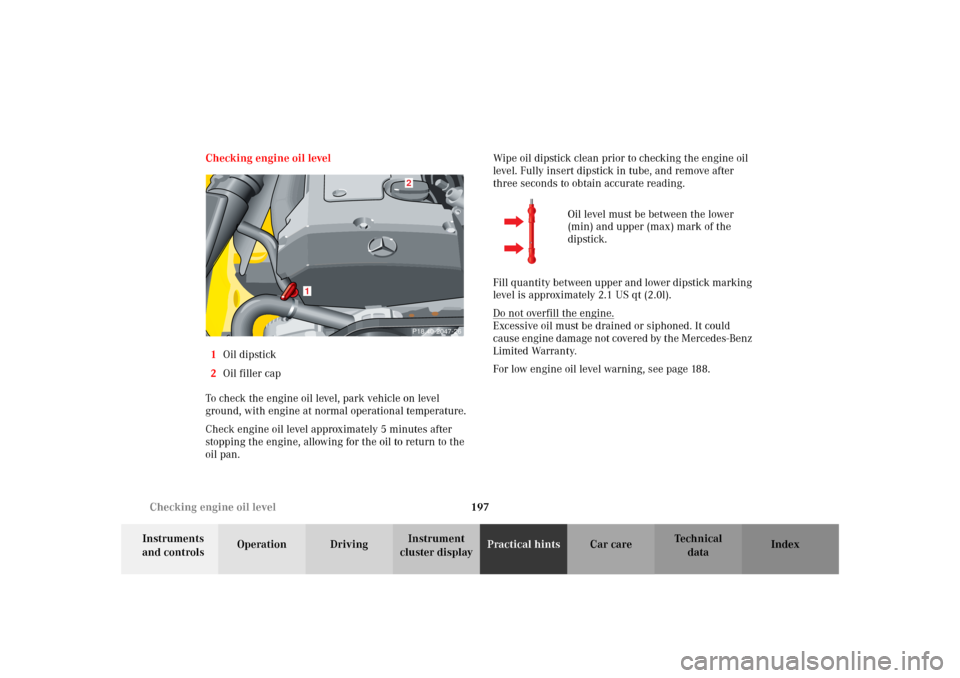
cluster displayPractical hintsCar care Index Checking engine oil level
1Oil dipstick
2Oil filler cap
To check the engine oil level, park vehicle on level
ground, with engine at normal operational temperature.
Check engine oil level approximately 5 minutes after
stopping the engine, allowing for the oil to return to the
oil pan.Wipe oil dipstick clean prior to checking the engine oil
level. Fully insert dipstick in tube, and remove after
three seconds to obtain accurate reading.
Oil level must be between the lower
(min) and upper (max) mark of the
dipstick.
Fill quantity between upper and lower dipstick marking
level is approximately 2.1 US qt (2.0l).
Do not overfill the engine.
Excessive oil must be drained or siphoned. It could
cause engine damage not covered by the Mercedes-Benz
Limited Warranty.
For low engine oil level warning, see page 188.
P18.40-2047-262
1
Page 249 of 290
246 Cleaning and care of the vehicle
Te ch n i c a l
data Instruments
and controlsOperation DrivingInstrument
cluster displayPractical hintsCar careIndex
Cleaning and care of the vehicle
In operation, your vehicle is subjected to varying
external influences which, if gone unchecked, can
attack the paintwork as well as the underbody and
cause lasting damage.
Such damage is caused not only by extreme and varying
climatic conditions, but also by air polution, road salt,
tar, gravel and stone chipping. Grease and oil, fuel,
coolant, brake fluid, bird droppings, insects, tree resins
etc. should be removed immediately to avoid paint
damage. Frequent washing reduces and/or eliminates
the aggressiveness and potency of the above adverse
influences.More frequent washings are necessary to deal with
unfavorable conditions; for example, near the ocean, in
industrial areas (smoke, exhaust emissions), or during
winter operation.
You should check your vehicle from time to time for
stone chipping or other damage. Any damage should be
repaired as soon as possible to prevent the start of
corrosion.
In doing so, do not neglect the underside of the vehicle.
A prerequisite for a thorough check is a washing of the
underbody followed by a thorough inspection. Damaged
areas need to be reundercoated.
Your vehicle has been treated at the factory with a wax-
base rustproofing in the body cavities which will last for
the lifetime of the vehicle. Post-production treatment is
neither necessary nor recommended by Mercedes-Benz
because of the possibility of incompatibility between
materials used in the production process and others
applied later.
We have selected car-care products and compiled
recommendations which are specially matched to our
vehicles and which always reflect the latest technology.
You can obtain Mercedes-Benz approved car-care
products at your authorized Mercedes-Benz Center.
Wa r n i n g !
Many cleaning products can be hazardous. Some
are poisonous, others are flammable. Always follow
the instructions on the particular container.
Always open your vehicle’s doors or windows when
cleaning the inside.Never use fluids or solvents that are not designed
for cleaning your vehicle.
Page 278 of 290

275 Index
Te ch n i c a l
data Instruments
and controlsOperation DrivingInstrument
cluster displayPractical hints Car careIndex Block heater .................................................................... 165
Brake assist system (BAS) ............................................ 169
Malfunction indicator lamp ..................................... 185
Brake fluid ...................................................................... 268
Brake pad wear indicator lamp .................................... 184
Brake warning lamp ...................................................... 183
Brake fluid low .......................................................... 183
Brakes ..................................................... 158, 169, 171, 173
Bulbs
See Replacing bulbs ................................................. 230
CCapacities
Fuels, coolants, lubricants etc. ............................... 266
Catalytic converter ........................................................ 140
CD changer installed ..................................................... 105
Cellular telephone ..........................................................118
Center console .................................................................. 18
Central locking switch .................................................... 30
Central locking system ................................................... 24
Automatic central locking ......................................... 31
Choosing global or selective mode ........................... 25
Emergency release for trunk lid ............................... 35
General notes ............................................................... 23Locking and unlocking ............................................... 25
Mechanical keys ..........................................................27
Remote control ............................................ 22, 24, 236
Vehicle keys ................................................................. 22
Changing wheels ........................................................... 207
Inflating the collapsible spare tire ......................... 212
Storing spare wheel in wheel well ......................... 213
Charge indicator lamp ................................................... 188
Check engine malfunction indicator lamp ................. 182
Check regularly and before a long trip ....................... 179
Checking engine oil level
Via engine oil level indicator .................................... 79
Via oil dipstick ........................................................... 197
Child restraint ..................................................... 44, 51, 63
Child seat
See Infant and child restraint systems .................... 63
Cleaning and care of the vehicle ................................ 246
Climate control ................................................................. 86
Air Recirculation ......................................................... 91
Basic setting ................................................................. 88
Defogging windows ..................................................... 89
Defrosting .....................................................................89
Dust Filter .....................................................................92
Rear window defroster ............................................... 90
Residual Engine Heat Utilization (REST) ................ 91
Special settings ........................................................... 89