Page 231 of 302

227 Tires, Wheels
Te ch n ica l
data Instruments
and controlsOperation DrivingInstrument
cluster displayPractical hintsCar care Index Wheels
Replace rims or tires with the same designation,
manufacturer and type as shown on the original part.
See your authorized Mercedes-Benz Center for further
information.
See your authorized Mercedes-Benz Center for
information on tested and recommended rims and tires
for summer and winter operation. They can also offer
advice concerning tire service and purchase.Tire replacement
Front and rear tires should be replaced in sets.
Furthermore - in the event of tire replacement - the
spare wheel (except Sport Package version), if possible,
should be used on the rear axle. Rims and tires must be
of the correct size and type. For dimensions, see
page 274.
We recommend that you break in new tires for approx.
60 miles (100 km) at moderate speed.
It is imperative that the wheel mounting bolts be
fastened to a tightening torque of 80 ft.lb. (110 Nm)
whenever wheels are mounted.
For rim and tire specifications, see page 274.
Page 232 of 302

228 Tires, Wheels
Te ch n ica l
data Instruments
and controlsOperation DrivingInstrument
cluster displayPractical hintsCar care Index
Rotating wheels
Wheel rotation applies only when winter tires are
mounted on all four wheels.
The wheels can be rotated according to the degree of
tire wear while retaining the same direction of travel.
Rotating, however, should be carried out as
recommended by the tire manufacturer, before the
characteristic tire wear pattern (shoulder wear on front
wheels and tread center wear on rear wheels) becomes
visible, as otherwise the driving properties deteriorate.
Important!
Unid irectional tires must a lways be mou nted w it h a rrow
on tire sidewall pointing in direction of vehicle forward
movement.
Wa r n i n g !
When replacing a tire on the 9
1/2 J x 18 H2 (Sport
Package SL 500) or 10 J x 18 H2 (Sport Package
SL 600) wheel rim, removal or mounting must only
be done over the back flange. Removal or
installation over the front flange will cause rim/
tire failure leading to serious or fatal injury.
Worn, old tires can cause accidents. If the tire tread
is badly worn, or if the tires have sustained
damage, replace them.When replacing rims, use only genuine Mercedes-
Benz wheel bolts specified for the particular rim
type. Failure to do so can result in the bolts
loosening and possibly an accident.
Page 236 of 302
232 Tires, Wheels
Te ch n ica l
data Instruments
and controlsOperation DrivingInstrument
cluster displayPractical hintsCar care Index
6. Using the wrench, loosen but do not yet remove the
wheel bolts. 7. Remove the protective cover from the jack support
tube opening by inserting the screwdriver in the
opening and prying it out.
The tube openings are located directly behind the
front wheel housings and in front of the rear wheel
housings.
P40.10-0375-26
Page 237 of 302

233 Tires, Wheels
Te ch n ica l
data Instruments
and controlsOperation DrivingInstrument
cluster displayPractical hintsCar care Index 8. Insert jack arm fully into the tube hole up to the
stop. Place jack on firm ground. Position the jack so
that it is always vertical (plumb-line) as seen from
the side (see arrow), especially if the vehicle is
parked on an incline.
9. Jack up the vehicle until the wheel is clear of the
ground. Never start engine while vehicle is raised.
10. Unscrew upper-most wheel bolt and install
alignment bolt (1) supplied in the tool kit. Remove
the remaining bolts. Keep bolt threads protected
from dirt and sand.11. Remove wheel. Grip wheel from the sides. Keep
hands from beneath the wheels.
12. Clean contact surfaces of wheel and wheel hub.
Install spare wheel on wheel hub. Insert wheel bolts
and tighten them slightly.
To avoid paint damage, place wheel flat against hub
and hold it there while installing first wheel bolt.
Unscrew the alignment bolt (1) to install the last
wheel bolt.
Page 238 of 302

234 Tires, Wheels
Te ch n ica l
data Instruments
and controlsOperation DrivingInstrument
cluster displayPractical hintsCar care Index
13. Lower vehicle. Remove jack and insert jack tube
cover.
Before storing the jack, the jack arm must be
lowered almost to the base of the jack.
Store the spare wheel first and then the vehicle jack.
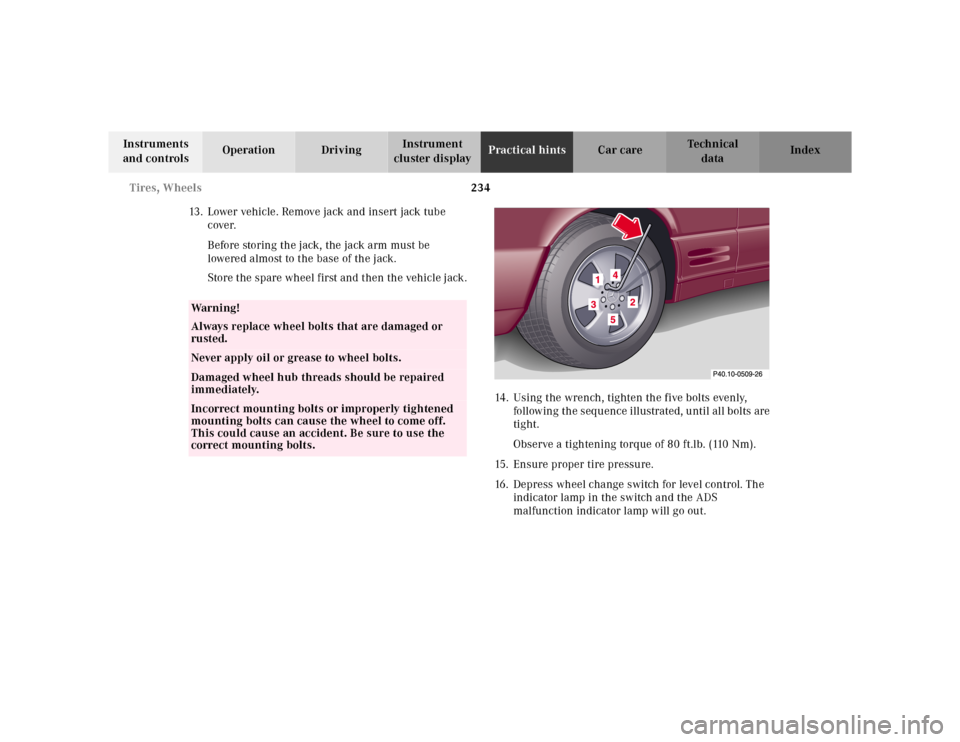
14. Using the wrench, tighten the five bolts evenly,
following the sequence illustrated, until all bolts are
tight.
Observe a tightening torque of 80 ft.lb. (110 Nm).
15. Ensure proper tire pressure.
16. Depress wheel change switch for level control. The
indicator lamp in the switch and the ADS
malfunction indicator lamp will go out.
Wa r n i n g !
Always replace wheel bolts that are damaged or
rusted.Never apply oil or grease to wheel bolts.Damaged wheel hub threads should be repaired
immediately.Incorrect mounting bolts or improperly tightened
mounting bolts can cause the wheel to come off.
This could cause an accident. Be sure to use the
correct mounting bolts.