2002 MERCEDES-BENZ S55AMG turn signal
[x] Cancel search: turn signalPage 8 of 430

5 ContentsCoolant level ...................................344
Adding coolant ...........................344
Windshield and headlamp
washer system ...........................345
Windshield and headlamp
washer fluid mixing ratio .........345
Spare wheel, vehicle tools,
storage compartment ................346
Vehicle jack .....................................347
Wheels .............................................348
Tire Replacement .......................348
Rotating wheels ..........................349
Spare wheel ....................................349
Changing wheels ........................... 351
Tire inflation pressure ..................356
Battery .............................................357
Jump starting ..................................359
Towing the vehicle ......................... 361
Exterior lamps ................................364
Headlamp assembly ...................365
Taillamp assemblies ..................368Changing batteries in
the electronic key ......................371
Synchronizing
remote control ............................ 373
Changing batteries in the
KEYLESS-GO-card .....................374
Emergency engine
shut-down ...................................376
Fuel filler flap,
manual release ..........................376
Emergency operation of
sliding/pop-up roof .................. 377
Replacing wiper blades ................ 378
Roof rack ......................................... 380
Vehicle careCleaning and care
of the vehicle ............................. 382
Power washer ............................. 383
Tar stains .................................... 384
Paintwork, painted body
components ................................ 384Engine cleaning ..........................384
Vehicle washing .........................384
Ornamental moldings ................385
Headlamps, taillamps,
turn signal lenses ......................385
Cleaning the Distronic
system sensor .............................386
Cleaning the parktronic
system sensors ...........................386
Wiper blades ...............................387
Light alloy wheels ......................388
Instrument cluster .....................388
Steering wheel and
gear selector lever ......................388
Cup holder ...................................388
Seat belts .....................................389
Headliner and shelf
below rear window .....................389
Leather upholstery .....................389
Hard plastic trim items .............389
Plastic and rubber parts ............389
Page 38 of 430
35 Central locking system
Te ch n i c a l
data Instruments
and controlsOperationDrivingInstrument
cluster displayPractical hints Car care Index Locking and unlocking with remote control
Unlocking:
Press transmit button Œ. All turn signal lamps blink
once to indicate that the vehicle is unlocked.
The remote control can be programmed for two kinds of
unlocking modes (see below):
Selective unlocking mode –
Press transmit button Œ o nce to un lock dr iver’s d oor
and fuel filler flap.
Press transmit button Πtwice to unlock all doors,
fuel filler flap, and trunk.
Global unlocking mode –
Press transmit button Πonce to unlock all doors,
fuel filler flap, and trunk.
Notes:
If the trunk was previously locked separately, it will
remain locked, see page 51.
The presently active unlocking mode (selective or
global) can only be determined by unlocking the vehicle
with the remote control (see below for changing mode).If within 40 seconds of unlocking with the remote
control, neither door nor trunk is opened, the electronic
key is not inserted in the starter switch, or the central
locking switch is not activated, the vehicle will
automatically lock.
Locking:
Press transmit button ‹ once. All turn signal lamps
blink three times to indicate that the vehicle is locked. If
they do not blink three times, a door or trunk is not
properly closed.
Note:
If the vehicle cannot be locked or unlocked by pressing
the transmit button, then it may be necessary to change
the batteries in the electronic key (if ok, battery check
lamp in electronic key will light briefly when pressing
transmit button) or to synchronize the remote control,
see pages 371 and 373.
Choosing global or selective mode on remote control
Press and hold transmit buttons‹ andŒ
simultaneously for five seconds to reprogram the
remote control. Battery check lamp will blink two times
indicating the completed mode change.
Page 41 of 430
38 Central locking system
Te ch n i c a l
data Instruments
and controlsOperationDrivingInstrument
cluster displayPractical hints Car care Index
Locking and unlocking with KEYLESS-GO-card
Unlocking:
Grasp any door handle. All turn signal lamps blink once
to indicate that the vehicle is unlocked.
The KEYLESS-GO-card can be programmed for two
kinds of unlocking modes (see below):
Selective unlocking mode –
Grasp driver’s door handle to unlock driver’s door and
fuel filler flap.
Grasping the passenger door or a rear door, centrally
unlocks the vehicle.
Global unlocking mode –
Grasp any door handle to unlock both doors, fuel filler
flap, and trunk.
For choosing global or selective mode on KEYLESS-GO-
card, see page 41.Notes:
The door which was unlocked, can be opened
immediately after the audible click. The other door can
be opened after its lock button rises up.
If the trunk was previously locked separately, it will
remain locked, see page 51.
The presently active unlocking mode (selective or
global) can be determined by pressing the button on the
KEYLESS-GO-card (see page 41 for changing mode).
If within 40 seconds of unlocking with the
KEYLESS-GO-card, neither door nor trunk is opened,
the electronic key is not inserted in the starter switch,
or the central locking switch is not activated, the vehicle
will automatically lock.
Page 42 of 430
39 Central locking system
Te ch n i c a l
data Instruments
and controlsOperationDrivingInstrument
cluster displayPractical hints Car care Index Locking:
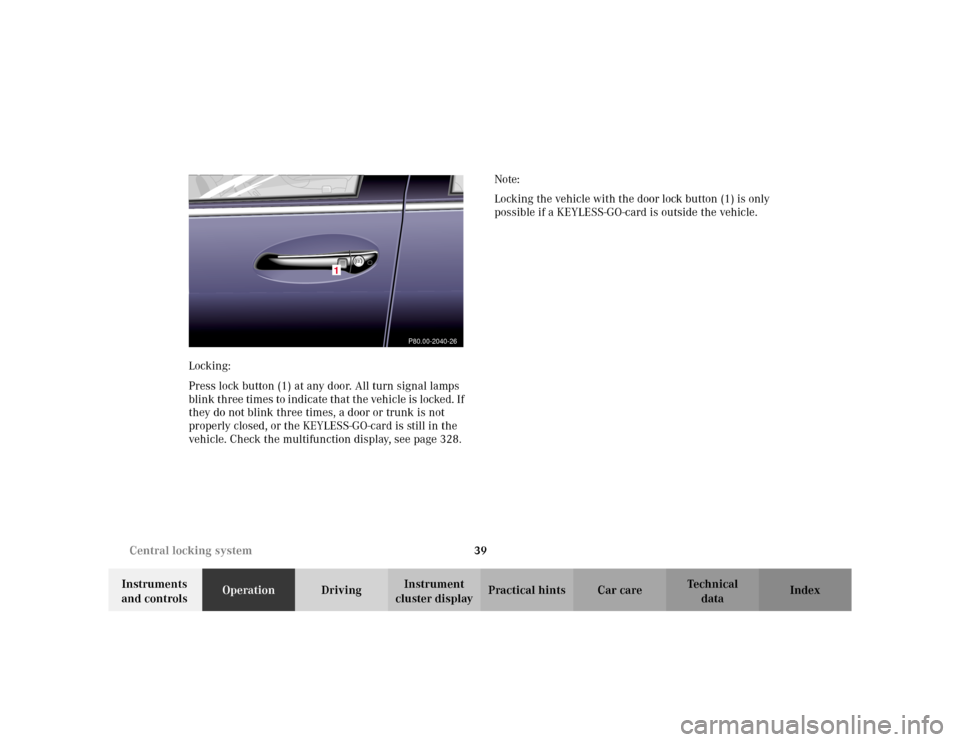
Press lock button (1) at any door. All turn signal lamps
blink three times to indicate that the vehicle is locked. If
they do not blink three times, a door or trunk is not
properly closed, or the KEYLESS-GO-card is still in the
vehicle. Check the multifunction display, see page 328.Note:
Locking the vehicle with the door lock button (1) is only
possible if a KEYLESS-GO-card is outside the vehicle.
P80.00-2040-26
1
Page 43 of 430
40 Central locking system
Te ch n i c a l
data Instruments
and controlsOperationDrivingInstrument
cluster displayPractical hints Car care Index
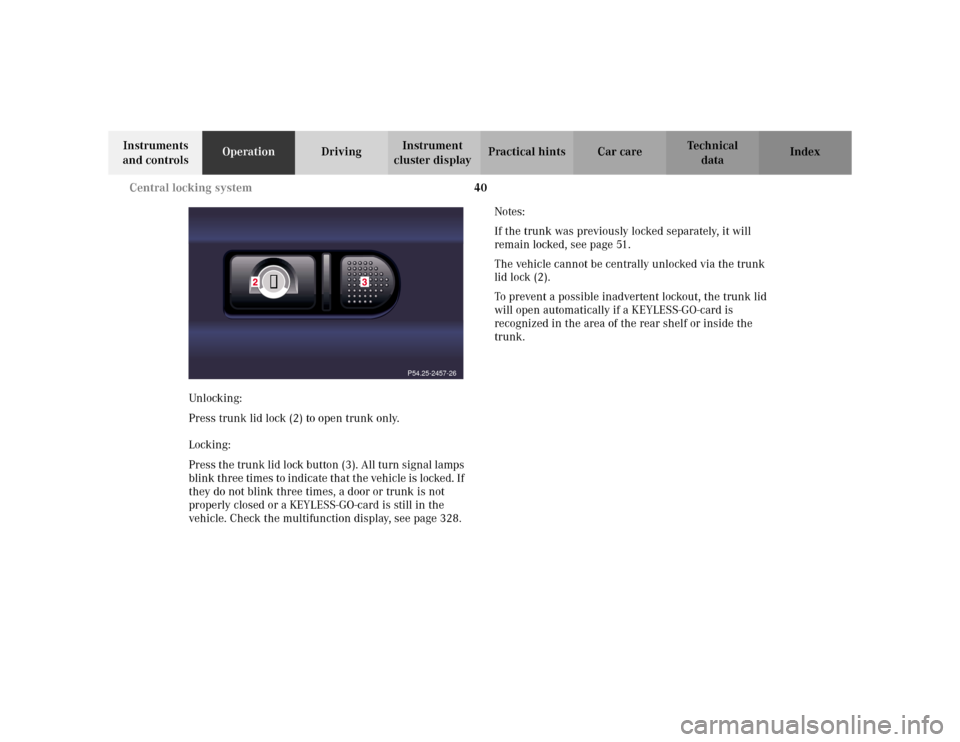
Unlocking:
Press trunk lid lock (2) to open trunk only.
Locking:
Press the trunk lid lock button (3). All turn signal lamps
blink three times to indicate that the vehicle is locked. If
they do not blink three times, a door or trunk is not
properly closed or a KEYLESS-GO-card is still in the
vehicle. Check the multifunction display, see page 328.Notes:
If the trunk was previously locked separately, it will
remain locked, see page 51.
The vehicle cannot be centrally unlocked via the trunk
lid lock (2).
To prevent a possible inadvertent lockout, the trunk lid
will open automatically if a KEYLESS-GO-card is
recognized in the area of the rear shelf or inside the
trunk.
P54.25-2457-26
Page 116 of 430
113 Instrument cluster
Te ch n i c a l
data Instruments
and controlsOperationDrivingInstrument
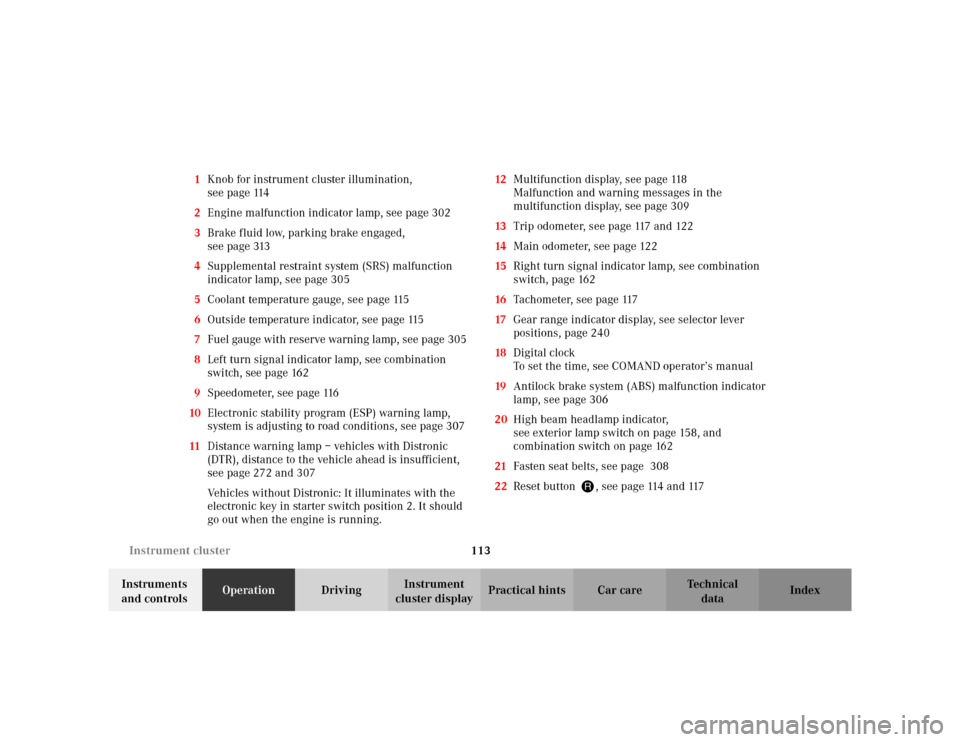
cluster displayPractical hints Car care Index 1Knob for instrument cluster illumination,
seepage114
2Engine malfunction indicator lamp, see page 302
3Brake fluid low, parking brake engaged,
seepage313
4Supplemental restraint system (SRS) malfunction
indicator lamp, see page 305
5Coolant temperature gauge, see page 115
6Outside temperature indicator, see page 115
7Fuel gauge with reserve warning lamp, see page 305
8Left turn signal indicator lamp, see combination
switch, see page 162
9Speedometer, see page 116
10Electronic stability program (ESP) warning lamp,
system is adjusting to road conditions, see page 307
11Distance warning lamp – vehicles with Distronic
(DTR), distance to the vehicle ahead is insufficient,
see page 272 and 307
Vehicles without Distronic: It illuminates with the
electronic key in starter switch position 2. It should
go out when the engine is running.12Multifunction display, see page 118
Malfunction and warning messages in the
multifunction display, see page 309
13Trip odometer, see page 117 and 122
14Main odometer, see page 122
15Right turn signal indicator lamp, see combination
switch, page 162
16Tachometer, see page 117
17Gear range indicator display, see selector lever
positions, page 240
18Digital clock
To set the time, see COMAND operator’s manual
19Antilock brake system (ABS) malfunction indicator
lamp, see page 306
20High beam headlamp indicator,
see exterior lamp switch on page 158, and
combination switch on page 162
21Fasten seat belts, see page 308
22Reset button J, see page 114 and 117
Page 152 of 430
149 Flexible service system
Te ch n i c a l
data Instruments
and controlsOperationDrivingInstrument
cluster displayPractical hints Car care Index Flexible service system (FSS)
(service indicator)
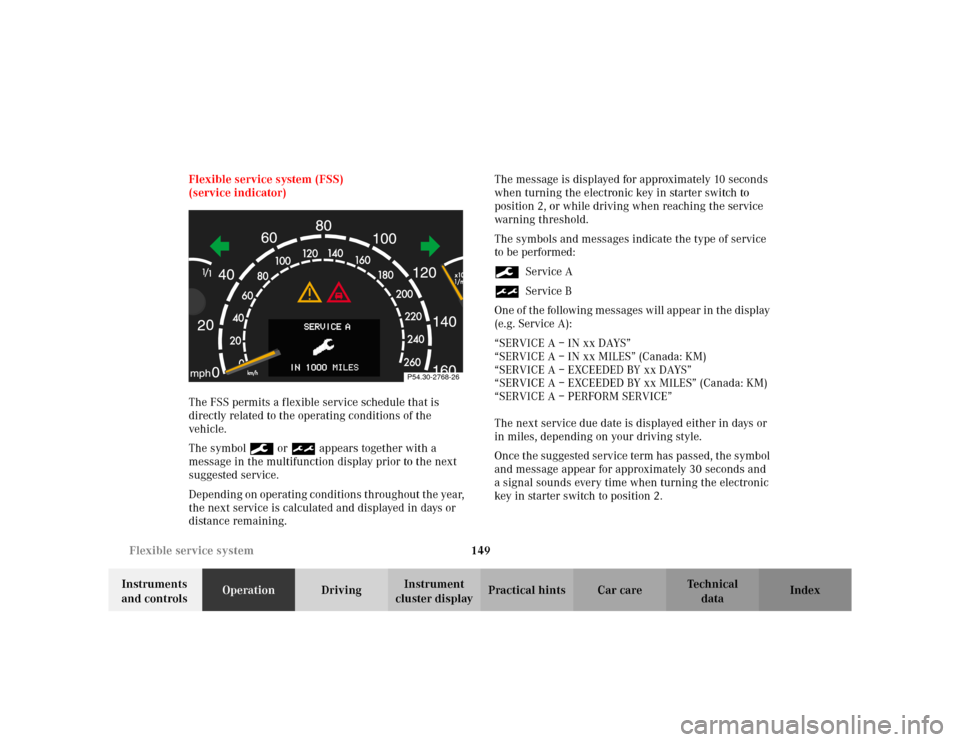
The FSS permits a flexible service schedule that is
directly related to the operating conditions of the
vehicle.
The symbol 9 or ½ appears together with a
message in the multifunction display prior to the next
suggested service.
Depending on operating conditions throughout the year,
the next service is calculated and displayed in days or
distance remaining.The message is displayed for approximately 10 seconds
when turning the electronic key in starter switch to
position 2, or while driving when reaching the service
warning threshold.
The symbols and messages indicate the type of service
to be performed:
9Service A
½Service B
One of the following messages will appear in the display
(e.g. Service A):
“SERVICE A – IN xx DAYS”
“SERVICE A – IN xx MILES” (Canada: KM)
“SERVICE A – EXCEEDED BY xx DAYS”
“SERVICE A – EXCEEDED BY xx MILES” (Canada: KM)
“SERVICE A – PERFORM SERVICE”
The next service due date is displayed either in days or
in miles, depending on your driving style.
Once the suggested service term has passed, the symbol
and message appear for approximately 30 seconds and
a signal sounds every time when turning the electronic
key in starter switch to position 2.
P54.30-2768-26
Page 165 of 430
162 Combination switch
Te ch n i c a l
data Instruments
and controlsOperationDrivingInstrument
cluster displayPractical hints Car care Index
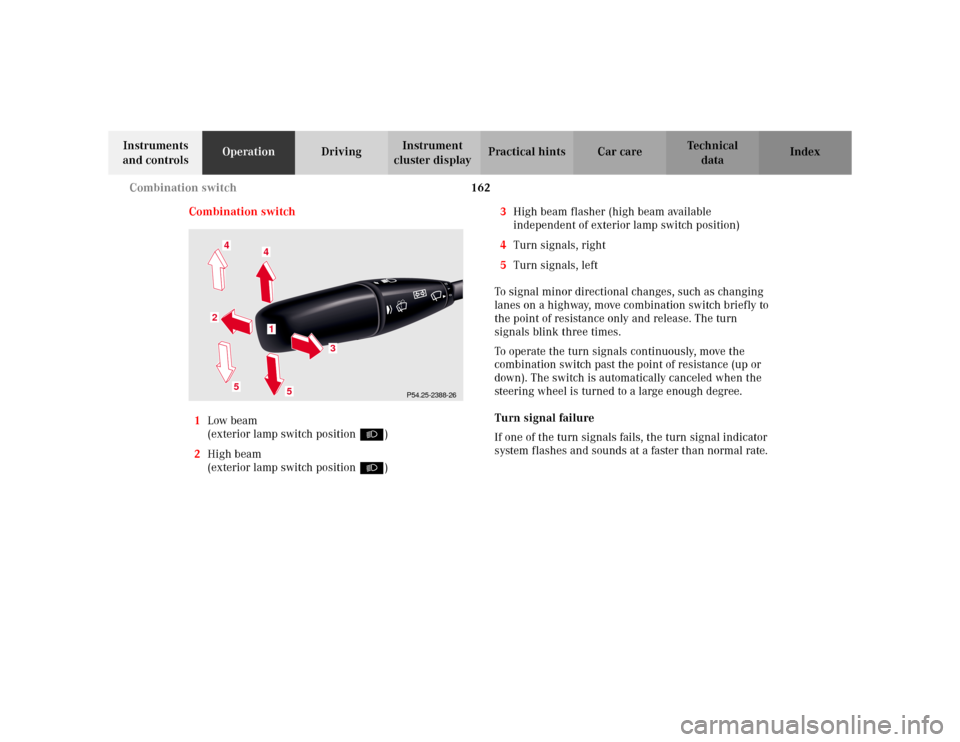
Combination switch
1Low beam
(exterior lamp switch position B)
2High beam
(exterior lamp switch position B)3High beam flasher (high beam available
independent of exterior lamp switch position)
4Turn signals, right
5Turn signals, left
To signal minor directional changes, such as changing
lanes on a highway, move combination switch briefly to
the point of resistance only and release. The turn
signals blink three times.
To operate the turn signals continuously, move the
combination switch past the point of resistance (up or
down). The switch is automatically canceled when the
steering wheel is turned to a large enough degree.
Turn signal failure
If one of the turn signals fails, the turn signal indicator
system flashes and sounds at a faster than normal rate.
P54.25-2388-26
5
2
1
4
3
4
5