Page 193 of 430

190 Interior equipment
Te ch n i c a l
data Instruments
and controlsOperationDrivingInstrument
cluster displayPractical hints Car care Index
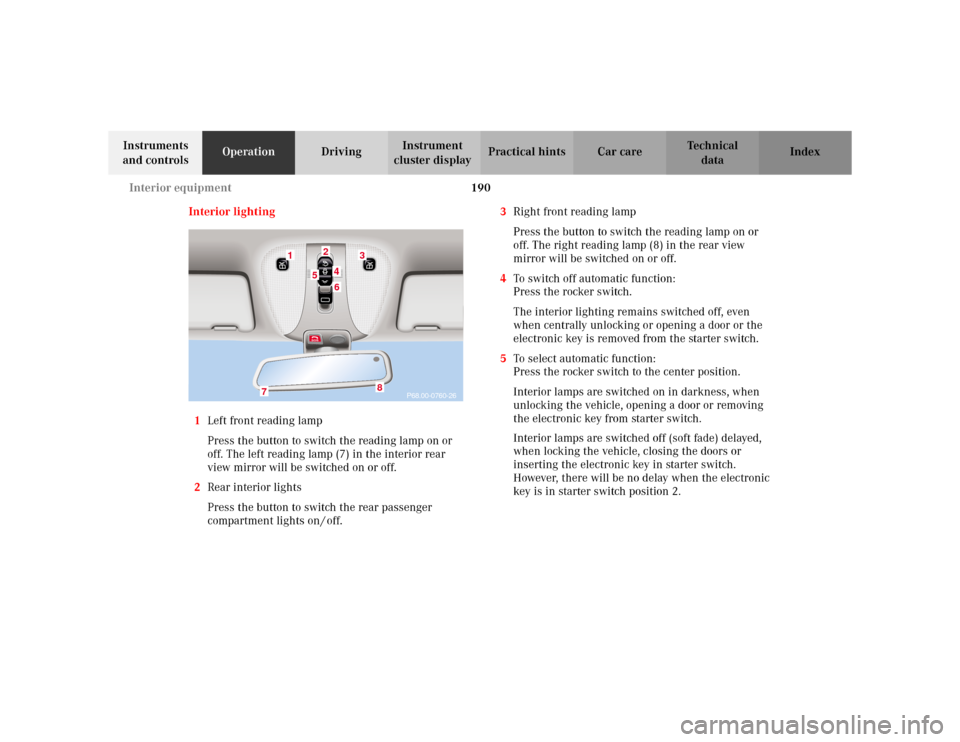
Interior lighting
1Left front reading lamp
Press the button to switch the reading lamp on or
off. The left reading lamp (7) in the interior rear
view mirror will be switched on or off.
2Rear interior lights
Press the button to switch the rear passenger
compartment lights on / off.3Right front reading lamp
Press the button to switch the reading lamp on or
off. The right reading lamp (8) in the rear view
mirror will be switched on or off.
4To switch off automatic function:
Press the rocker switch.
The interior lighting remains switched off, even
when centrally unlocking or opening a door or the
electronic key is removed from the starter switch.
5To select automatic function:
Press the rocker switch to the center position.
Interior lamps are switched on in darkness, when
unlocking the vehicle, opening a door or removing
the electronic key from starter switch.
Interior lamps are switched off (soft fade) delayed,
when locking the vehicle, closing the doors or
inserting the electronic key in starter switch.
However, there will be no delay when the electronic
key is in starter switch position 2.
P68.00-0760-26
1
3
24
5
6
7
8
Page 195 of 430

192 Interior equipment
Te ch n i c a l
data Instruments
and controlsOperationDrivingInstrument
cluster displayPractical hints Car care Index
Courtesy lighting
The interior of your vehicle is equipped with various
different lighting installations to help you to orient
yourself better in the dark.
Entrance lamps, exit lamps
With exterior lamps on or electronic key in starter
switch position 1, the lamps in the door trays illuminate.
The lights will remain on for approximately 5 minutes if
the electronic key is in starter switch position 0 and
exterior lamps are switched off.Footwell lighting
With parking lamps on, the footwell is illuminated.
Center console lighting
Turn the electronic key in the starter switch to
position 1. The center console is illuminated from the
inside rear view mirror.
Door entry lamps
The appropriate entry lamp switches on if a door is
opened in darkness and if the interior lighting is
switched to automatic function.
The entry lamp switches off automatically when the
door is closed.
Page 198 of 430
195 Interior equipment
Te ch n i c a l
data Instruments
and controlsOperationDrivingInstrument
cluster displayPractical hints Car care Index Va n i t y m i r r o r s 1Illuminated vanity mirror
Front seats:
With the visor engaged in its inner mounting (2),
the lamp (4) can be switched on by opening the
cover (3).
Slide the mirror to the left or right for a normal or
magnified image.
Fold the cover down to close the vanity mirror.
P68.00-0766-26
4
3
1
2
Wa r n i n g !
Do not use the vanity mirror while driving.
Page 199 of 430
196 Interior equipment
Te ch n i c a l
data Instruments
and controlsOperationDrivingInstrument
cluster displayPractical hints Car care Index
5Illuminated vanity mirror
Rear seats:
Touch the cover to lower the mirror. The lamp will
switch on automatically.
Close the cover and the lamp will go out.Interior
Storage compartments and armrests
P82.00-0413-26
5
Wa r n i n g !
To help avoid personal injury during a collision or
sudden maneuver, exercise care when stowing
things. Put luggage or cargo in the trunk if
possible. Do not pile luggage or cargo higher than
the seat backs. Do not place anything on the shelf
below the rear window.Luggage nets cannot secure hard or heavy objects. Wa r n i n g !
Keep compartment lids closed. This will help to
prevent stored objects from being thrown about
and injuring vehicle occupants during an accident.
Page 214 of 430

211 Garage door opener
Te ch n i c a l
data Instruments
and controlsOperationDrivingInstrument
cluster displayPractical hints Car care Index For operation in the USA only: This device complies
with Part 15 of the FCC Rules. Operation is subject to
the following two conditions:
(1) This device may not cause harmful interference, and
(2) this device must accept any interference received,
including interference that may cause undesired
operation.
Any unauthorized modification to this device could void
to the user’s authority to operate the equipment.
Programming or reprogramming the integrated
remote control:
1. Turn electronic key in starter switch to position 1
or 2.
2. Hold the end of the hand-held transmitter of the
device you wish to train approximately 2 to 5 inches
(5 cm to 12 cm) away from the surface of the
integrated remote control located on the inside rear
view mirror, keeping the indicator lamp in view.3. Using both hands, simultaneously push the hand-
held transmitter button and the desired integrated
remote control button. Do not release the buttons
until completing step 4.
4. The indicator lamp on the integrated remote control
will flash, first slowly and then rapidly. When the
indicator lamp flashes rapidly, both buttons may be
released (the rapid flashing lamp indicates
successful programming of the new frequency
signal). To program the remaining two buttons,
follow steps 1 through 4.
Note:
If, after repeated attempts, you do not successfully
program the integrated remote control device to learn
the signal of the hand-held transmitter, the garage door
opener could be equipped with the “rolling code
feature”.
Page 222 of 430

219 Tele Aid
Te ch n i c a l
data Instruments
and controlsOperationDrivingInstrument
cluster displayPractical hints Car care Index Important!
Always make sure that the indicator lamps in the
“SOS” button, in the “Roadside Assistance” button and
in the “Information” button do not remain illuminated
constantly in red and the message “TELE AID – VISIT
WORKSHOP” is not displayed in the multifunction
display after the system self check.
If a malfunction is indicated as outlined above, have the
system checked at the nearest Mercedes-Benz Center as
soon as possible.
Emergency calls
An emergency call is initiated automatically:
•following an accident in which the Emergency
Tensioning Retractors (ETR’s) or airbags deploy,
•if the antitheft alarm or the tow away alarm stays on
for more than 20 seconds, see pages 60 and 61.
An emergency call can also be initiated manually by
opening the cover next to the inside rear view mirror
labeled “SOS”, then briefly pressing the button located
under the cover. See below for instructions on initiating
an emergency call manually.Once the emergency call is in progress, the indicator
lamp in the “SOS” button will begin to flash. The
message “EMERGENCY CALL – CONNECTING CALL”
appears in the multifunction display. When the
connection is established, the message “EMERGENCY
CALL – CALL CONNECTED” appears in the
multifunction display. All information relevant to the
emergency, such as the location of the vehicle
(determined by the GPS satellite location system),
vehicle model, identification number and color are
generated.
A voice connection between the Response Center and
the occupants of the vehicle will be established
automatically soon after the emergency call has been
initiated. When a voice connection is established the
audio system mutes and the message “TELE AID –
EMERGENCY CALL ACTIVE” appears in the
multifunction display. The Response Center will attempt
to determine more precisely the nature of the accident
provided they can speak to an occupant of the vehicle.
Page 321 of 430
318 Malfunction and warning messages
Te ch n i c a l
data Instruments
and controlsOperation DrivingInstrument
cluster displayPractical hints Car care Index
LIGHTING SYSTEM
Line 1 Line 2 C*
LOW BEAM, L CHECK LAMPS! 2
LOW BEAM, R CHECK LAMPS! 2
DISPLAY DEFECTIVE VISIT WORKSHOP!
1
2
TURN SIGNAL LR CHECK LAMPS! 2
TURN SIGNAL RR CHECK LAMPS! 2
TURN SIGNAL IN MIRROR, L CHECK LAMPS! 2
TURN SIGNAL IN MIRROR, R CHECK LAMPS! 2
TURN SIGNAL LF CHECK LAMPS! 2
TURN SIGNAL RF CHECK LAMPS! 2
BRAKE LAMP
2
VISIT WORKSHOP! 2
BRAKE LAMP, L
3
CHECK LAMPS! 2
BRAKE LAMP, R
3
CHECK LAMPS! 2
3RD BRAKE LAMP
3
CHECK LAMPS! 2
HIGH BEAM, L CHECK LAMPS! 2
HIGH BEAM, R CHECK LAMPS! 2
LICENSE PLATE LAMP, L CHECK LAMPS! 2
LICENSE PLATE LAMP, R CHECK LAMPS! 2
TURN OFF LAMPS! 1
FRONT FOGLAMP, L CHECK LAMPS! 2
FRONT FOGLAMP, R CHECK LAMPS! 2
REAR FOGLAMP CHECK LAMPS! 2
REVERSE LAMP, L CHECK LAMPS! 2 Line 1 Line 2 C*
Page 372 of 430
369 Exterior lamps
Te ch n i c a l
data Instruments
and controlsOperation DrivingInstrument
cluster displayPractical hintsCar care Index License plate lamp
Loosen both securing screws (1), remove lamp and
replace tubular lamp (C 5 W/4 cp).Stop lamp,
High mounted stop lamp,
Additional turn signals on the exterior mirror
The stop lamps, the high mounted stop lamp (3rd brake
lamp), and the additional turn signals on the exterior
mirrors are equipped with LEDs.
Have the system checked at an authorized
Mercedes-Benz Center if a malfunction occurs.