Page 109 of 430
106 Rear view mirrors
Te ch n i c a l
data Instruments
and controlsOperationDrivingInstrument
cluster displayPractical hints Car care Index
Exterior rear view mirrors, electrically folding
The buttons are located on the driver’s door.
1Push button briefly to fold both exterior rear view
mirrors out.
2Push button briefly to fold both exterior rear view
mirrors in.Important!
If an exterior rear view mirror housing is forcibly
pushed forward (hit from the rear), it must be
rep osition ed man ually by apply in g f irm pr ess ur e until it
snaps back into place.
If an exterior rear view mirror is forcibly pushed
rearward (hit from the front), press button (2) to fold
mirrors in, then press button (1) to fold mirrors out. Do
not force mirror by hand.
Before running the vehicle through an automatic car
wash, fold mirrors in, otherwise they might get
damaged.
Note:
The exterior rear view mirrors can vibrate if they are
not completely folded out.
Page 111 of 430
108 Memory function
Te ch n i c a l
data Instruments
and controlsOperationDrivingInstrument
cluster displayPractical hints Car care Index
Memory function
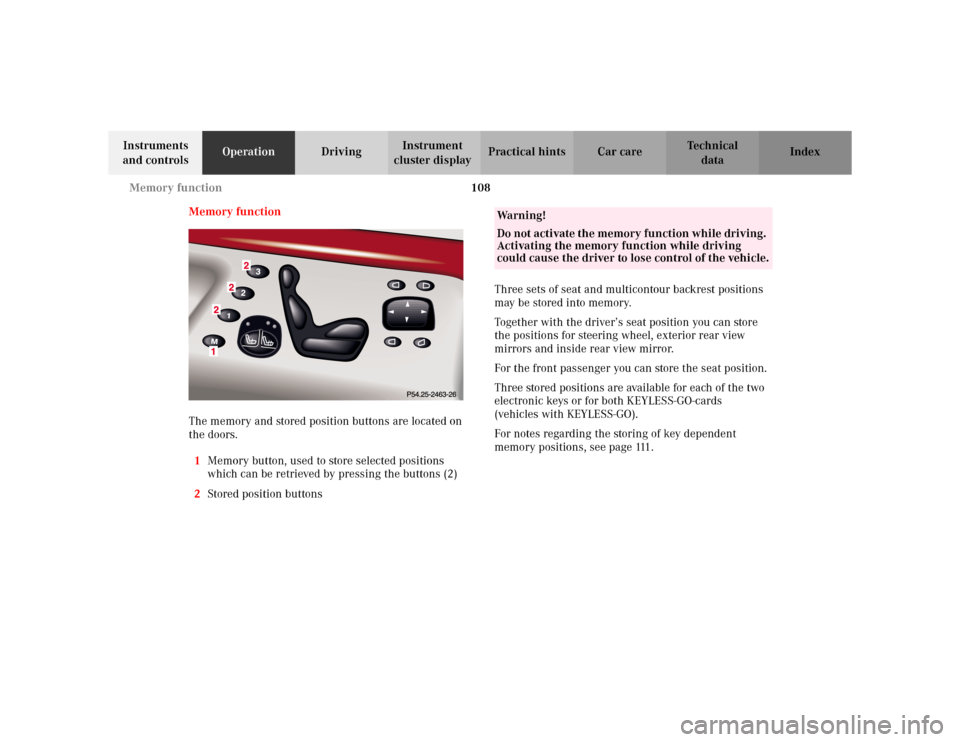
The memory and stored position buttons are located on
the doors.
1Memory button, used to store selected positions
which can be retrieved by pressing the buttons (2)
2Stored position buttonsThree sets of seat and multicontour backrest positions
may be stored into memory.
Together with the driver’s seat position you can store
the positions for steering wheel, exterior rear view
mirrors and inside rear view mirror.
For the front passenger you can store the seat position.
Three stored positions are available for each of the two
electronic keys or for both KEYLESS-GO-cards
(vehicles with KEYLESS-GO).
For notes regarding the storing of key dependent
memory positions, see page 111.
Wa r n i n g !
Do not activate the memory function while driving.
Activating the memory function while driving
could cause the driver to lose control of the vehicle.
Page 112 of 430
109 Memory function
Te ch n i c a l
data Instruments
and controlsOperationDrivingInstrument
cluster displayPractical hints Car care Index Storing positions into memory
Driver’s seat: with the electronic key in starter switch
position 1 or 2 or with the driver’s door open.
Front passenger seat and rear seats: with electronic key
in starter switch position 1 or 2 or the relevant doors
open.
Adjust the seat and multicontour backrest to the desired
position. You can also adjust the steering wheel, the
exterior rear view mirrors electrically and the inside
rear view mirror by hand for the driver’s seat. See
page 104 for exterior rear view mirror adjustment and
page 102 for steering wheel adjustment.
Push memory button “M”, release and push a stored
position button “1”, “2” or “3” within 3 seconds.Recalling positions from memory
To recall a seat / steering wheel and rear view mirror
position, push and hold button “1”, “2” or “3” until seat /
steering wheel and rear view mirror movement has
stopped.
The seat / steering wheel and rear view mirror
movement stops when the button is released.
Caution!
Do not operate the power seats using the memory
button if the seat backrest is in an excessively reclined
position. Doing so could cause damage to front or rear
seats.
First move backrest to an upright position.
Page 117 of 430
114 Instrument cluster
Te ch n i c a l
data Instruments
and controlsOperationDrivingInstrument
cluster displayPractical hints Car care Index
Activating instrument cluster display
The instrument cluster is activated by:
•Opening the door
1.
•Pressing button Jon the instrument cluster
1.
•Turning the electronic key in starter switch to
position 1 or 2.
•Switching on the exterior lamps.
1 The instrument cluster is activated for approximately 30 seconds.Instrument cluster illumination
The instrument cluster illumination is dimmed or
brightened automatically to suit daylight lighting
conditions.Display illumination, changing basic settings for driving
at dusk or in darkness:
Press adjusting knob (1) – the knob will pop out.
Rotate adjusting knob (1) clockwise – instrument lamp
intensity increases.
Rotate adjusting knob (1) counterclockwise –
instrument lamp intensity decreases.
Push knob back into panel.
Note:
It is not possible to select a basic brightness setting in
daylight – the intensity is adjusted automatically.
Page 150 of 430
147 Multifunction steering wheel, multifunction display
Te ch n i c a l
data Instruments
and controlsOperationDrivingInstrument
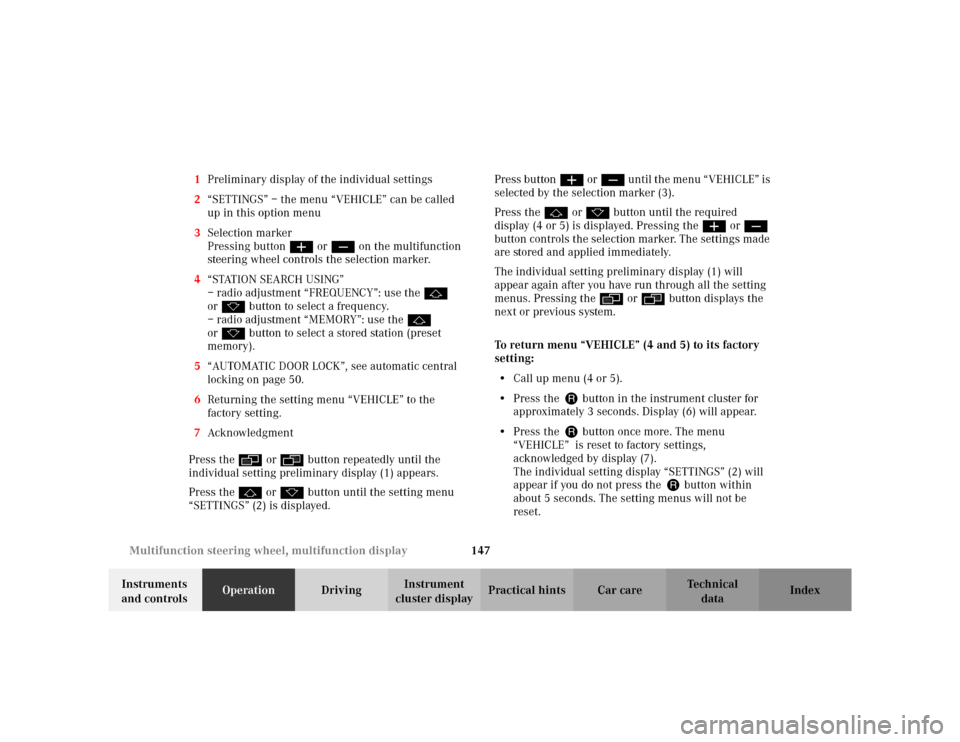
cluster displayPractical hints Car care Index 1Preliminary display of the individual settings
2“SETTINGS” – the menu “VEHICLE” can be called
up in this option menu
3Selection marker
Pressing buttonæ orç on the multifunction
steering wheel controls the selection marker.
4“STATION SEARCH USING”
– radio adjustment “FREQUENCY”: use the j
ork button to select a frequency.
– radio adjustment “MEMORY”: use the j
ork button to select a stored station (preset
memory).
5“AUTOMATIC DOOR LOCK”, see automatic central
locking on page 50.
6Returning the setting menu “VEHICLE” to the
factory setting.
7Acknowledgment
Press the è or ÿ button repeatedly until the
individual setting preliminary display (1) appears.
Press the j or k button until the setting menu
“SETTINGS” (2) is displayed.Press buttonæ orç until the menu “VEHICLE” is
selected by the selection marker (3).
Press the j or k button until the required
display (4 or 5) is displayed. Pressing the æ orç
button controls the selection marker. The settings made
are stored and applied immediately.
The individual setting preliminary display (1) will
appear again after you have run through all the setting
menus. Pressing the è or ÿ button displays the
next or previous system.
To return menu “VEHICLE” (4 and 5) to its factory
setting:
•Call up menu (4 or 5).
•Press the Jbutton in the instrument cluster for
approximately 3 seconds. Display (6) will appear.
•Press the Jbutton once more. The menu
“VEHICLE” is reset to factory settings,
acknowledged by display (7).
The individual setting display “SETTINGS” (2) will
appear if you do not press the Jbutton within
about 5 seconds. The setting menus will not be
reset.
Page 161 of 430
158 Exterior lamp switch
Te ch n i c a l
data Instruments
and controlsOperationDrivingInstrument
cluster displayPractical hints Car care Index
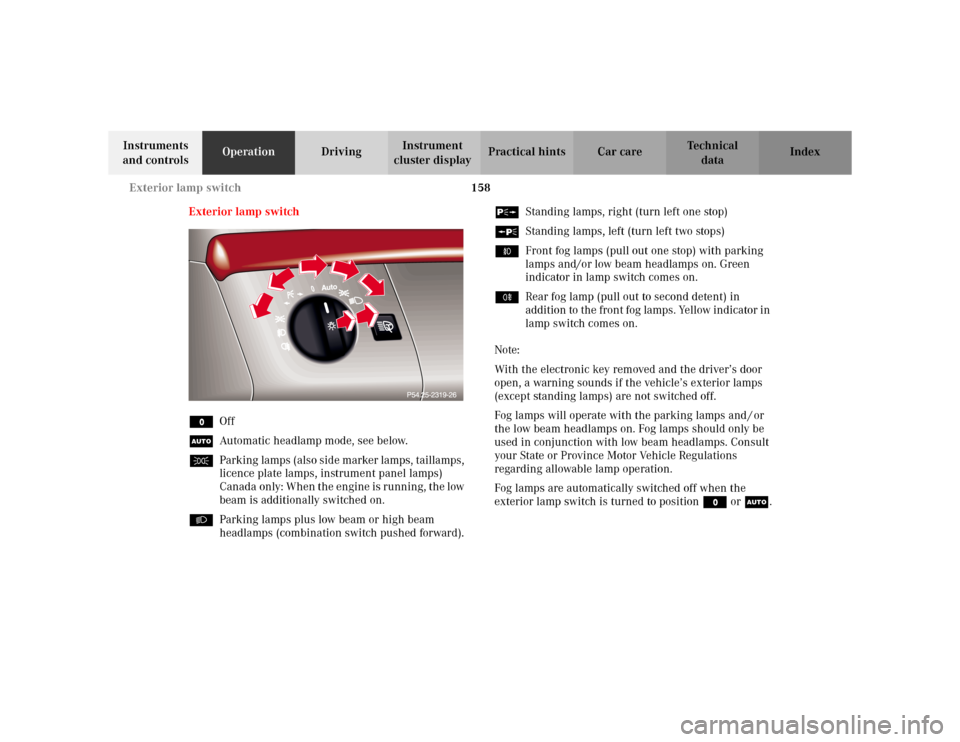
Exterior lamp switch
MOff
UAutomatic headlamp mode, see below.
CParking lamps (also side marker lamps, taillamps,
licence plate lamps, instrument panel lamps)
Canada only: When the engine is running, the low
beam is additionally switched on.
BParking lamps plus low beam or high beam
headlamps (combination switch pushed forward).ˆStanding lamps, right (turn left one stop)
‚Standing lamps, left (turn left two stops)
‡Front fog lamps (pull out one stop) with parking
lamps and/or low beam headlamps on. Green
indicator in lamp switch comes on.
†Rear fog lamp (pull out to second detent) in
addition to the front fog lamps. Yellow indicator in
lamp switch comes on.
Note:
With the electronic key removed and the driver’s door
open, a warning sounds if the vehicle’s exterior lamps
(except standing lamps) are not switched off.
Fog lamps will operate with the parking lamps and / or
the low beam headlamps on. Fog lamps should only be
used in conjunction with low beam headlamps. Consult
your State or Province Motor Vehicle Regulations
regarding allowable lamp operation.
Fog lamps are automatically switched off when the
exterior lamp switch is turned to position M or U.
Page 163 of 430

160 Exterior lamp switch
Te ch n i c a l
data Instruments
and controlsOperationDrivingInstrument
cluster displayPractical hints Car care Index
Daytime running lamp mode
Turn exterior lamp switch to positionM orU.
When the engine is running, the low beam headlamps
are automatically switched on. In low ambient light
conditions the parking lamps will also switch on.
•Canada only:
When shifting from a driving position to
position “N” or “P”, the low beam switches off
(3 minutes delay).
For nighttime driving the exterior lamp switch
should be turned to position B to permit
activation of the high beam headlamps.
•USA only:
The high beam headlamps can also be activated
when driving with the daytime running lamp mode
activated and exterior lamp switch in positionM.
To activate the daytime running lamp mode, see the
individual setting menu “LIGHTING” – “LAMP
CIRCUIT HEADLAMP” on page 142.
Note:
See page 158 for notes on the exterior lamp switch.Night security illumination
Turn exterior lamp switch to positionU.
At low ambient light conditions and with the engine
having been turned off, the exterior lamps (fog lamps
and parking lamps) switch on for added illumination.
After the last door has been closed the lamp-on time
period commences.
To activate the function see the individual setting menu
“LIGHTING” –“HEADLAMPS DELAYED SHUT-OFF” on
page 142.
The lamp-on time period for night security illumination
can be set at several different timed levels from 0 (off) to
60 seconds.
Note:
Within 10 minutes after closing the last door the night
security illumination can be reactivated by opening a
door.
If after switching the engine off, no doors are opened or
if after opening the doors they are not closed, the night
security illumination will switch off automatically after
approximately 60 seconds.
Page 164 of 430
161 Exterior lamp switch
Te ch n i c a l
data Instruments
and controlsOperationDrivingInstrument
cluster displayPractical hints Car care Index Deactivating night security illumination temporarily:
Turn the electronic key in starter switch to position 0
then to position 2 and back to position 0 again before
getting out of the vehicle. The night security
illumination will not be activated when the door is
opened.
Locator lighting
Turn exterior lamp switch to positionU.
After unlocking the vehicle with the electronic key
during darkness the fog lamps and parking lamps
switch on for a approx. 40 seconds.
The exterior lamps will be switched off when opening
the driver’s door.
To activate the function see the individual setting menu
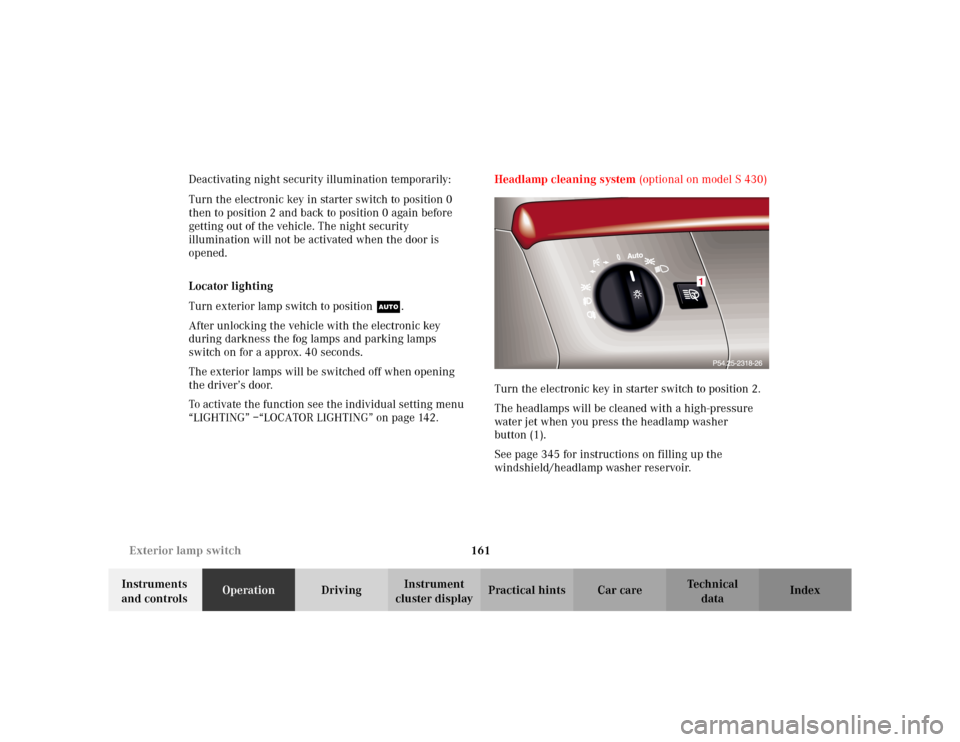
“LIGHTING” –“LOCATOR LIGHTING” on page 142.Headlamp cleaning system (optional on model S 430)
Turn the electronic key in starter switch to position 2.
The headlamps will be cleaned with a high-pressure
water jet when you press the headlamp washer
button (1).
See page 345 for instructions on filling up the
windshield/headlamp washer reservoir.
Auto
1