Page 75 of 430
72 Seats
Te ch n i c a l
data Instruments
and controlsOperationDrivingInstrument
cluster displayPractical hints Car care Index
Vehicles without seat ventilation function:
Normal heating mode.
Press button (1):
One indicator lamp in the switch lights up.
The seat heater will be automatically switched off after
approximately 30 minutes.
Rapid heating mode.
Press button (2):
Both indicator lamps in the switch light up.
The system switches over to normal heating mode
automatically after approximately 5 minutes.
Turning off the heater.
Press button (1) or (2) again:
The indicator lamps go out. The seat heater is switched
off.
1
2
P54.25-2005-26
Page 76 of 430
73 Seats
Te ch n i c a l
data Instruments
and controlsOperationDrivingInstrument
cluster displayPractical hints Car care IndexVehicles with seat ventilation function:
Rapid heating mode
Press button (3) once.
Both indicator lamps above the button light up.
The system switches over to normal heating mode
automatically after approximately 5 minutes.
Normal heating mode
Press button (3) twice:
One indicator lamp above the button lights up.
The seat heater will be automatically switched off after
approximately 30 minutes.
Turning off the heater.
Press the button again:
The indicator lamps go out. The seat heater is switched
off.
3
P54.25-2004-26
Page 77 of 430

74 Seats
Te ch n i c a l
data Instruments
and controlsOperationDrivingInstrument
cluster displayPractical hints Car care Index
Seat ventilation system
(optional, standard on model S 600)
The buttons are located on each door.
Seat ventilation can be activated manually with the
electronic key in starter switch positions 1 or 2, or by
the summer opening function (driver’s seat only), see
page 43.
Notes:
When in operation, the seat ventilation system
consumes a large amount of electrical power. It is not
advisable to use the seat ventilator longer than
necessary.The seat ventilators may automatically switch off if too
many power consumers are switched on at the same
time or if the battery charge is low. In this case, one or
more indicator lamps will blink.
The seat ventilation switch back on again automatically
as soon as sufficient voltage is available.
If the blinking of the indicator lamps is distracting to
you, the seat ventilators can be switched off.
The maximum ventilation level (level 3) is automatically
selected if the driver’s seat ventilation is activated by
the summer opening function, see page 43.
Page 78 of 430
75 Seats
Te ch n i c a l
data Instruments
and controlsOperationDrivingInstrument
cluster displayPractical hints Car care Index Manual activation:
Turn the electronic key in starter switch to position 1
or 2.
Level 3 ventilation setting (maximum).
Press button (1):
Three blue indicator lamps above the button light up.Level 2 ventilation setting (middle).
Press button (1) again:
Two blue indicator lamps above the button light up.
Level 1 ventilation setting (minimum).
Press button (1) again:
One blue indicator lamp above the button lights up.
Turning off the seat ventilation.
Press button (1) again:
The indicator lamps go out. Seat ventilation is switched
off.
1
P54.25-0423-26
Page 83 of 430
80 Seats
Te ch n i c a l
data Instruments
and controlsOperationDrivingInstrument
cluster displayPractical hints Car care Index
Power seat, setting passenger seat position from rear
The switch is located on the right rear door.
1Front passenger seat adjustment
2Rear seat adjustmentTurn the electronic key in starter switch to position 1
or 2.
Press button 1 to adjust the front passenger seat:
3Fore / aft adjustment
4Backrest tilt
5Head restraint height
6Seat, up / down
Press button 2 to adjust the rear seat.
See page 79 for rear seat adjustment.
Note:
Setting the passenger seat position from the rear is not
possible if you deactivate the operation of rear door
windows, see page 186.
Do not move the front passenger seat completely
forward if objects are stored in the parcel net in the
front passenger-side footwell. Items in the net may be
damaged.
5
3
4
4
66
3
1
2
P54.00-2004-26
Page 87 of 430
84 Restraint systems
Te ch n i c a l
data Instruments
and controlsOperationDrivingInstrument
cluster displayPractical hints Car care Index
Fastening seat belts1Latch plate
2Buckle
3Release button
Push the latch plate (1) into the buckle (2) until it clicks.
Do not twist the belt. A twisted seat belt may cause
injury.
To help avoid severe or fatal injuries, the lap belt should
be positioned as low as possible on your hips and not
across the abdomen.
Tighten the lap portion to a snug fit by pulling shoulder
portion up.
P91.40-2001-27
1
2
3
Wa r n i n g !
Always fasten your seat belt before driving off.
Always make sure your passengers are properly
restrained – even those sitting in the rear.
Page 88 of 430

85 Restraint systems
Te ch n i c a l
data Instruments
and controlsOperationDrivingInstrument
cluster displayPractical hints Car care Index Operation of seat belts
The inertia reel stops the belt from unwinding during
sudden stops or when quickly pulling on the belt.
The locking function of the reel may be checked by
quickly pulling out the belt.
Adjust seat belt so that shoulder portion is located as
close as possible to the middle of your shoulder (it
should not touch the neck). The height setting for the
shoulder portion of the front seat belts is automatically
adjusted by the fore / aft movement of the front seat.
Seat moved to front: Belt outlet fully lowered.
Seat moved to rear: Belt outlet fully raised.
Caution!
For safety reasons, avoid adjusting the seat or seat back
into positions which could affect the correct seat belt
positioning.Unfastening of seat belts
Press release button (3) in the belt buckle (2).
Allow the retractor to completely rewind the seat belt by
guiding the latch plate (1).
Page 107 of 430

104 Rear view mirrors
Te ch n i c a l
data Instruments
and controlsOperationDrivingInstrument
cluster displayPractical hints Car care Index
Exterior rear view mirrors
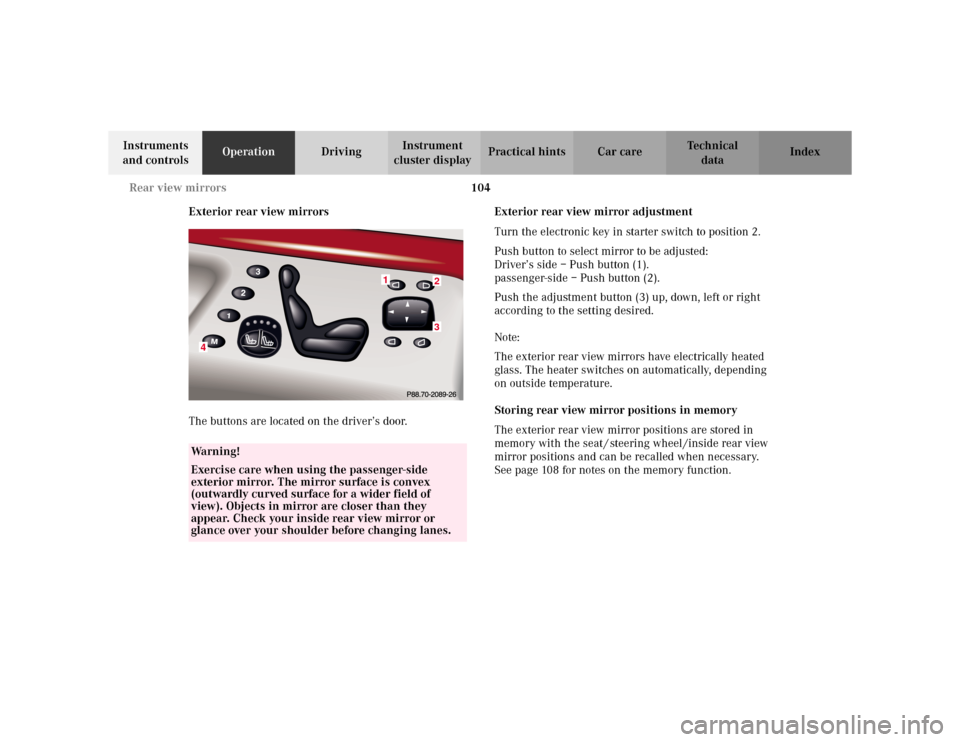
The buttons are located on the driver’s door.Exterior rear view mirror adjustment
Turn the electronic key in starter switch to position 2.
Push button to select mirror to be adjusted:
Driver’s side – Push button (1).
passenger-side – Push button (2).
Push the adjustment button (3) up, down, left or right
according to the setting desired.
Note:
The exterior rear view mirrors have electrically heated
glass. The heater switches on automatically, depending
on outside temperature.
Storing rear view mirror positions in memory
The exterior rear view mirror positions are stored in
memory with the seat / steering wheel /inside rear view
mirror positions and can be recalled when necessary.
See page 108 for notes on the memory function.
Wa r n i n g !
Exercise care when using the passenger-side
exterior mirror. The mirror surface is convex
(outwardly curved surface for a wider field of
view). Objects in mirror are closer than they
appear. Check your inside rear view mirror or
glance over your shoulder before changing lanes.
23
4
1