Page 344 of 430
341 Engine compartment
Te ch n i c a l
data Instruments
and controlsOperation DrivingInstrument
cluster displayPractical hintsCar care Index Pull handle (2) to its stop out of radiator grill and open
hood (do not pull up on the handle).
Note:
To avoid damage to the windshield wipers or hood, open
the hood only with the wipers in the parked position. To c l o s e :
Lower the hood and let it drop into lock from a height of
approximately 1 ft. (30 cm), assisting with hands placed
flat on edges of hood (3).
To avoid hood damage, please make sure that hood is
fully closed. If not, repeat closing procedure. Do not
push down on hood to attempt to fully close it.
P88.40-0391-26
2
P88.40-0390-26
3
3
Page 347 of 430

344 Engine compartment
Te ch n i c a l
data Instruments
and controlsOperation DrivingInstrument
cluster displayPractical hintsCar care Index
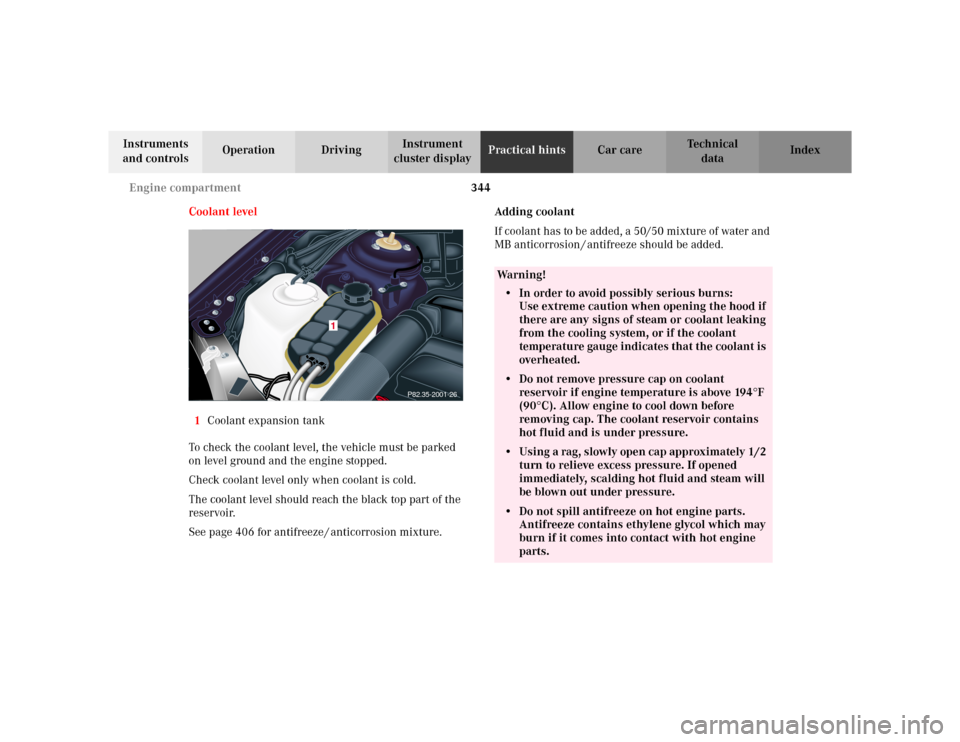
Coolant level
1Coolant expansion tank
To check the coolant level, the vehicle must be parked
on level ground and the engine stopped.
Check coolant level only when coolant is cold.
The coolant level should reach the black top part of the
reservoir.
See page 406 for antifreeze / anticorrosion mixture.Adding coolant
If coolant has to be added, a 50/50 mixture of water and
MB anticorrosion / antifreeze should be added.
P82.35-2001-26
1
Wa r n i n g !
• In order to avoid possibly serious burns:
Use extreme caution when opening the hood if
there are any signs of steam or coolant leaking
from the cooling system, or if the coolant
temperature gauge indicates that the coolant is
overheated.• Do not remove pressure cap on coolant
reservoir if engine temperature is above 194
°F
(90
°C). Allow engine to cool down before
removing cap. The coolant reservoir contains
hot fluid and is under pressure.
• Using a rag, slowly open cap approximately 1/2
turn to relieve excess pressure. If opened
immediately, scalding hot fluid and steam will
be blown out under pressure.• Do not spill antifreeze on hot engine parts.
Antifreeze contains ethylene glycol which may
burn if it comes into contact with hot engine
parts.
Page 363 of 430

360 Jump starting
Te ch n i c a l
data Instruments
and controlsOperation DrivingInstrument
cluster displayPractical hintsCar care Index
Proceed as follows:
1. Position the vehicle with the charged battery so that
the jumper cables will reach, but never let the
vehicles touch. Make sure the jumper cables do not
have loose or missing insulation.
2. On both vehicles:
•Turn off engine and all lights and accessories,
except hazard warning flashers or work lights.
•Apply parking brake and shift selector lever to
position “P”.
Important!
3. Clamp one end of the first jumper cable to the
positive (+) terminal of the discharged battery and
the other end to the positive (+) terminal of the
charged battery. Make sure the cable clamps do not
touch any other metal parts.
4. Clamp one end of the second jumper cable to the
grounded negative (–) terminal of the charged
battery and the final connection to the negative (–)
under hood terminal of the disabled vehicle.Important!
5. Start engine of the vehicle with the charged battery
and run at high idle. Make sure the cables are not
on or near pulleys, fans, or other parts that move
when the engine is started. Allow the discharged
battery to charge for a few minutes. Start engine of
the disabled vehicle in the usual manner.
6. After the engine has started, remove jumper cables
by exactly reversing the above installation
sequence, starting with the last connection made
first. When removing each clamp, make sure that it
does not touch any other metal while the other end
is still attached.
Note:
If engine does not run after several unsuccessful
starting attempts, have it checked at the nearest
authorized Mercedes-Benz Center.
Excessive unburned fuel may damage the catalytic
converter.
Page 369 of 430

366 Exterior lamps
Te ch n i c a l
data Instruments
and controlsOperation DrivingInstrument
cluster displayPractical hintsCar care Index
Bulbs for high and low beam
H7 (55 W)
Open hood.
Press the clip together (arrow) and remove headlamp
cover (1 or 2).
Pull electrical connector off.
Unclip the retainer spring and take out the bulb.
Insert the new bulb so that the base locates in the
recess on the holder.
Clip in retainer springs and plug the connector onto the
bulb.
Align headlamp cover (1 or 2) and click into place.
Xenon (optional)
Bulb for low beamTurn signal lamp
(2357 NA [28.5 / 8.3 W] (Yellow))
Open hood.
Press the clip together (arrow) and remove headlamp
cover (2).
Twist bulb socket (7) counterclockwise and pull out.
Push bulb into socket, turn counterclockwise and
remove.
Insert new bulb in socket, push in and twist clockwise.
Reinstall bulb socket.
Align headlamp cover (2) and click into place.
Wa r n i n g !
Because of high voltage in Xenon lamps, it is
dangerous to replace the bulb or repair the lamp
and its components. We recommend that you have
such work done by a qualified technician.
Page 370 of 430
367 Exterior lamps
Te ch n i c a l
data Instruments
and controlsOperation DrivingInstrument
cluster displayPractical hintsCar care Index Front fog lamp
H1 (55W)
Open hood.
Press the clip together (arrow) and remove headlamp
cover (1).
Pull electrical connector off.
Unclip the retainer spring and take out the bulb.
Insert the new bulb so that the base locates in the
recess on the holder.
Clip in retainer spring and plug the connector onto the
bulb.
Align headlamp cover (1) and click into place.Parking and standing lamp
W 5W
Open hood.
Press the clip together (arrow) and remove headlamp
cover (1).
Twist bulb socket (4) counterclockwise and pull out.
Push bulb into socket, turn counterclockwise and
remove.
Insert new bulb in socket, push in and twist clockwise.
Reinstall bulb socket.
Align headlamp cover (1) and click into place.
Page 381 of 430
378 Replacing wiper blades
Te ch n i c a l
data Instruments
and controlsOperation DrivingInstrument
cluster displayPractical hintsCar care Index
Replacing wiper blades
To prevent damage to the hood or the wipers, the wiper
arms should only be folded forward while in the position
shown above.•Turn electronic key in starter switch to position 1.
•Turn combination switch to position I, see page 162.
•With wiper arms in position shown above, turn
electronic key in starter switch to position 0.
For safety reasons, remove electronic key from
starter switch before replacing a wiper blade,
otherwise the motor can suddenly turn on and cause
injury.
Notes:
Do not open engine hood with wiper arms folded
forward.
Do not allow the wiper arms to contact the windshield
glass without a wiper blade inserted. The glass may be
scratched or broken.
Make certain that the wiper blades are properly
installed. An improperly installed wiper blade may
cause windshield damage.
Page 387 of 430

384 Cleaning and care of the vehicle
Te ch n i c a l
data Instruments
and controlsOperation DrivingInstrument
cluster displayPractical hintsCar careIndex
Ta r sta in s
Quickly remove tar stains before they dry and become
more difficult to remove. A tar remover is
recommended.
Paintwork, painted body components
Mercedes-Benz approved Paint Care should be applied
when water drops on the paint surface do not “bead up”,
normally in 3 to 5 months, depending on climate and
washing detergent used.
Mercedes-Benz approved Paint Cleaner should be
applied if paint surface shows signs of dirt embedding
(i.e. loss of gloss).
Do not apply any of these products or wax if your
vehicle is parked in the sun or if the hood is still hot.
Use the appropriate MB-Touch-Up Stick for quick and
provisional repairs of minor paint damage (i.e. chips
from stones, vehicle doors etc.).Engine cleaning
Prior to cleaning the engine compartment make sure to
protect electrical components and connectors from the
intrusion of water and cleaning agents.
Corrosion protection, such as MB Anticorrosion Wax
should be applied to the engine compartment after
every engine cleaning. Before applying, all control
linkage bushings and joints should be lubricated. The
poly-V-belt and all pulleys should be protected from any
wax.
Ve h i c l e w a s h i n g
Do not use hot water or wash your vehicle in direct
sunlight. Use only a mild car wash detergent, such as
Mercedes-Benz approved Car Shampoo.
Thoroughly spray the vehicle with a diffused jet of
water. Direct only a very weak spray towards the
ventilation intake. Use plenty of water and rinse the
sponge and chamois frequently.
Rinse with clear water and thoroughly wipe dry with a
chamois. Do not allow cleaning agents to dry on the
finish.
Page 390 of 430
387 Cleaning and care of the vehicle
Te ch n i c a l
data Instruments
and controlsOperation DrivingInstrument
cluster displayPractical hintsCar careIndex Wiper bladesTo prevent damage to the hood or the wipers, the wiper
arms should only be folded forward while in the position
shown above.
•Turn electronic key in starter switch to position 1.
•Turn combination switch to position I, see page 163.
•Once the wiper arms are in the position shown
above, turn electronic key in starter switch to
position 0.
Note:
For safety reasons, remove electronic key from
starter switch before cleaning the wiper blades,
otherwise the wiper motor can suddenly turn on and
cause injury.
•Turn combination switch to position 0, see page 163.
Clean the wiper blade inserts with a clean cloth and
detergent solution.