2002 MERCEDES-BENZ S500 parking lock
[x] Cancel search: parking lockPage 218 of 430

215 Contents – Driving
Te ch n i c a l
data Instruments
and controlsOperationDrivingInstrument
cluster displayPractical hints Car care Index
DrivingControl and operation of
radio transmitters ..................... 216
The first 1 000 miles
(1 500 km) ................................. 217
Maintenance ................................... 217
Tele Aid ........................................... 218
Catalytic converter ........................228
Emission control ............................229
Starter switch .................................230
Starter switch –
KEYLESS-GO ..............................232
Starting and turning off
the engine ..................................235
Automatic transmission ...............237
Parking brake .................................246
Driving instructions ......................247
Drive sensibly –
Save Fuel .....................................247
Drinking and driving .................247Pedals .......................................... 247
Power assistance ........................ 248
Brakes .......................................... 248
Driving off ................................... 249
Parking ........................................ 250
Tires ............................................. 251
Snow chains ............................... 253
Winter driving instructions ..... 254
Block heater ................................ 255
Deep water .................................. 256
Passenger compartment ........... 256
Traveling abroad ........................ 257
Cruise control ................................ 258
Distronic (DTR) .............................. 261
Brake assist system
(BAS) .......................................... 277
Antilock brake system
(ABS) .......................................... 278
Electronic stability program
(ESP) ........................................... 280Active body control
(ABC) ..........................................284
Level control system for vehicles
with Airmatic system ...............285
Level control system for vehicles
with Active Body Control
(ABC) ..........................................286
Adaptive damping system
(ADS) ...........................................289
Parking assist (Parktronic) .......... 291
What you should know
at the gas station .......................296
Check regularly and
before a long trip ......................299
Page 238 of 430

235 Starting and turning off the engine
Te ch n i c a l
data Instruments
and controlsOperationDrivingInstrument
cluster displayPractical hints Car care Index Starting and turning off the engine
Before starting
Ensure that parking brake is engaged and that selector
lever is in position “P” or “N”.
Important!
In areas where temperatures frequently drop below -4
°F
(-20
°C) we recommend that an engine block heater be
installed. Your authorized Mercedes-Benz Center will
advise you on this subject, see page 255.
Starting with the electronic key
Do not depress accelerator.
Turn electronic key in starter switch to position 2.
Briefly turn electronic key in starter switch clockwise to
the stop and release. The starter will engage until the
engine is running.
If engine will not run, and the starting procedure stops,
turn electronic key completely to the left and repeat
starting the engine.After several unsuccessful attempts, have the system
checked at the nearest authorized Mercedes-Benz
Center.
Important!
Due to the installed starter non-repeat feature, the
electronic key must be turned completely to the left
before attempting to start the engine again.
Note:
Too many unsuccessful starting attempts may discharge
the battery.
Turning off with the electronic key
Put the selector lever in position “P” and turn the
electronic key in the starter switch to position 0 to stop
the engine.
The electronic key can only be removed with the
selector lever in position “P”.
Page 242 of 430
239 Automatic transmission
Te ch n i c a l
data Instruments
and controlsOperationDrivingInstrument
cluster displayPractical hints Car care Index Stopping
For brief stops, e.g. at traffic lights, leave the
transmission in gear and hold vehicle with the service
brake.
For longer stops with the engine idling, shift into “N”
or “P” and hold the vehicle with the service brake.
When stopping the vehicle on an uphill gradient, do not
hold it with the accelerator, use the brake. This avoids
unnecessary transmission heat build up.
Maneuvering
To maneuver in tight areas, e.g. when pulling into a
parking space, control the vehicle speed by gradually
releasing the brakes. Accelerate gently and never
abruptly step on the accelerator.
To rock a vehicle out of soft ground (mud or snow),
alternately shift from forward to reverse, while applying
slight partial throttle.Rocking a vehicle free in this manner may cause the
ABS or traction system malfunction indicator lamp to
come on. Turn off and restart the engine to clear the
malfunction indication.
Wa r n i n g !
Getting out of your vehicle with the selector lever
not fully engaged in position “P” is dangerous.
Also, when parked on an incline, position “P” alone
may not prevent your vehicle from moving,
possibly hitting people or objects.Always set the parking brake in addition to shifting
to position “P”, see page 246 for parking brake. When parked on an incline, also turn front wheel
against curb.Wa r n i n g !
When leaving the vehicle always remove the
electronic key from the starter switch, take the
KEYLESS-GO-card (if so equipped) with you and
lock the vehicle. Do not leave children unattended
in the vehicle, or with access to an unlocked
vehicle. Children could move the gear selector lever
from position “P”, which could result in an
accident or serious injury.
Page 243 of 430

240 Automatic transmission
Te ch n i c a l
data Instruments
and controlsOperationDrivingInstrument
cluster displayPractical hints Car care Index
Selector lever position
The current selector lever position is indicated in the
gear range indicator display. The automatic gear
shifting process can be adapted to specific operating
conditions using the selector lever.Park position
The park position is to be used when parking the
vehicle. Engage only with the vehicle stopped.
The park position is not intended to serve as a
brake when the vehicle is parked. Rather, the
driver should always use the parking brake in
addition to placing the selector lever in park to
secure the vehicle.
Note:
The electronic key can only be removed from the
starter switch with the selector lever in
position “P”. With the electronic key removed, the
selector lever is locked in position “P”.
Reverse gear
Shift to reverse gear only with the vehicle
stopped.
Dependent on the program mode selector switch
position “S” or “W” the maximum speed in the
reverse gear is different. However, it is not
possible to change the program mode while in
reverse.
Page 249 of 430
246 Parking brake
Te ch n i c a l
data Instruments
and controlsOperationDrivingInstrument
cluster displayPractical hints Car care Index
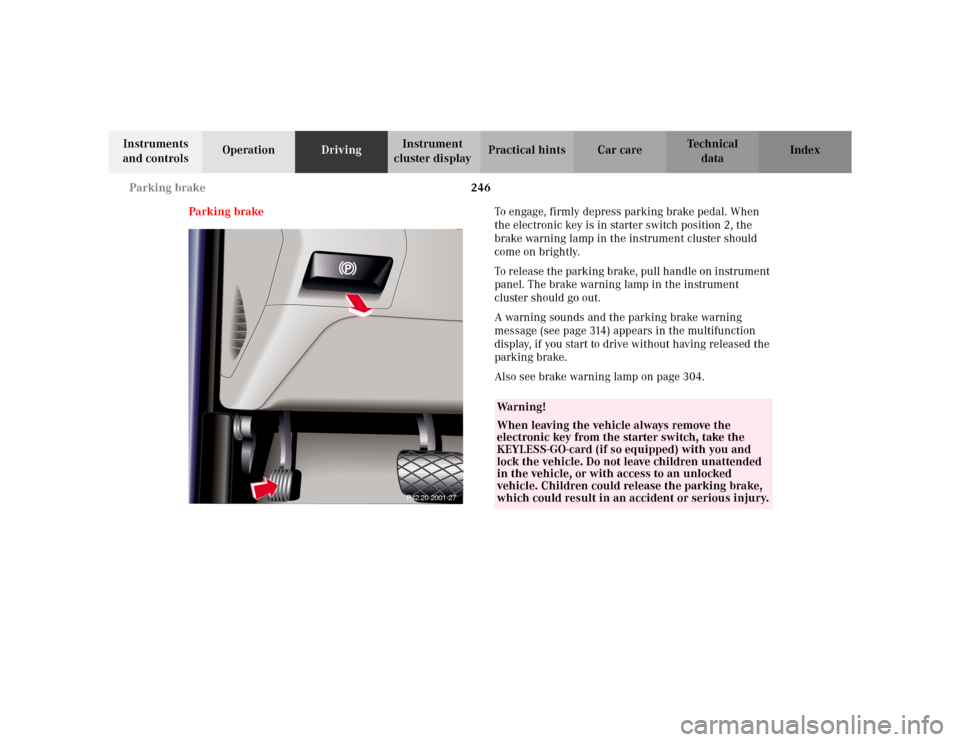
Parking brakeTo engage, firmly depress parking brake pedal. When
the electronic key is in starter switch position 2, the
brake warning lamp in the instrument cluster should
come on brightly.
To release the parking brake, pull handle on instrument
panel. The brake warning lamp in the instrument
cluster should go out.
A warning sounds and the parking brake warning
message (see page 314) appears in the multifunction
display, if you start to drive without having released the
parking brake.
Also see brake warning lamp on page 304.
P42.20-2001-27
Wa r n i n g !
When leaving the vehicle always remove the
electronic key from the starter switch, take the
KEYLESS-GO-card (if so equipped) with you and
lock the vehicle. Do not leave children unattended
in the vehicle, or with access to an unlocked
vehicle. Children could release the parking brake,
which could result in an accident or serious injury.
Page 253 of 430
250 Driving instructions
Te ch n i c a l
data Instruments
and controlsOperationDrivingInstrument
cluster displayPractical hints Car care Index
Parking Important!
It is advisable to set the parking brake whenever
parking or leaving the vehicle. In addition, move
selector lever to position “P”.
When parking on hills, always set the parking brake.
Wa r n i n g !
To reduce the risk of personal injury as a result of
vehicle movement, before
turning off the engine
and leaving the vehicle, always:
1. Keep right foot on service brake pedal.
2. Firmly depress parking brake pedal.
3. Move the selector lever to position “P”.
4. Slowly release service brake pedal.
5. Turn front wheels towards the road curb.
6. Turn the electronic key to starter switch
position 0 and remove, or press start- / stop
button (vehicles with KEYLESS-GO).
7. Take the electronic key and the KEYLESS-GO-
card (vehicles with KEYLESS-GO) and lock
vehicle when leaving.
Page 350 of 430
347 Vehicle jack
Te ch n i c a l
data Instruments
and controlsOperation DrivingInstrument
cluster displayPractical hintsCar care Index Ve h i c l e j a c k
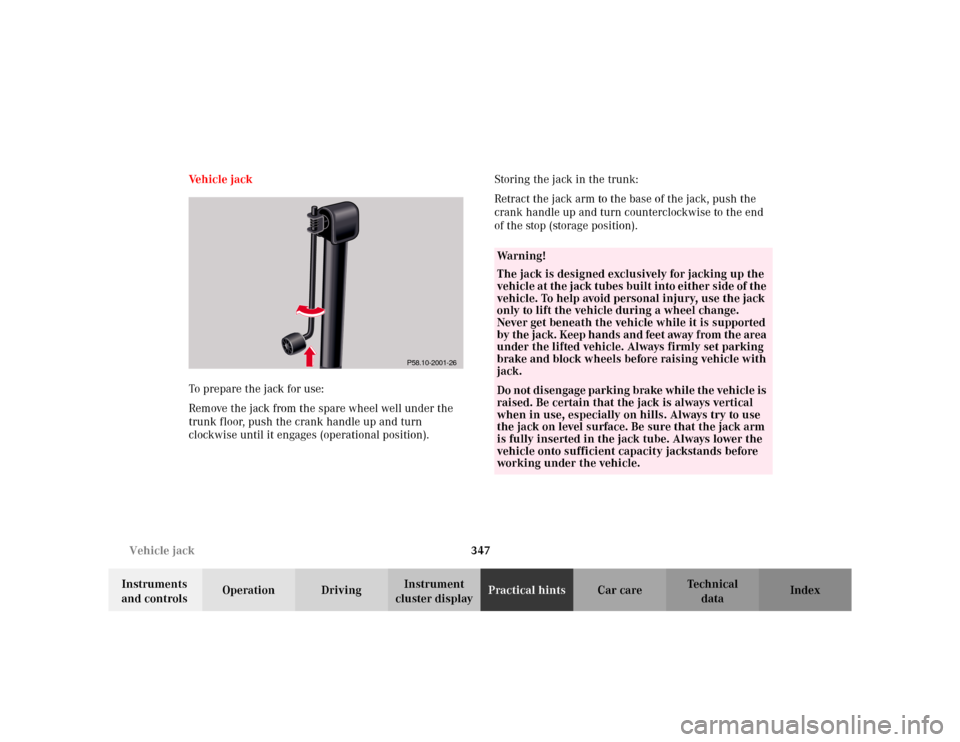
To prepare the jack for use:
Remove the jack from the spare wheel well under the
trunk floor, push the crank handle up and turn
clockwise until it engages (operational position).Storing the jack in the trunk:
Retract the jack arm to the base of the jack, push the
crank handle up and turn counterclockwise to the end
of the stop (storage position).
P58.10-2001-26
Wa r n i n g !
The jack is designed exclusively for jacking up the
vehicle at the jack tubes built into either side of the
vehicle. To help avoid personal injury, use the jack
only to lift the vehicle during a wheel change.
Never get beneath the vehicle while it is supported
by the jack. Keep hands and feet away from the area
under the lifted vehicle. Always firmly set parking
brake and block wheels before raising vehicle with
jack.Do not disengage parking brake while the vehicle is
raised. Be certain that the jack is always vertical
when in use, especially on hills. Always try to use
the jack on level surface. Be sure that the jack arm
is fully inserted in the jack tube. Always lower the
vehicle onto sufficient capacity jackstands before
working under the vehicle.
Page 354 of 430
351 Tires, Wheels
Te ch n i c a l
data Instruments
and controlsOperation DrivingInstrument
cluster displayPractical hintsCar care Index Changing wheelsMove vehicle to a level area which is a safe distance
from the roadway.
1. Set parking brake and turn on hazard warning
flasher.
2. Move selector lever to position “P” and turn off
engine.
3. Prevent vehicle from rolling away by blocking
wheels with wheel chocks (not supplied with
vehicle) or sizable wood block or stone. When
changing a wheel on a hill, place chocks on the
downhill side blocking both wheels of the other
axle. On an level road, place one chock in front of
and one behind the wheel that is diagonally
opposite to the wheel being changed.
Wa r n i n g !
The jack is designed exclusively for jacking up the
vehicle at the jack tubes built into either side of the
vehicle. To help avoid personal injury, use the jack
only to lift the vehicle during a wheel change.
Never get beneath the vehicle while it is supported
by the jack. Keep hands and feet away from the area
under the lifted vehicle. Always firmly set parking
brake and block wheels before raising vehicle with
jack.Do not disengage parking brake while the vehicle is
raised. Be certain that the jack is always vertical
when in use, especially on hills. Always try to use
the jack on level surface. Be sure that the jack arm
is fully inserted in the jack tube. Always lower the
vehicle onto sufficient capacity jackstands before
working under the vehicle.