2002 MERCEDES-BENZ S500 Starting
[x] Cancel search: StartingPage 238 of 430
235 Starting and turning off the engine
Te ch n i c a l
data Instruments
and controlsOperationDrivingInstrument
cluster displayPractical hints Car care Index Starting and turning off the engine
Before starting
Ensure that parking brake is engaged and that selector
lever is in position “P” or “N”.
Important!
In areas where temperatures frequently drop below -4
°F
(-20
°C) we recommend that an engine block heater be
installed. Your authorized Mercedes-Benz Center will
advise you on this subject, see page 255.
Starting with the electronic key
Do not depress accelerator.
Turn electronic key in starter switch to position 2.
Briefly turn electronic key in starter switch clockwise to
the stop and release. The starter will engage until the
engine is running.
If engine will not run, and the starting procedure stops,
turn electronic key completely to the left and repeat
starting the engine.After several unsuccessful attempts, have the system
checked at the nearest authorized Mercedes-Benz
Center.
Important!
Due to the installed starter non-repeat feature, the
electronic key must be turned completely to the left
before attempting to start the engine again.
Note:
Too many unsuccessful starting attempts may discharge
the battery.
Turning off with the electronic key
Put the selector lever in position “P” and turn the
electronic key in the starter switch to position 0 to stop
the engine.
The electronic key can only be removed with the
selector lever in position “P”.
Page 239 of 430
236 Starting and turning off the engine
Te ch n i c a l
data Instruments
and controlsOperationDrivingInstrument
cluster displayPractical hints Car care Index
Starting with KEYLESS-GO
Note:
For improved recognition of the chip card the doors
should be closed when pressing the start-/stop button.
Depress brake pedal during the starting procedure.
Do not depress accelerator.
Briefly press start-/stop button on gear selector lever.
The starter will engage until the engine is running.
If engine will not run, and the starting procedure stops,
press start-/stop button on gear selector lever and repeat
starting the engine.
After several unsuccessful attempts, have the system
checked at the nearest authorized Mercedes-Benz
Center.Turning off with KEYLESS-GO
Stop the vehicle and put the selector lever in
position “P”.
Press start-/stop button on the selector lever until the
engine stops. With the driver’s door closed the starter
switch is set to the “On” position (starter switch
position 1). With the driver’s door opened the starter
switch is set to the “Off” position (starter switch
position 0, same as electronic key removed from starter
switch).
Note:
The engine can only be turned off with selector lever in
position “P”. If attempting to turn off the engine while
the selector lever is in any other position than “P” a
signal sounds and the message “SELECTOR LEVER
TO P” appears in the multifunction display as a
reminder to move the selector to position “P”.
Page 252 of 430
249 Driving instructions
Te ch n i c a l
data Instruments
and controlsOperationDrivingInstrument
cluster displayPractical hints Car care Index If the parking brake is released and the brake warning
lamp in the instrument cluster stays on, the brake fluid
level in the reservoir is too low.
Brake pad wear or a leak in the system may be the
reason for low brake fluid in the reservoir.
Have the brake system inspected at an authorized
Mercedes-Benz Center immediately.
All checks and service work on the brake system should
be carried out by an authorized Mercedes-Benz Center.
Install only brake pads and brake fluid recommended by
Mercedes-Benz.Caution!
When driving down long and steep grades, relieve the
load on the brakes by shifting into a lower gear to use
the engine’s braking power. This helps prevent
overheating of the brakes and reduces brake pad wear.
After hard braking, it is advisable to drive on for some
time, rather than immediately parking, so the air stream
will cool down the brakes faster.
Driving off
Apply the service brakes to test them briefly after
driving off. Perform this procedure only when the road
is clear of other traffic.
Warm up the engine smoothly. Do not place full load on
the engine until the operating temperature has been
reached.
When starting off on a slippery surface, do not allow one
drive wheel to spin for an extended period with the ESP
switched off. Doing so may cause serious damage to the
drive train which is not covered by the Mercedes-Benz
Limited Warranty.
Wa r n i n g !
If other than recommended brake pads are
installed, or other than recommended brake fluid
is used, the braking properties of the vehicle can be
degraded to an extent that safe braking is
substantially impaired. This could result in an
accident.
Page 272 of 430
269 Driving systems
Te ch n i c a l
data Instruments
and controlsOperationDrivingInstrument
cluster displayPractical hints Car care Index Additional driving hints
Important!
When starting the engine, Distronic goes through an
initialization and self-test phase – this can take up to
2minutes.
The most likely cause for a malfunctioning system is a
dirty sensor (located behind the hood grille), especially
at times of snow and ice or heavy rain. In such a case,
Distronic will switch off, and the message
“DISTRONIC – CLEAN SENSOR!” appears in the
multifunction display.
For cleaning and care of the Distronic sensor, see
page 386.
Restart the engine after cleaning the sensor.
The following are some sample situations which may
influence the functions of Distronic.
Wa r n i n g !
Distronic works to maintain the speed selected by
the driver unless a moving obstacle proceeding
directly ahead of it in the same travel direction is
detected (e.g. following another vehicle ahead at a
distance set by Distronic). This means that:• your vehicle can pass another vehicle after you
change lanes,• while in a sharp turn or if the vehicle in front
is in a sharp turn, Distronic could lose sight of
a vehicle traveling in front of it, then your
vehicle could accelerate to the previously
selected speed.Distronic regulates only the distance between your
vehicle and those directly ahead, but does not
register stationary objects in the roadway, e.g.:
• a stopped vehicle in a traffic jam,
• a disabled vehicle,
• an oncoming vehicle.
The driver must always be on the alert and observe
all traffic and intercede with steering and braking
inputs as necessary.Wa r n i n g !
Distronic should not be used in snowy or icy road
conditions.
Page 294 of 430

291 Parking system
Te ch n i c a l
data Instruments
and controlsOperationDrivingInstrument
cluster displayPractical hints Car care Index Parking assist (Parktronic)
(optional, standard on model S 600)
The Parktronic system assists the driver during parking
maneuvers. It visually and audibly indicates the relative
distance between the vehicle and an obstacle.
The front area of the vehicle is monitored when driving
forward. When reversing or with the gear selector lever
in position “N”, the front as well as the rear areas are
monitored.
With the electronic key in starter switch position 2,
Parktronic engages automatically at speeds up to
approximately 10 mph (15 km / h) and deactivates
during higher speeds.
Parktronic can be switched off by a control switch
located in the center console. It engages automatically
again when starting the engine.
See page 295 for Parktronic switch.
Wa r n i n g !
Parktronic is a supplemental system. It is not
intended to nor does it replace the need for extreme
care. The responsibility during parking and other
critical maneuvers rests always with the driver.Special attention must be paid to objects having
smooth surfaces or low silhouettes (e.g. trailer
couplings, painted posts, or street curbs). Such
objects may not be detected by the system and can
damage the vehicle.The operational function of the Parktronic can be
affected by dirty sensors, especially at times of
snow and ice. See page 386 for notes on cleaning
the parktronic system sensors.Interference caused by other ultrasonic signals
(e.g. working jackhammers or the air brakes of
trucks) can cause the system to send erratic
indications, and should be taken into
consideration.
Page 308 of 430
305 Malfunction and indicator lamps
Te ch n i c a l
data Instruments
and controlsOperation DrivingInstrument
cluster displayPractical hints Car care Index Supplemental restraint system (SRS) indicator lamp
The operational readiness of the airbag
system is verified by the indicator lamp
“SRS” in the instrument cluster when
turning the electronic key in starter switch to position 1
or 2. If no fault is detected, the lamp will go out after
approximately 4 seconds; after the lamp goes out, the
system continues to monitor the components and
circuitry of the airbag system and will indicate a
malfunction by coming on again.
See page 91 for notes on airbags, see page 89 for belt
tensioners and page 81 for infant and child seat
restraint.Fuel reserve warning
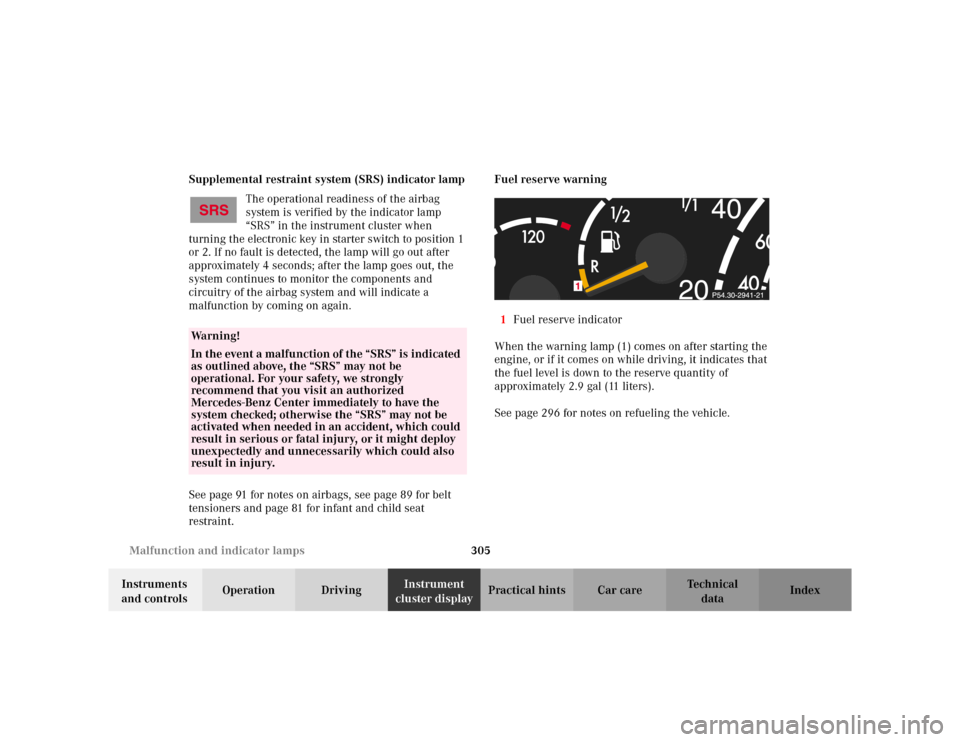
1Fuel reserve indicator
When the warning lamp (1) comes on after starting the
engine, or if it comes on while driving, it indicates that
the fuel level is down to the reserve quantity of
approximately 2.9 gal (11 liters).
See page 296 for notes on refueling the vehicle.
Wa r n i n g !
In the event a malfunction of the “SRS” is indicated
as outlined above, the “SRS” may not be
operational. For your safety, we strongly
recommend that you visit an authorized
Mercedes-Benz Center immediately to have the
system checked; otherwise the “SRS” may not be
activated when needed in an accident, which could
result in serious or fatal injury, or it might deploy
unexpectedly and unnecessarily which could also
result in injury.
Page 311 of 430
308 Malfunction and indicator lamps
Te ch n i c a l
data Instruments
and controlsOperation DrivingInstrument
cluster displayPractical hints Car care Index
Seat belt nonusage warning lamp
With the electronic key in starter switch
position 2, the seat belt nonusage warning
lamp comes on, and a warning sounds for a
short time if the driver’s seat belt is not fastened.
After starting the engine, the seat belt nonusage
warning lamp blinks for a brief period to remind the
driver and passengers to fasten seat belts.
Malfunction and indicator lamp in the center
console
AIRBAG OFF indicator lamp
The 7 indicator lamp will light up for approximately
6 seconds when you turn the electronic key in starter
switch to position 1 or 2.
It does not light up if there is a fault in the system.
The 7 indicator lamp stays lit as long as a
BabySmart
TM child seat is properly installed on the front
passenger seat. It indicates that the front passenger
airbag is switched off.
See page 88 for BabySmart
TM airbag and its deactivation
system.
Baby Smart
TM is a trademark of Siemens Automotive Corp.
Wa r n i n g !
The BabySmart
TM airbag deactivation system will
ONLY work with a special child seat designed to
operate with it. It will not work with child seats
which are not BabySmart
TM compatible.
Never place anything between seat cushion and
child seat (e.g. pillow), since it reduces the
effectiveness of the deactivation system.Follow the manufacturer’s instructions for
installation of special child seats.The passenger front airbag will not deploy only if
the 7 indicator lamp remains illuminated.Please be sure to check the indicator every time
you use the special system child seat. Should the
light go out while the restraint is installed, please
check installation. If the light remains out, do not
use the BabySmart
TM restraint to transport children
on the front passenger seat until the system has
been repaired.
Page 326 of 430
323 Malfunction and warning messages
Te ch n i c a l
data Instruments
and controlsOperation DrivingInstrument
cluster displayPractical hints Car care Index
1 One or more tires is or has deflated rapidly. Carefully bring the
vehicle to a halt, avoiding abrupt steering and braking maneuvers.
For reference on changing wheels, see page 348.
2 The tire pressure on one or more tires is already below minimum
value. Carefully bring the vehicle to a halt, avoiding abrupt
steering and braking maneuvers. For reference on changing
wheels, see page 351.
3 For tire inflation pressure monitor, see page 152.4 Tire pressure in one or more tires is low. Check and correct tire
pressure according to the label affixed inside the fuel filler flap.
For tire inflation pressure, see page 356.
The tire inf lation pressure monitor must be activated again after
the tire inflation pressure has been corrected, see page 152.
5 When the message appears after starting the engine, the tire
inflation pressure on all road wheels should be checked and
corrected according to the label affixed inside the fuel filler flap.
For tire inflation pressure, see page 356.
The tire inf lation pressure monitor must be activated again after
the tire inflation pressure has been corrected, see page 152.
6 The tire inflation pressure monitor system is unable to monitor the
tire pressure due to the presence of several wheel electronics in
the vehicle (e.g. a deflated road wheel in the trunk), or nearby
radio interference source, or excessive wheel sensor temperatures,
or unrecognized wheel sensors mounted.
7 The tire inflation pressure monitor is defective or a wheel without
proper sensor was installed. Visit your authorized Mercedes-Benz
Center.Wa r n i n g !
Do not drive with a flat tire. A flat tire affects the
ability to steer or brake the vehicle. You may lose
control of the vehicle. Continued driving with a flat
tire will cause excessive heat build-up and possibly
a fire.