Page 241 of 430

238 Automatic transmission
Te ch n i c a l
data Instruments
and controlsOperationDrivingInstrument
cluster displayPractical hints Car care Index
Driving
The selector lever is automatically locked while in
position “P”. To move the selector lever out of
position “P”, the service brake pedal must be firmly
depressed before the shift lock will release.
Shift selector lever to the desired position only when the
engine is idling normally and the service brake is
applied. Do not release the brake until ready to drive.
The vehicle may otherwise start creeping when the
selector lever is in drive or reverse position.Important!
After selecting any driving position from “N” or “P”,
wait a moment to allow the gear to fully engage before
accelerating, especially when the engine is cold.
Accelerator position
Partial throttle = early upshifting = normal acceleration
Full throttle = later upshifting = rapid acceleration
Kickdown (depressing the accelerator beyond full
throttle) = downshifting to a lower gear = maximum
acceleration. Once the desired speed is attained, ease up
on the accelerator — the transmission shifts up again.
Wa r n i n g !
It is dangerous to shift the selector lever out of “P”
or “N” if the engine speed is higher than idle speed.
If your foot is not firmly on the brake pedal, the
vehicle could accelerate quickly forward or in
reverse. You could lose control of the vehicle and
hit someone or something. Only shift into gear
when the engine is idling normally and when your
right foot is firmly on the brake pedal.
Page 242 of 430

239 Automatic transmission
Te ch n i c a l
data Instruments
and controlsOperationDrivingInstrument
cluster displayPractical hints Car care Index Stopping
For brief stops, e.g. at traffic lights, leave the
transmission in gear and hold vehicle with the service
brake.
For longer stops with the engine idling, shift into “N”
or “P” and hold the vehicle with the service brake.
When stopping the vehicle on an uphill gradient, do not
hold it with the accelerator, use the brake. This avoids
unnecessary transmission heat build up.
Maneuvering
To maneuver in tight areas, e.g. when pulling into a
parking space, control the vehicle speed by gradually
releasing the brakes. Accelerate gently and never
abruptly step on the accelerator.
To rock a vehicle out of soft ground (mud or snow),
alternately shift from forward to reverse, while applying
slight partial throttle.Rocking a vehicle free in this manner may cause the
ABS or traction system malfunction indicator lamp to
come on. Turn off and restart the engine to clear the
malfunction indication.
Wa r n i n g !
Getting out of your vehicle with the selector lever
not fully engaged in position “P” is dangerous.
Also, when parked on an incline, position “P” alone
may not prevent your vehicle from moving,
possibly hitting people or objects.Always set the parking brake in addition to shifting
to position “P”, see page 246 for parking brake. When parked on an incline, also turn front wheel
against curb.Wa r n i n g !
When leaving the vehicle always remove the
electronic key from the starter switch, take the
KEYLESS-GO-card (if so equipped) with you and
lock the vehicle. Do not leave children unattended
in the vehicle, or with access to an unlocked
vehicle. Children could move the gear selector lever
from position “P”, which could result in an
accident or serious injury.
Page 243 of 430

240 Automatic transmission
Te ch n i c a l
data Instruments
and controlsOperationDrivingInstrument
cluster displayPractical hints Car care Index
Selector lever position
The current selector lever position is indicated in the
gear range indicator display. The automatic gear
shifting process can be adapted to specific operating
conditions using the selector lever.Park position
The park position is to be used when parking the
vehicle. Engage only with the vehicle stopped.
The park position is not intended to serve as a
brake when the vehicle is parked. Rather, the
driver should always use the parking brake in
addition to placing the selector lever in park to
secure the vehicle.
Note:
The electronic key can only be removed from the
starter switch with the selector lever in
position “P”. With the electronic key removed, the
selector lever is locked in position “P”.
Reverse gear
Shift to reverse gear only with the vehicle
stopped.
Dependent on the program mode selector switch
position “S” or “W” the maximum speed in the
reverse gear is different. However, it is not
possible to change the program mode while in
reverse.
Page 248 of 430

245 Automatic transmission
Te ch n i c a l
data Instruments
and controlsOperationDrivingInstrument
cluster displayPractical hints Car care Index WWinter / Wet (snow and ice) mode
Press switch on symbol “W”. The vehicle starts
out in 2nd gear, except with selector lever in 1st
gear, or with accelerator pedal in kick-down
position.
The “W” mode helps to improve traction and
driving stability of the vehicle.
The gear shifting process occurs at lower vehicle
and engine speeds than in the “S” program mode.
Caution!
Never change the program mode when the selector lever
is out of position “P”. It could result in a change of
driving characteristics for which you may not be
prepared.
Important!
Always be certain of the program mode selected since
the vehicle driving characteristics change with the
selection of the program mode.
Dependent on the program mode selector switch
position “S” or “W” and the gear selector lever in
position “R”, the ratio of power transmission changes.Emergency operation
(Limp home mode)
If vehicle acceleration worsens or the transmission no
longer shifts, the transmission is most likely operating
in Limp Home Mode which engages when there is a
malfunction of the transmission. This condition may be
accompanied by the “CHECK ENGINE” malfunction
indicator lamp in the instrument cluster coming on.
In this mode only the 2nd gear or reverse gear can be
activated.
To engage 2nd gear or reverse:
1. S to p t h e ve h i c l e .
2. Move selector lever to position “P”.
3. Turn off the engine.
4. Wait approximately 10 seconds.
5. Restart the engine.
6. Move selector lever to position “D” (for 2nd gear), or
move selector lever to position “R” (for reverse gear).
Have the transmission checked at your authorized
Mercedes-Benz Center as soon as possible.
Page 321 of 430
318 Malfunction and warning messages
Te ch n i c a l
data Instruments
and controlsOperation DrivingInstrument
cluster displayPractical hints Car care Index
LIGHTING SYSTEM
Line 1 Line 2 C*
LOW BEAM, L CHECK LAMPS! 2
LOW BEAM, R CHECK LAMPS! 2
DISPLAY DEFECTIVE VISIT WORKSHOP!
1
2
TURN SIGNAL LR CHECK LAMPS! 2
TURN SIGNAL RR CHECK LAMPS! 2
TURN SIGNAL IN MIRROR, L CHECK LAMPS! 2
TURN SIGNAL IN MIRROR, R CHECK LAMPS! 2
TURN SIGNAL LF CHECK LAMPS! 2
TURN SIGNAL RF CHECK LAMPS! 2
BRAKE LAMP
2
VISIT WORKSHOP! 2
BRAKE LAMP, L
3
CHECK LAMPS! 2
BRAKE LAMP, R
3
CHECK LAMPS! 2
3RD BRAKE LAMP
3
CHECK LAMPS! 2
HIGH BEAM, L CHECK LAMPS! 2
HIGH BEAM, R CHECK LAMPS! 2
LICENSE PLATE LAMP, L CHECK LAMPS! 2
LICENSE PLATE LAMP, R CHECK LAMPS! 2
TURN OFF LAMPS! 1
FRONT FOGLAMP, L CHECK LAMPS! 2
FRONT FOGLAMP, R CHECK LAMPS! 2
REAR FOGLAMP CHECK LAMPS! 2
REVERSE LAMP, L CHECK LAMPS! 2 Line 1 Line 2 C*
Page 322 of 430

319 Malfunction and warning messages
Te ch n i c a l
data Instruments
and controlsOperation DrivingInstrument
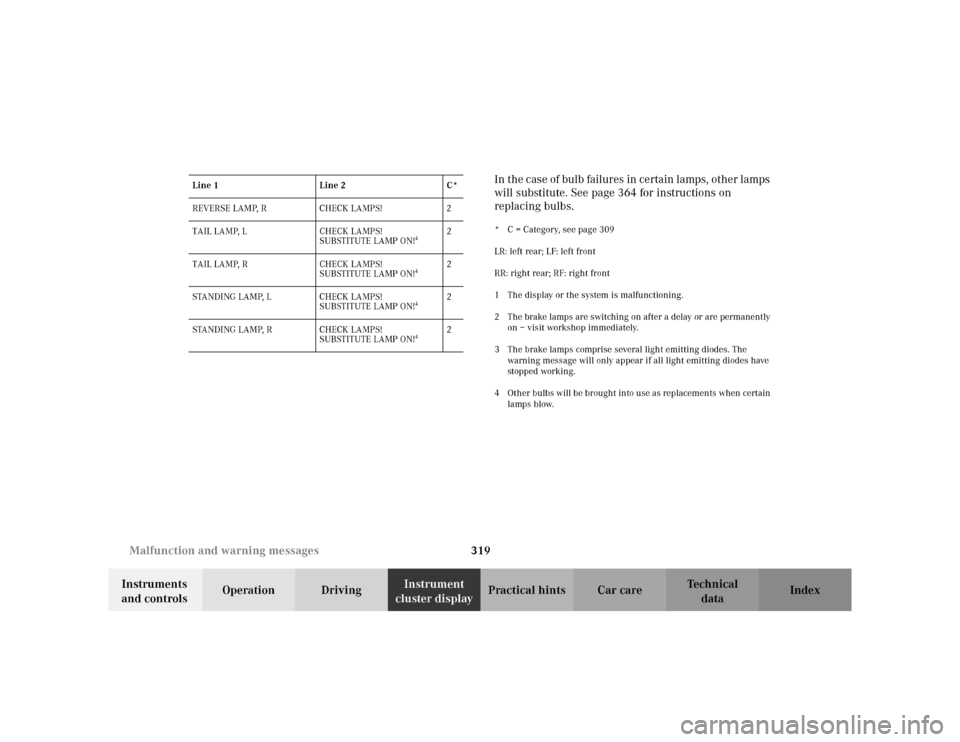
cluster displayPractical hints Car care IndexIn the case of bulb failures in certain lamps, other lamps
will substitute. See page 364 for instructions on
replacing bulbs.
* C = Category, see page 309
LR: left rear; LF: left front
RR: right rear; RF: right front
1 The display or the system is malfunctioning.
2 The brake lamps are switching on after a delay or are permanently
on – visit workshop immediately.
3 The brake lamps comprise several light emitting diodes. The
warning message will only appear if all light emitting diodes have
stopped working.
4 Other bulbs will be brought into use as replacements when certain
lamps blow. REVERSE LAMP, R CHECK LAMPS! 2
TAIL LAMP, L CHECK LAMPS!
SUBSTITUTE LAMP ON!
4
2
TAIL LAMP, R CHECK LAMPS!
SUBSTITUTE LAMP ON!
4
2
STANDING LAMP, L CHECK LAMPS!
SUBSTITUTE LAMP ON!
4
2
STANDING LAMP, R CHECK LAMPS!
SUBSTITUTE LAMP ON!
4
2 Line 1 Line 2 C*