2002 MERCEDES-BENZ S-Class battery
[x] Cancel search: batteryPage 5 of 251

Introduction
AudioIntroduction
Telephone Navigation Index AudioInfo Services and
system settings 3
Contents
ContentsIntroduction ........................................ 1
How to use the COMAND
operating manual ............................ 1
Operation – COMAND and
telephone .......................................... 2
Operating safety .............................. 2
Contents .............................................. 3
Quick reference – COMAND ......... 8
Multifunction steering wheel,
Multifunction display..................... 11
Screen displays .............................. 12
Switch the COMAND
operating unit on and off ............. 13
Adjusting the volume ................... 15
Selecting beep tones ..................... 15
Switching the screen on and off . 15
Pop-up screen messages when
the battery gets low ...................... 16
Status window for
Tele Aid calls .................................. 16
AudioContents – Audio ............................. 17
Radio operation ................................ 18
Quick reference – Radio ............... 18
Menu overview – Radio ................ 20
Switching radio operation on ...... 22
Changing the Radio Band ............ 22
Selecting a station ......................... 24
Automatic Station Scan ................ 28
Memory functions ......................... 29
Radio playback mute .................... 38
Multifunction steering wheel,
Multifunction display ................... 39
Tape operation .................................. 40
Quick reference – Tape deck ....... 40
Menu overview – Tape deck ........ 42
Switching tape operation
on and off ........................................ 44
Changing sides .............................. 45
Seeking/Skipping tracks ............. 45Fast forward/rewinding ............... 46
Scanning ......................................... 47
Repeating tracks ............................ 48
Skip blanks .................................... 49
Dolby B, Dolby C
(noise reduction) ........................... 50
Tape playback mute ...................... 51
Alarm on serious malfunction ... 51
Notes on tape care ......................... 52
Multifunction steering wheel,
Multifunction display ................... 55
CD operation ..................................... 56
Quick reference for CD changer
operation (optional) ...................... 56
General information on CD
playback .......................................... 58
Loading CDs in the CD changer .. 59
Menu overview – CD operation .. 62
Switching on CD operation .......... 64
Track select .................................... 65
Selecting CD’s ................................ 67
03-EINF-25-US.pm509.07.2004, 13:58 Uhr 3
Page 17 of 251

Introduction
AudioIntroduction
Telephone Navigation Index AudioInfo Services and
system settings 15 Adjusting the volume
Using buttons on the multifunction steering wheel:
Raising the volume – press steering wheel button
Lowering the volume – press steering wheel
button On the COMAND operating unit:
Raising the volume – press rocker switch Lowering the volume – press rocker switch Audio functions for radio and CD operation (CD drive
and CD changer):
The volume selected applies to all of the audio functions.
For other audio sources:
Other audio sources are telephone, voice output during
route guidance and Voice Recognition System. Refer to
seperate operating instructions for telephone and voice
recognition system. The volume level for voice output
in navigation and voice recognition system is the same
(altering either affects the other). Telephone volume is
adjusted separately.
Altering the listening volume for the telephone affects
only the telephone and not navigation or voice
recognition system.Selecting beep tones
To indicate operating steps or error messages acousti-
cally, it is possible to select different beep tones. Beep
tones may be switched on and off, page 238.
Acknowledgement beep:
is heard when an entry is accepted
Info beep:
is heard when window displays warn that the battery
power is decreasing, page 16.
Alarm beep:
is heard on a serious malfunction (e.g. if the tape cover
sticks). This warning can only be switched off by
switching the COMAND off.
Switching the screen on and off
Press
to turn off the screen. It is still possible to
operate all of the functions.
Press to switch the screen on again. Information
will reappear in the display.
03-EINF-25-US.pm509.07.2004, 13:59 Uhr 15
Page 18 of 251

IntroductionIntroductionTelephoneNavigation
Index AudioInfo Services and
system settings
16
Pop-up screen messages when the battery gets low
To prevent the car battery from running down, the
driver will receive two messages to start the engine
when battery power gets low. This warning will appear
in all of the displays.
It is possible to switch off the warning “Caution. Please
start engine. Otherwise COMAND will shut down in
3 minutes” by pressing the rotary/pushbutton
.
Please, start the engine, refer to the operating
instructions of the vehicle.
You can then still operate COMAND.
The next two messages will not disappear until the
engine has been started or COMAND has been
switched off. It is not possible to operate COMAND
while they are on the screen.
First the following warning will appear on the screen:
“Caution. Please start engine. Otherwise COMAND will
shut down in 10 seconds”. Please, start the engine.
If the engine is not started, COMAND will switch off
after 10 seconds. The following message will appear in
the display: “Caution. COMAND will shut down now.”.
Please, start the engine.Status window for Tele Aid calls
When the Tele Aid call system is in operation (refer to
operating instructions of the vehicle) a pop-up window
appears indicating the type of call and status.
During transmission of a Tele Aid call the audio source
will be muted until the Tele Aid call is ended.
The window can be cleared by manually by turning or
pressing the rotary/pushbutton
. It will switch off
automatically when the emergency call is completed.
03-EINF-25-US.pm509.07.2004, 13:59 Uhr 16
Page 61 of 251

59
Introduction
AudioTelephone
Navigation
Index Info Services and
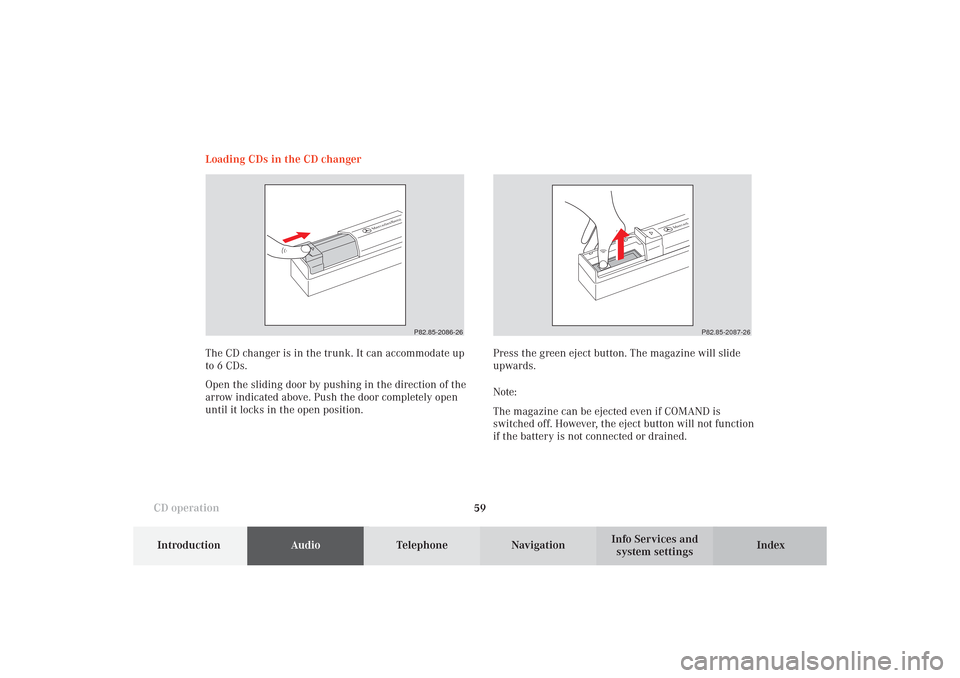
system settings CD operationLoading CDs in the CD changer
P82.85-2086-26
P82.85-2087-26
The CD changer is in the trunk. It can accommodate up
to 6 CDs.
Open the sliding door by pushing in the direction of the
arrow indicated above. Push the door completely open
until it locks in the open position.Press the green eject button. The magazine will slide
upwards.
Note:
The magazine can be ejected even if COMAND is
switched off. However, the eject button will not function
if the battery is not connected or drained.
06-CD-US.pm509.07.2004, 14:08 Uhr 59
Page 233 of 251

System settings231Introduction
Audio Telephone
Navigation
Index Info Services and
system settings Set the date and time
COMAND is equipped with an integrated clock. Press
to display the current time. The clock is used e.g.
for indicating the estimated time of arrival at the
destination, page 181.
There are several ways to set the time:
• With GPS reception, page 232
Set the time in 30 minute steps, page 233
Set the time by selecting a country and the time
zone, page 234
• Without GPS reception, page 232
Set the date and time manually, page 236
Note:
The clock must always be reset if the COMAND
system was disconnected or if the vehicle battery
was discharged. List of languages:
• “Adopt from Instrument Cluster” – the system will
use the same language as is set in instrument
cluster
• “Deutsch”
• “English (metric)” – distance measured in km,
speed in km/h
• “English (imperial)” – distance measured in yards,
miles, speed in mph
• “Español“
• “Français“
• “Italiano“
• “Nederlands“
12-System-25-US.pm517.10.2001, 11:06 Uhr 231
Page 238 of 251

236 System settings
Audio Telephone Navigation
Index Info Services and
system settings Introduction
Set the date and time manually
If the clock has been disconnected from the vehicle
battery for any reason or if the dates of the change
between summer and winter time are not available in
advance, it will be necessary to set the clock manually.
Use the rotary/pushbutton
to highlight the “Date/
Time ...” menu field in the “Settings” menu (page 229)
and press to confirm.
11Setting the day, month, year, hours, minutes,
when the menu appears on the screen, the day is
highlighted automatically.Activate the setting mode:
Press the rotary/pushbutton
. The day is shown in
red.
Move the day forwards – turn the rotary/pushbutton
to the right.
Move the day back – turn the rotary/pushbutton
to
the left.
Exiting from the setting mode:
Press the rotary/pushbutton
. The day is shown in
black, the cursor moves to the month indicating.
Adopting a date and time:
Press the rotary/pushbutton longer than 2 seconds.
The main System settings menu will appear.
Note:
If an entry is not accepted, the message “Invalid input”
will appear.
P82.85-3077-26
11
12-System-25-US.pm517.10.2001, 11:06 Uhr 236