Page 52 of 251

50
AudioTelephone
Navigation
Index Info Services and
system settings Introduction
Tape operation
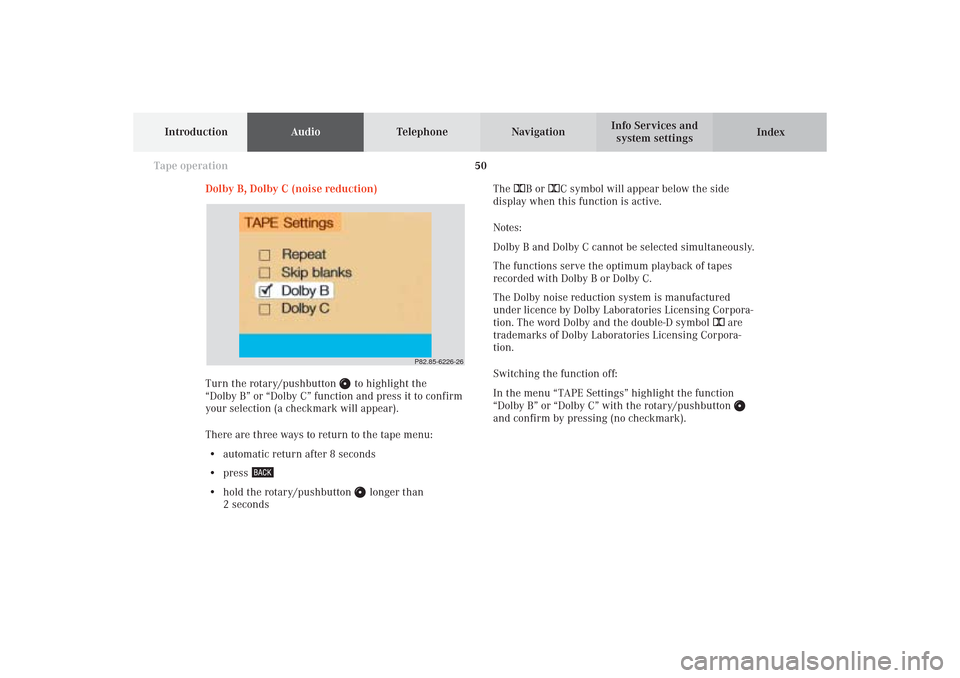
Dolby B, Dolby C (noise reduction)
Turn the rotary/pushbutton
to highlight the
“Dolby B” or “Dolby C” function and press it to confirm
your selection (a checkmark will appear).
There are three ways to return to the tape menu:
• automatic return after 8 seconds
• press
• hold the rotary/pushbutton
longer than
2 secondsThe DB or DC symbol will appear below the side
display when this function is active.
Notes:
Dolby B and Dolby C cannot be selected simultaneously.
The functions serve the optimum playback of tapes
recorded with Dolby B or Dolby C.
The Dolby noise reduction system is manufactured
under licence by Dolby Laboratories Licensing Corpora-
tion. The word Dolby and the double-D symbol D are
trademarks of Dolby Laboratories Licensing Corpora-
tion.
Switching the function off:
In the menu “TAPE Settings” highlight the function
“Dolby B” or “Dolby C” with the rotary/pushbutton
and confirm by pressing (no checkmark).
P82.85-6226-26
05-TAPE-25-US.pm509.07.2004, 14:05 Uhr 50
Page 56 of 251
54
AudioTelephone
Navigation
Index Info Services and
system settings Introduction
Tape operation
P82.85-2082-26
The message “Caution. Please clean sound head.” is
displayed after 50 hours of playback.
Clear the screen message by pressing the rotary/
pushbutton
. Insert a high quality cleaning tape.
Note:
For questions concerning the type of tape cleaner to
use, contact your Mercedes-Benz Center.
Do not touch the tape.
Note:
It is not possible to use tapes with a playing time of
longer than 120 minutes.
05-TAPE-25-US.pm509.07.2004, 14:05 Uhr 54
Page 57 of 251
55
AudioTelephone
Navigation
Index
IntroductionInfo Services and
system settings Tape operationMultifunction steering wheel, Multifunction
display1No audio function has been switched on
2The tape deck is switched on
3Side currently playing
Press
on COMAND and switch the tape deck on.
Press repeatedly necessary until display (2)
appears.
Press to fast forward to the next track.
Press to rewind to the beginning of the same
track, or to go back to the previous track.
Press to display the next system.
05-TAPE-25-US.pm509.07.2004, 14:05 Uhr 55
Page 59 of 251
57
Introduction
AudioTelephone
Navigation
Index Info Services and
system settings CD operation6Requesting and displaying Info Services, page 224
Adjust system settings (brightness, language,
clock, beep tones), page 227
7Return to previous menu
8Press to mute CD audio, press again to cancel mute
function, page 76
9Switching the COMAND on and off, page 13
10Color screen with main CD menu 1Switching CD operation on and off, page 64
2Track select, page 66
Selecting CD’s, page 67
3Raising
or lowering
the volume, page 14
4Press
briefly: next track, page 65
Press longer than 2 seconds: fast forward,
page 69
Press briefly: previous track, page 65
Press longer than 2 seconds: fast backward,
page 69
5Turn to highlight a function or menu field
Press to perform a function or activate a submenu
06-CD-US.pm509.07.2004, 14:07 Uhr 57
Page 68 of 251
66
AudioTelephone Navigation
Index Info Services and
system settings Introduction
CD operation
Select a track in the “CD Select” menu:
Activate the menu with the “CD Select” menu field.
Press
and the number key for the track you wish
to select, e.g.
.
The chosen track will be played automatically after
3 seconds or immediately after you press
. Select a track using the number keypad:
Press
and enter the number of the track you wish
to select, e.g.
. The selected track will then begin to
play automatically after 3 seconds or immediately after
you press
.
Note:
If you enter a two-digit number, you must enter the
second number within 3 seconds. Otherwise, the
function will switch off and the screen will return to
the previous display.
P82.85-2980-26
P82.85-2550-26
06-CD-US.pm509.07.2004, 14:08 Uhr 66
Page 70 of 251
68
AudioTelephone Navigation
Index Info Services and
system settings Introduction
CD operation
Selecting a CD in the “CD select” menu:
Use the rotary/pushbutton
to highlight the “CD
Select” menu field in the main CD menu and confirm
your selection by pressing.
Use the rotary/pushbutton to highlight the desired
CD in the menu and confirm your selection by
pressing. “CD loading ...” will appear middle above the
selection places on the screen. Playback will then begin
with track 1 of the CD selected.
Note:
If magazine slots are empty, it is not possible to select
them with the rotary/pushbutton
.
If you select an empty magazine slot with a number
key, e.g.
the message “No CD” is displayed.
P82.85-2547-26
43
21
1Current track and the name of the CD playing if
this was entered previously, page 71
2Selected CD, current CD in red color
3Magazine slot contains a CD
4Magazine slot does not contain a CD
06-CD-US.pm509.07.2004, 14:09 Uhr 68
Page 71 of 251
69
Introduction
AudioTelephone
Navigation
Index Info Services and
system settings CD operationFast forward/backward
Fast forward:
Press
longer than 2 seconds.
Display message: “Forward
”, display shows the
current position via the time indicator display.Fast backward:
Press
longer than 2 seconds.
Display message: “
Reverse”, display shows the
current position via the time indicator display.
Release the on of the keys to stop the function. Play-
back will resume.
P82.85-2984-26
06-CD-US.pm509.07.2004, 14:09 Uhr 69
Page 73 of 251

71
Introduction
AudioTelephone
Navigation
Index Info Services and
system settings CD operationEntering, altering and deleting CD names
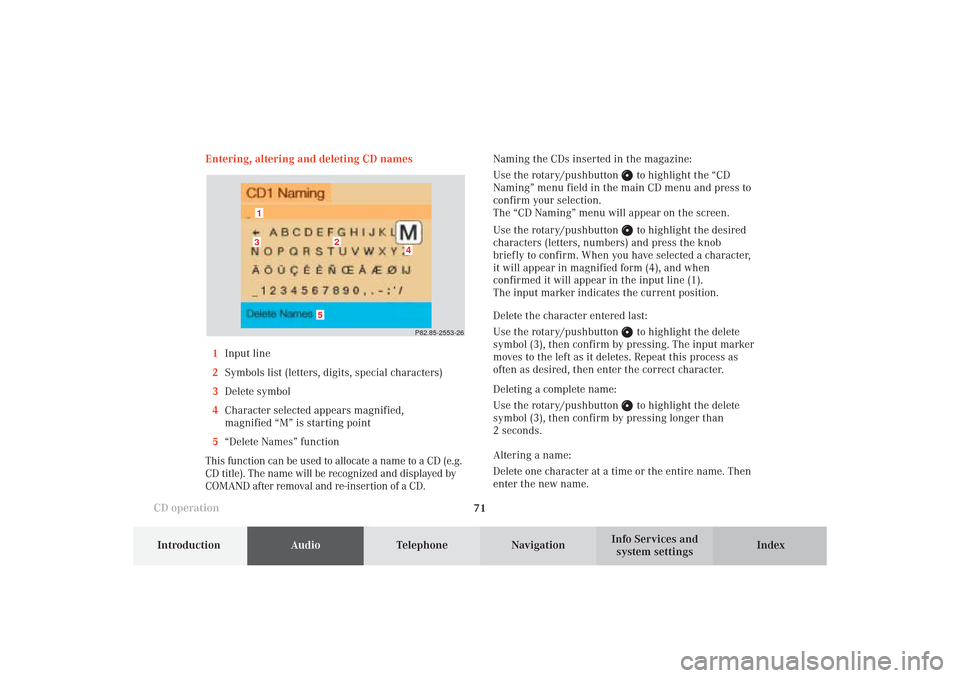
1Input line
2Symbols list (letters, digits, special characters)
3Delete symbol
4Character selected appears magnified,
magnified “M” is starting point
5“Delete Names” function
This function can be used to allocate a name to a CD (e.g.
CD title). The name will be recognized and displayed by
COMAND after removal and re-insertion of a CD.Naming the CDs inserted in the magazine:
Use the rotary/pushbutton
to highlight the “CD
Naming” menu field in the main CD menu and press to
confirm your selection.
The “CD Naming” menu will appear on the screen.
Use the rotary/pushbutton to highlight the desired
characters (letters, numbers) and press the knob
briefly to confirm. When you have selected a character,
it will appear in magnified form (4), and when
confirmed it will appear in the input line (1).
The input marker indicates the current position.
Delete the character entered last:
Use the rotary/pushbutton to highlight the delete
symbol (3), then confirm by pressing. The input marker
moves to the left as it deletes. Repeat this process as
often as desired, then enter the correct character.
Deleting a complete name:
Use the rotary/pushbutton to highlight the delete
symbol (3), then confirm by pressing longer than
2 seconds.
Altering a name:
Delete one character at a time or the entire name. Then
enter the new name.
P82.85-2553-26
5
4
3
2
1
06-CD-US.pm509.07.2004, 14:09 Uhr 71