2002 MERCEDES-BENZ ML55AMG check oil
[x] Cancel search: check oilPage 7 of 342

4 Contents
Instrument cluster displayMalfunction and
indicator lamps in
the instrument cluster .............240
On-board diagnostic system –
Check engine malfunction
indicator lamp .............................240
Brake warning lamp .................. 241
Supplemental restraint system
(SRS) indicator lamp ..................242
Fuel reserve warning .................242Electronic stability program
(ESP) / Electronic traction
system (ETS) – warning lamp .. 243
BAS/ESP malfunction
indicator lamp ............................ 243
4-ETS malfunction
indicator lamp ............................ 243
LOW RANGE
indicator lamp ............................ 243
ABS malfunction
indicator lamp ............................ 244
Adjustable steering wheel –
indicator lamp ............................ 244
AIRBAG OFF
indicator lamp ............................ 244Seat belt warning lamp .............245
Charge indicator lamp ...............245
Low engine oil level
warning lamp ..............................246
Low engine coolant level
warning ........................................246
Low windshield and
headlamp washer system fluid
level warning lamp ....................247
Brake pad wear i
ndicator lamp ..............................247
FSS indicator ...............................247
Page 8 of 342

5 Contents
Practical hintsFirst aid kit .....................................250
Fuses ................................................250
Electrical outlet ..............................252
Stowing items in the vehicle ........252
Hood .................................................253
Checking engine oil level .............255
Automatic transmission
fluid level ...................................256
Engine oil consumption ................256
Coolant level ...................................256
Adding coolant ...........................257
Windshield washer/headlamp
cleaning system .........................258
Windshield and headlamp
washer fluid mixing ratio .........259Ve h i c l e j a c k ,
wheel bolt wrench and
screwdriver ............................... 259
Air pump ......................................... 261
Wheels ............................................ 262
Tire replacement ....................... 262
Rotating wheels ......................... 263
Spare wheel .................................... 264
Changing wheels ........................... 267
Tire inflation pressure ................. 272
Battery ............................................. 273
Jump starting ................................. 275
Towing the vehicle ........................ 277
Transmission selector lever,
manually unlocking .................. 281
Stranded vehicle ............................ 281Exterior lamps ................................282
Headlamp assembly ...................283
Taillamp assemblies ..................287
Adjusting headlamp aim ...............290
Remote control battery
replacement ...............................292
Synchronizing
remote control ............................293
Emergency operation of
sliding/pop-up roof ...................294
Manual release for
fuel filler flap .............................295
Replacing wiper blades .................295
Roof rack .........................................296
Page 99 of 342
96 Engine oil level indicator
Te ch n i c a l
data Instruments
and controlsOperationDrivingInstrument
cluster displayPractical hints Car care Index
Engine oil level indicator
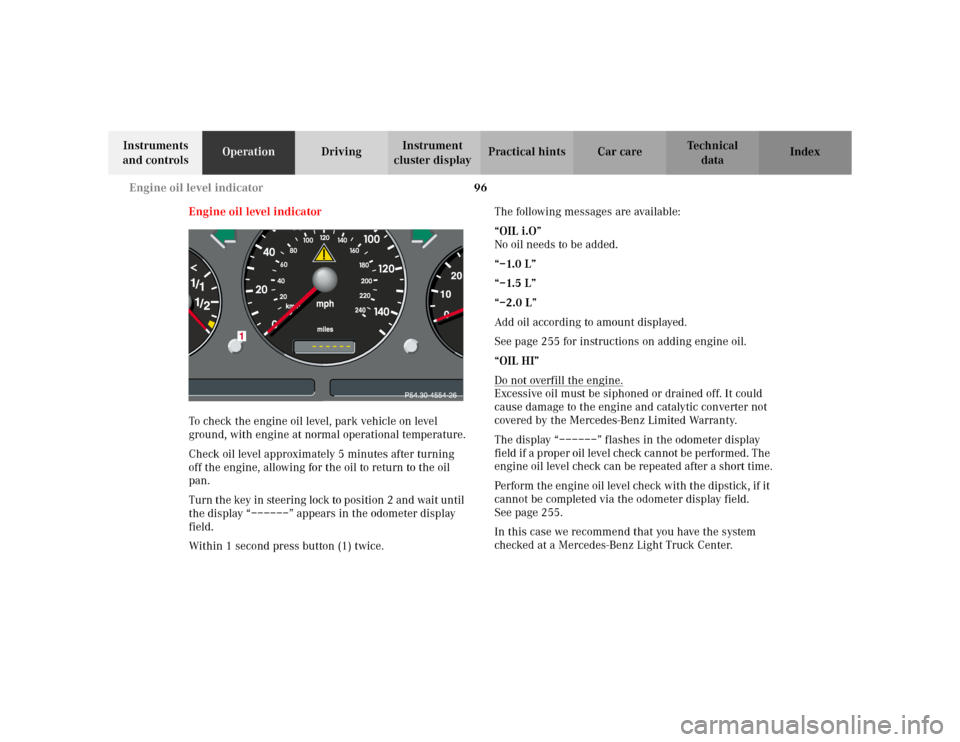
To check the engine oil level, park vehicle on level
ground, with engine at normal operational temperature.
Check oil level approximately 5 minutes after turning
off the engine, allowing for the oil to return to the oil
pan.
Turn the key in steering lock to position 2 and wait until
the display “––––––” appears in the odometer display
field.
Within 1 second press button (1) twice.The following messages are available:
“OIL i.O”
No oil needs to be added.
“–1.0 L”
“–1.5 L”
“–2.0 L”
Add oil according to amount displayed.
See page 255 for instructions on adding engine oil.
“OIL HI”
Do not overfill the engine.
Excessive oil must be siphoned or drained off. It could
cause damage to the engine and catalytic converter not
covered by the Mercedes-Benz Limited Warranty.
The display “––––––” flashes in the odometer display
field if a proper oil level check cannot be performed. The
engine oil level check can be repeated after a short time.
Perform the engine oil level check with the dipstick, if it
cannot be completed via the odometer display field.
Seepage255.
In this case we recommend that you have the system
checked at a Mercedes-Benz Light Truck Center.
Page 203 of 342
200 Driving instructions
Te ch n i c a l
data Instruments
and controlsOperationDrivingInstrument
cluster displayPractical hints Car care Index
If the vehicle is parked after being driven on salt treated
roads, the braking efficiency should be tested as soon as
possible after driving is resumed while observing the
safety rules in the previous paragraph.
Winter driving
Have your vehicle winterized at your authorized
Mercedes-Benz Light Truck Center before the onset of
winter.
•Change the engine oil if the engine contains an oil
which is not approved for winter operation. For
viscosity (SAE / CCMC class) and filling quantity,
see page 314.•Check engine coolant anticorrosion / antifreeze
concentration.
•Additive for the windshield washer and headlamp
cleaning system: Add MB Concentrate “S” to a
premixed windshield washer solvent / antifreeze
which is formulated for below freezing temperatures
see page 259.
•Test battery: Battery capacity drops with decreasing
ambient temperature. A well charged battery helps
to ensure that the engine can be started, even at low
ambient temperatures.
•Tires: We recommend M+S rated radial-ply tires on
all four wheels for the winter season. Observe
permissible maximum speed for M+S rated
radial-ply tires and the legal speed limit.
In winter operation, the maximum effectiveness of the
antilock brake system (ABS), the four wheel electronic
traction system (4-ETS+), the electronic stability
program (ESP), and electronic brake proportioning
(EBP) can only be achieved with M+S rated radial-ply
tires and / or snow chains recommended by
Mercedes-Benz. Snow chains maximize performance.
For driving instructions using snow chains see
page 199.
Wa r n i n g !
If the vehicle becomes stuck in snow, make sure
that snow is kept clear of the exhaust pipe and
from around the vehicle with engine running.
Otherwise, deadly carbon monoxide (CO) gases may
enter vehicle interior resulting in unconsciousness
and death.To assure sufficient fresh air ventilation, open a
window slightly on the side of the vehicle not
facing the wind.
Page 205 of 342

202 Driving instructions
Te ch n i c a l
data Instruments
and controlsOperationDrivingInstrument
cluster displayPractical hints Car care Index
Off-Road driving
Familiarize yourself with the vehicle characteristics and
gear changing before you attempt any difficult terrain
off-road driving. We recommend that you start out with
easy off-road travel.
Please read this chapter carefully before you begin
off-road travel.
Special driving features are available for specific kinds
of operation:
•LOW RANGE mode, see page 227
•LOW RANGE - ABS, see page 220
•LOW RANGE - 4-ETS+, see page 222
•LOW RANGE - ESP, see page 226
Engage the LOW RANGE mode before driving under
off-road conditions. For switching LOW RANGE mode on
and off see page 227.
Fasten items being carried as securely as possible, see
page 154.
We recommend to keep doors, liftgate, windows, and
roof closed whenever driving in off-road mode.Important!
Adjust vehicle speed to condition of terrain. The more
uneven, rutty and steeper the terrain, the lower the
speed should be.
Watch out for obstacles, such as rocks, holes,
tree-stumps, ruts.
Be especially careful when driving in unknown
territory. Eventually get out of the vehicle and scout the
path you intend to take.
Continuous and speedy driving in sandy soil overcomes
the vehicle rolling resistance, and helps to prevent the
vehicle from sinking into the ground.
Do not initiate jumps with the vehicle. It interrupts the
forward momentum of the vehicle.
Sand, dirt, mud and other material having friction
property, can cause exceptional wear and tear as well as
failure of the brakes.
In this case the brakes may be less effective or even fail
when you most need them. Always clean and check the
brakes following each off-road trip.
Page 206 of 342
203 Driving instructions
Te ch n i c a l
data Instruments
and controlsOperationDrivingInstrument
cluster displayPractical hints Car care Index Checklist before off-road driving
• Tires: Check the tread depth and maintain specified
tire pressure (see tire pressure label inside the fuel
filler flap). Check tires for possible damage and
remove foreign objects. The valve caps must be
mounted.
•Rims: Dented or bent rims can cause tire pressure
loss and damage the tire beads. For this reason,
check and, if neccesary, change rims before driving
off-road.
• Vehicle tool kit: Check if the vehicle jack is
functional. In all cases take the vehicle tool kit, a
strong tow rope, a shovel and a small plank (to put
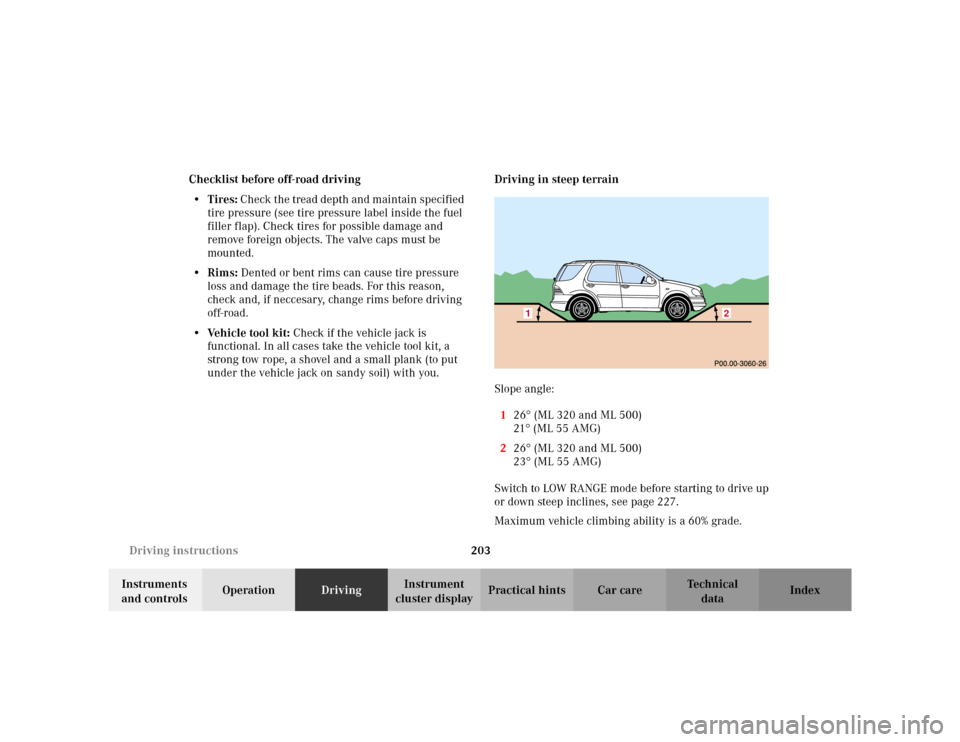
under the vehicle jack on sandy soil) with you.Driving in steep terrain
Slope angle:
126
° (ML 320 and ML 500)
21° (ML 55 AMG)
226° (ML 320 and ML 500)
23° (ML 55 AMG)
Switch to LOW RANGE mode before starting to drive up
or down steep inclines, see page 227.
Maximum vehicle climbing ability is a 60% grade.1
2
Page 211 of 342
208 Driving instructions
Te ch n i c a l
data Instruments
and controlsOperationDrivingInstrument
cluster displayPractical hints Car care Index
Returning from off-road driving
Off-road driving increases strain on the vehicle.
We recommend that you inspect the vehicle for possible
damage after each off-road trip. Recognizing any
damage and a subsequent timely repair reduces the
chance of a possible breakdown or accident later on.
Proceed as follows:
•Switch off the LOW RANGE mode, see page 227.
•Remove excessive dirt from tires, wheels, wheel
housings, and underbody. For instance, after driving
in mud, clean the radiator, chassis, engine, brakes,
and wheels from extreme dirt, using a strong jet of
water.
•Inspect frame, oil pan, brake hoses, etc., as well as
vehicle underbody for possible damage.
•Check tires for possible damage, clean all exterior
lamps, and conduct a brake test.•Check for brush or branches caught in the
undercarriage. They could increase the possibility of
a fire, as well as cut fuel and / or brake lines,
puncture rubber bellows of the axles or drive shafts.
•After continued operation in mud, sand, water or
other dirty conditions clean the brake discs, wheels,
brake pads and check and clean axle joints.
Wa r n i n g !
If you feel a sudden significant vibration or ride
disturbance, or you suspect that possible damage to
your vehicle has occurred, you should turn on the
hazard warning flashers, carefully slow down, and
drive with caution to an area which is a safe
distance from the roadway.Inspect the tires and under the vehicle for possible
damage. If the vehicle or tires appear unsafe, have
it towed to the nearest Mercedes-Benz Light Truck
Center or tire dealer for repairs.
Page 239 of 342
236 What you should know at the gas station
Te ch n i c a l
data Instruments
and controlsOperationDrivingInstrument
cluster displayPractical hints Car care Index
Leaving the engine running and the fuel cap open can
cause the “CHECK ENGINE” lamp to illuminate.
ML 320 and ML 500:
Fuel tank capacity approximately 22.0 US gal (83.0 l).
This includes approximately 3.2 US gal (12.0 l) reserve.
ML 55 AMG:
Fuel tank capacity approximately 25.0 US gal (95.0 l).
This includes approximately 3.2 US gal (12.0 l) reserve.
Use premium unleaded gasoline: Posted Octane
Index 91 (Average of 96 RON / 86 MON).• Engine oil
Engine oil level check, see page 96 and page 255.
Fill quantity between upper and lower dipstick
marking level: 2.1 US qt (2.0 l).
Recommended engine oils, see Approved Service
Products sheet.
Wa r n i n g !
Overfilling of fuel tank may result in creating
pressure in the system which could cause a gas
discharge such as the gas spraying back out upon
removing the filler nozzle which could cause
personal injury.