Page 267 of 342
264 Tires, Wheels
Te ch n i c a l
data Instruments
and controlsOperation DrivingInstrument
cluster displayPractical hintsCar care Index
Spare wheel
In the case of a flat tire or break-down, you may
temporarily use the space-saver spare wheel, while
observing the following restrictions:
•Do not exceed vehicle speed of 50 mph (80 km / h).
•Drive to the nearest repair facility to have the flat
tire repaired or replaced as appropriate.
•Do not operate vehicle with more than one spare
wheel mounted.
For rim and tire specifications, refer to “Technical data”
on page 310.
Caution!
Exercise care when removing or installing spare wheel
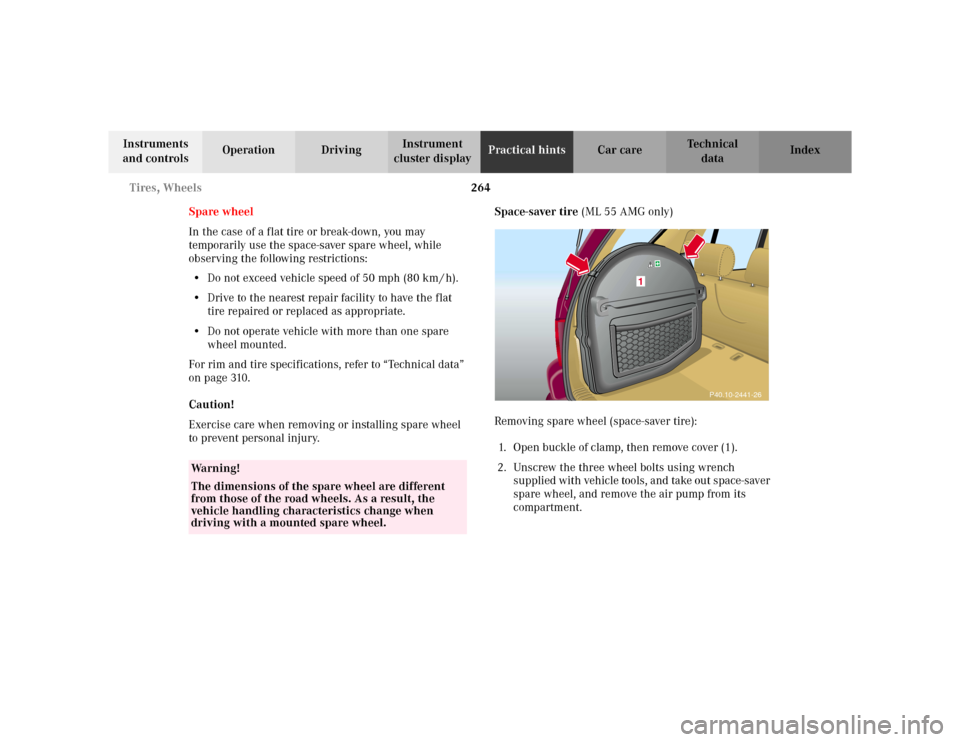
to prevent personal injury.Space-saver tire (ML 55 AMG only)
Removing spare wheel (space-saver tire):
1. Open buckle of clamp, then remove cover (1).
2. Unscrew the three wheel bolts using wrench
supplied with vehicle tools, and take out space-saver
spare wheel, and remove the air pump from its
compartment.
Wa r n i n g !
The dimensions of the spare wheel are different
from those of the road wheels. As a result, the
vehicle handling characteristics change when
driving with a mounted spare wheel.
P40.10-2441-26
Page 268 of 342
265 Tires, Wheels
Te ch n i c a l
data Instruments
and controlsOperation DrivingInstrument
cluster displayPractical hintsCar care Index Important!
To realize the total crumple zone in case of a rear end
collision, the space-saver spare wheel must be stored in
its holder with the tire deflated. Properly inflate the tire
prior to mounting it on the axle. See page 271 for
detailed instructions.
When storing the space-saver spare wheel in its holder,
tighten the three wheel bolts with a tightening torque of
37 ft.lb. (50 Nm).Space-saver tire (except ML 55 AMG)
Removing spare wheel (space-saver tire):
1. Hold left and right side of cover (1) at bottom and
pull away from bumper (arrows).
P40.10-2439-26
Page 269 of 342
266 Tires, Wheels
Te ch n i c a l
data Instruments
and controlsOperation DrivingInstrument
cluster displayPractical hintsCar care Index
2. Loosen screw (2) using wrench supplied with
vehicle tools, see page 259. The screw (2) remains
in the holder.
3. Lift spare wheel carrier slightly and push lever (3)
to the right using screwdriver supplied with vehicle
tools, swing spare wheel carrier down and pull it out
from under the bumper.
4. Remove space-saver spare wheel.
5. Turn the bayonet lock clockwise to the endstop and
take off. Remove the cover and spare wheel.
Note:
Store bayonet lock and spare wheel cover in cargo area.
P40.10-2440-26
Page 272 of 342
269 Tires, Wheels
Te ch n i c a l
data Instruments
and controlsOperation DrivingInstrument
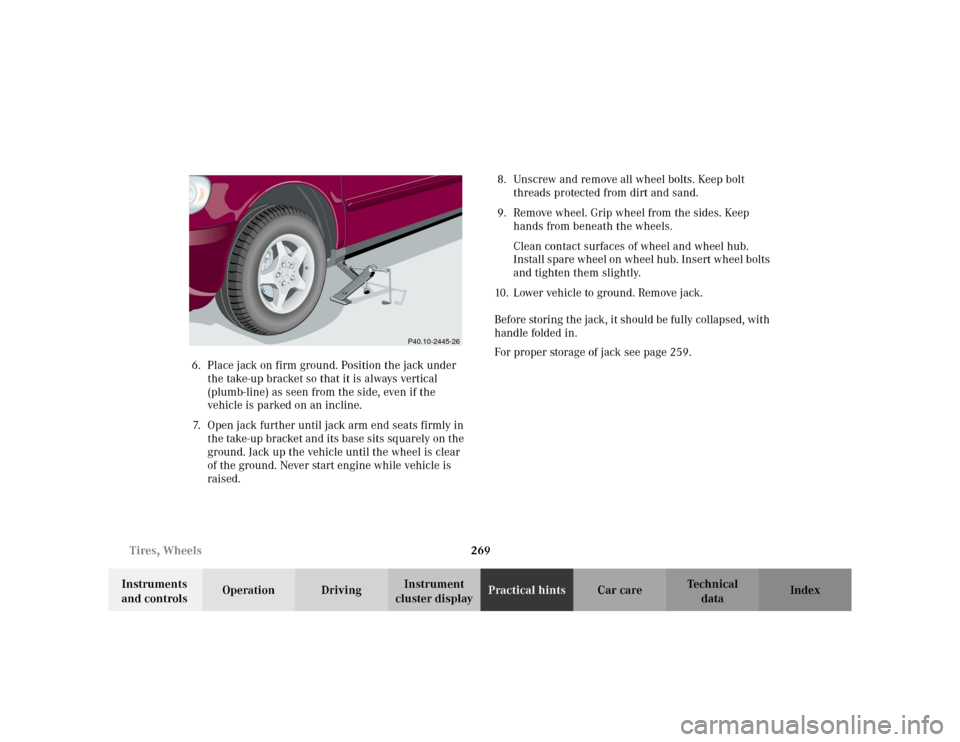
cluster displayPractical hintsCar care Index 6. Place jack on firm ground. Position the jack under
the take-up bracket so that it is always vertical
(plumb-line) as seen from the side, even if the
vehicle is parked on an incline.
7. Open jack further until jack arm end seats firmly in
the take-up bracket and its base sits squarely on the
ground. Jack up the vehicle until the wheel is clear
of the ground. Never start engine while vehicle is
raised.8. Unscrew and remove all wheel bolts. Keep bolt
threads protected from dirt and sand.
9. Remove wheel. Grip wheel from the sides. Keep
hands from beneath the wheels.
Clean contact surfaces of wheel and wheel hub.
Install spare wheel on wheel hub. Insert wheel bolts
and tighten them slightly.
10. Lower vehicle to ground. Remove jack.
Before storing the jack, it should be fully collapsed, with
handle folded in.
For proper storage of jack see page 259.
P40.10-2445-26
Page 273 of 342
270 Tires, Wheels
Te ch n i c a l
data Instruments
and controlsOperation DrivingInstrument
cluster displayPractical hintsCar care Index
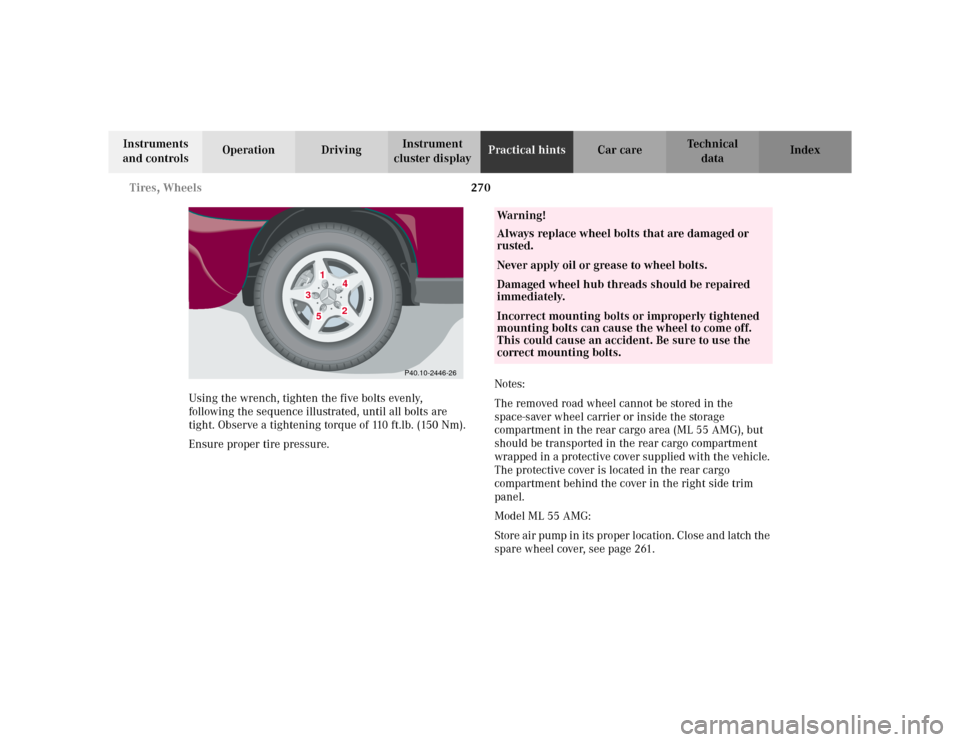
Using the wrench, tighten the five bolts evenly,
following the sequence illustrated, until all bolts are
tight. Observe a tightening torque of 110 ft.lb. (150 Nm).
Ensure proper tire pressure.Notes:
The removed road wheel cannot be stored in the
space-saver wheel carrier or inside the storage
compartment in the rear cargo area (ML 55 AMG), but
should be transported in the rear cargo compartment
wrapped in a protective cover supplied with the vehicle.
The protective cover is located in the rear cargo
compartment behind the cover in the right side trim
panel.
Model ML 55 AMG:
Store air pump in its proper location. Close and latch the
spare wheel cover, see page 261.
1
2
3
4
5
P40.10-2446-26
Wa r n i n g !
Always replace wheel bolts that are damaged or
rusted.Never apply oil or grease to wheel bolts.Damaged wheel hub threads should be repaired
immediately.Incorrect mounting bolts or improperly tightened
mounting bolts can cause the wheel to come off.
This could cause an accident. Be sure to use the
correct mounting bolts.
Page 274 of 342
271 Tires, Wheels
Te ch n i c a l
data Instruments
and controlsOperation DrivingInstrument
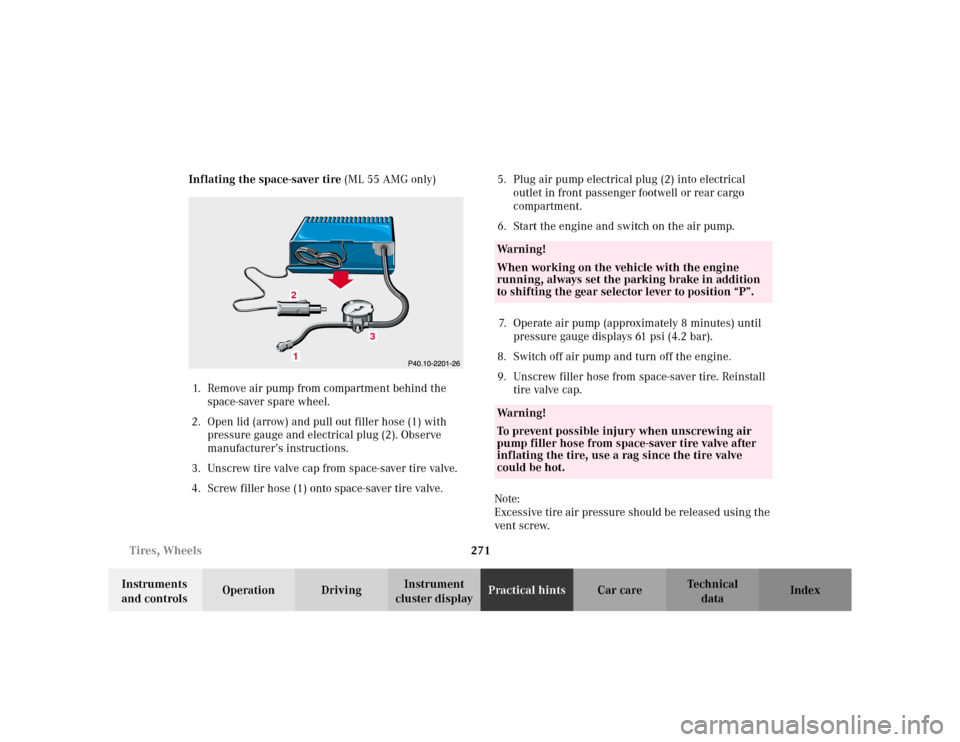
cluster displayPractical hintsCar care Index Inflating the space-saver tire (ML 55 AMG only)
1. Remove air pump from compartment behind the
space-saver spare wheel.
2. Open lid (arrow) and pull out filler hose (1) with
pressure gauge and electrical plug (2). Observe
manufacturer’s instructions.
3. Unscrew tire valve cap from space-saver tire valve.
4. Screw filler hose (1) onto space-saver tire valve.5. Plug air pump electrical plug (2) into electrical
outlet in front passenger footwell or rear cargo
compartment.
6. Start the engine and switch on the air pump.
7. Operate air pump (approximately 8 minutes) until
pressure gauge displays 61 psi (4.2 bar).
8. Switch off air pump and turn off the engine.
9. Unscrew filler hose from space-saver tire. Reinstall
tire valve cap.
Note:
Excessive tire air pressure should be released using the
vent screw.
3
12
Wa r n i n g !
When working on the vehicle with the engine
running, always set the parking brake in addition
to shifting the gear selector lever to position “P”.Wa r n i n g !
To prevent possible injury when unscrewing air
pump filler hose from space-saver tire valve after
inflating the tire, use a rag since the tire valve
could be hot.
Page 275 of 342
272 Tires, Wheels
Te ch n i c a l
data Instruments
and controlsOperation DrivingInstrument
cluster displayPractical hintsCar care Index
Tire inflation pressure
A table (see fuel filler flap) lists the tire inflation
pressures specified for Mercedes-Benz recommended
tires as well as for the varying operating conditions.
Important!
Tire pressure changes by approximately 1.5 psi (0.1 bar)
per 18
°F (10
°C) of air temperature change. Keep this in
mind when checking tire pressure inside a garage –
especially in the winter.
Example:
If garage temperature = approximately +68
°F (+20
°C)
and ambient temperature = approximately +32
°F (0
°C)
then the adjusted air pressure = specified air pressure
+3 psi (+0.2 bar).Tire pressures listed for light loads are minimum values
offering high driving comfort. Increased inflation
pressures for heavy loads produce favorable handling
characteristics with lighter loads and are perfectly
permissible. The ride of the vehicle, however, will
become somewhat harder.
Tire temperature and pressure increase with the vehicle
speed. Tire pressure should therefore only be checked
and corrected on cold tires. Correct tire pressure in
warm tires only if pressure has dropped below the
pressure listed in the table and the respective operating
conditions are taken into consideration.
An underinflated tire due to a slow leak (e.g. due to a
nail in the tire) may cause damage such as tread
separation, bulging etc.. Regular tire pressure checks
(including the spare tire) at intervals of no more than
14 days are therefore essential.
Page 313 of 342
310 Technical data
Te ch n i c a l
data Instruments
and controlsOperation DrivingInstrument
cluster displayPractical hints Car care Index
Rims – Tires
1 Must not be used with snow chains.Model ML 320 ML 500 ML 55 AMG
Rims (light alloy)
Wheel offset8 J x 17 H2 ET52
2.0 in (52 mm)8
1/2 J x17 H2 ET52
2.0 in (52 mm)9 J x 18 H2 ET52
2.0 in (52 mm)
All season tires:
Radial-ply tires 255 / 60 R17 106 H 275 / 55 R17 109V 285 / 55 R18 109W
1
Spare wheel
Rim (standard equipment)
Steel
Wheel offset4 J x 18 H 2 ET0
0 in (0 mm)4 J x 18 H 2 ET0
0 in (0 mm)4 J x 18 H 2 ET0
0 in (0 mm)
Space-saver tire T155 / 90 D18 113M
1
T155 / 90 D18 113M
1
T155 / 90 D18 113M
1