Page 205 of 342

202 Driving instructions
Te ch n i c a l
data Instruments
and controlsOperationDrivingInstrument
cluster displayPractical hints Car care Index
Off-Road driving
Familiarize yourself with the vehicle characteristics and
gear changing before you attempt any difficult terrain
off-road driving. We recommend that you start out with
easy off-road travel.
Please read this chapter carefully before you begin
off-road travel.
Special driving features are available for specific kinds
of operation:
•LOW RANGE mode, see page 227
•LOW RANGE - ABS, see page 220
•LOW RANGE - 4-ETS+, see page 222
•LOW RANGE - ESP, see page 226
Engage the LOW RANGE mode before driving under
off-road conditions. For switching LOW RANGE mode on
and off see page 227.
Fasten items being carried as securely as possible, see
page 154.
We recommend to keep doors, liftgate, windows, and
roof closed whenever driving in off-road mode.Important!
Adjust vehicle speed to condition of terrain. The more
uneven, rutty and steeper the terrain, the lower the
speed should be.
Watch out for obstacles, such as rocks, holes,
tree-stumps, ruts.
Be especially careful when driving in unknown
territory. Eventually get out of the vehicle and scout the
path you intend to take.
Continuous and speedy driving in sandy soil overcomes
the vehicle rolling resistance, and helps to prevent the
vehicle from sinking into the ground.
Do not initiate jumps with the vehicle. It interrupts the
forward momentum of the vehicle.
Sand, dirt, mud and other material having friction
property, can cause exceptional wear and tear as well as
failure of the brakes.
In this case the brakes may be less effective or even fail
when you most need them. Always clean and check the
brakes following each off-road trip.
Page 216 of 342
213 Driving instructions
Te ch n i c a l
data Instruments
and controlsOperationDrivingInstrument
cluster displayPractical hints Car care Index At very steep inclines, not manageable with selector
lever in position “1”, switch transfer case to LOW
RANGE, see page 227 for instructions on how to engage
LOW RANGE.
When going down a long hill, shift into a lower gear and
use the engine’s braking effect. Avoid riding the brakes,
thus overheating the vehicle and trailer brakes.
If the engine coolant rises to an extremely high
temperature (coolant temperature needle approaching
the red zone) when the air conditioner is on, turn off the
air conditioner. Engine coolant heat can be additionally
vented by opening the windows, switching the climate
control fan speed to high and setting the temperature
control to the maximum hot position.
Extreme care must be exercised since your vehicle with
a trailer will require additional passing distance ahead
than when driving without a trailer. Because your
vehicle and trailer is longer than your vehicle alone, you
will also need to go much farther ahead of the passed
vehicle before you can return to your lane.Parking
Wa r n i n g !
To reduce the risk of personal injury, or damage to
the vehicle powertrain, as a result of vehicle/trailer
movement, always:1. Keep right foot on brake pedal.2. Shift gear selector lever to position “N”.3. Have a second person place wheel chocks on
downhill side of left and right trailer wheels.4. Slowly release brake pedal and let vehicle and
trailer roll into chocks until stopped.5. Firmly depress parking brake pedal.6. Move gear selector lever to position “P”.7. On inclines turn front wheels towards the road
curb.
Page 241 of 342
238 Check regulary and before a long trip
Te ch n i c a l
data Instruments
and controlsOperationDrivingInstrument
cluster displayPractical hints Car care Index
Check regularly and before a long trip 1Engine oil level
See “Checking engine oil level” on page 255 and
“Engine oil level indicator” on page 96.
2Coolant level
See “Coolant level” on page 256.
3Brake fluid
See “Brake fluid” on page 316.
4Windshield washer system/
Headlamp cleaning system/
Rear window washer system
For refilling reservoir see page 258.
Opening hood, see page 253.
Vehicle lighting: Check function and cleanliness. For
replacement of light bulbs, see “Exterior lamps” on
page 282.
Exterior lamp switch, see page 97.
Page 261 of 342
258 Engine compartment
Te ch n i c a l
data Instruments
and controlsOperation DrivingInstrument
cluster displayPractical hintsCar care Index
Windshield washer/headlamp cleaning system
The reservoir should be refilled with MB Windshield
washer concentrate and water (or commercially
available premixed windshield washer solvent/
antifreeze, depending on ambient temperatures).
1Windshield washer / headlamp cleaning / rear
window wiper / washer system fluid reservoir
Capacity approximately 8.0 US qt (7.6 l).
Wa r n i n g !
Washer solvent / antifreeze is highly flammable. Do
not spill washer solvent / antifreeze on hot engine
parts, because it may burn. You can be seriously
burned.
1
Page 299 of 342
296 Roof rack
Te ch n i c a l
data Instruments
and controlsOperation DrivingInstrument
cluster displayPractical hintsCar care Index
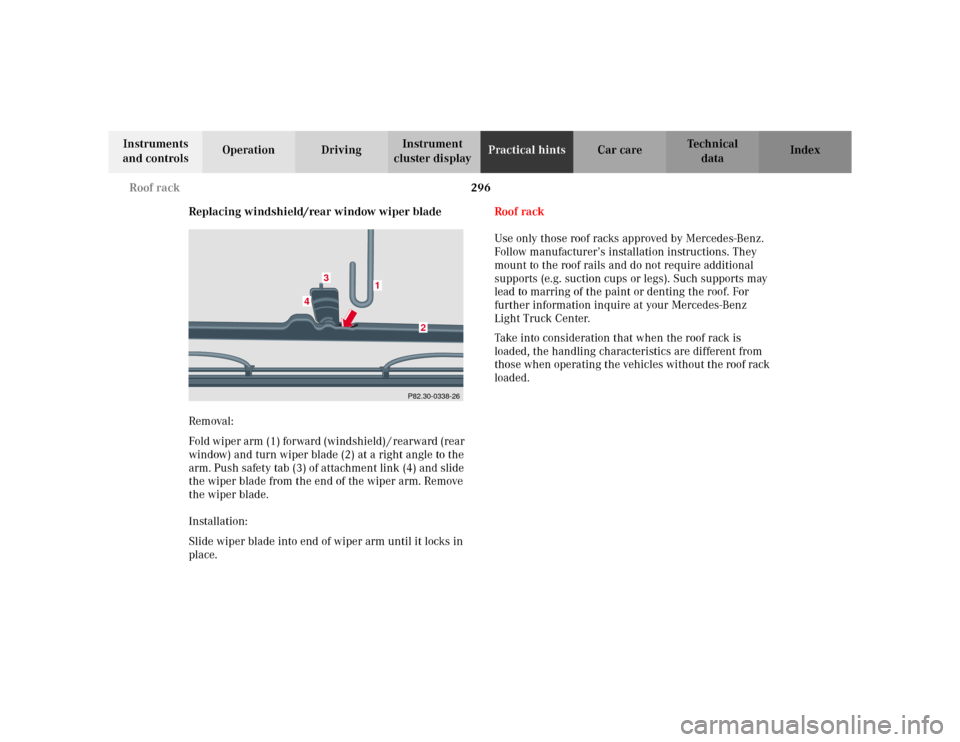
Replacing windshield/rear window wiper blade
Removal:
Fold wiper arm (1) forward (windshield) / rearward (rear
window) and turn wiper blade (2) at a right angle to the
arm. Push safety tab (3) of attachment link (4) and slide
the wiper blade from the end of the wiper arm. Remove
the wiper blade.
Installation:
Slide wiper blade into end of wiper arm until it locks in
place.Roof rack
Use only those roof racks approved by Mercedes-Benz.
Follow manufacturer’s installation instructions. They
mount to the roof rails and do not require additional
supports (e.g. suction cups or legs). Such supports may
lead to marring of the paint or denting the roof. For
further information inquire at your Mercedes-Benz
Light Truck Center.
Take into consideration that when the roof rack is
loaded, the handling characteristics are different from
those when operating the vehicles without the roof rack
loaded.
P82.30-0338-26
1
2
3
4
Page 300 of 342
297 Contents - Car care
Te ch n i c a l
data Instruments
and controlsOperation DrivingInstrument
cluster displayPractical hintsCar careIndex
Vehicle careCleaning and care of the vehicle .298
Power washer ..............................299
Tar stains .....................................299
Paintwork, painted body
components .................................299
Engine cleaning ..........................300
Vehicle washing .........................300
Ornamental moldings ................300
Headlamps, taillamps,
turn signal lenses ......................300
Cleaning the parktronic
system sensors ........................... 301Window cleaning ....................... 301
Wiper blades .............................. 301
Light alloy wheels ..................... 302
Instrument cluster ..................... 302
Steering wheel and
gear selector lever ..................... 302
Cup holder .................................. 302
Seat belts ..................................... 302
Headliner .................................... 302
Upholstery .................................. 303
Hard plastic trim items ............. 303
Plastic and rubber parts ........... 303
Page 301 of 342
298 Cleaning and care of the vehicle
Te ch n i c a l
data Instruments
and controlsOperation DrivingInstrument
cluster displayPractical hintsCar careIndex
Cleaning and care of the vehicle
In operation, your vehicle is subjected to varying
external influences which, if gone unchecked, can
attack the paintwork as well as the underbody and
cause lasting damage.
Such damage is caused not only by extreme and varying
climatic conditions, but also by air polution, road salt,
tar, gravel and stone chipping. Grease and oil, fuel,
coolant, brake fluid, bird droppings, insects, tree resins
etc. should be removed immediately to avoid paint
damage. Frequent washing reduces and / or eliminates
the aggressiveness and potency of the above adverse
influences.More frequent washings are necessary to deal with
unfavorable conditions; for example, near the ocean, in
industrial areas (smoke, exhaust emissions), or during
winter operation.
You should check your vehicle from time to time for
stone chipping or other damage. Any damage should be
repaired as soon as possible to prevent the start of
corrosion.
In doing so, do not neglect the underside of the vehicle.
A prerequisite for a thorough check is a washing of the
underbody followed by a thorough inspection. Damaged
areas need to be reundercoated.
Your vehicle has been treated at the factory with a wax-
base rustproofing in the body cavities which will last for
the lifetime of the vehicle. Post-production treatment is
neither necessary nor recommended by Mercedes-Benz
because of the possibility of incompatibility between
materials used in the production process and others
applied later.
We have selected car-care products and compiled
recommendations which are specially matched to our
vehicles and which always reflect the latest technology.
You can obtain Mercedes-Benz approved car-care
products at your authorized Mercedes-Benz Light Truck
Center.
Wa r n i n g !
Many cleaning products can be hazardous. Some
are poisonous, others are flammable. Always follow
the instructions on the particular container.
Always open your vehicle’s doors or windows when
cleaning the inside.Never use fluids or solvents that are not designed
for cleaning your vehicle.
Page 304 of 342
301 Cleaning and care of the vehicle
Te ch n i c a l
data Instruments
and controlsOperation DrivingInstrument
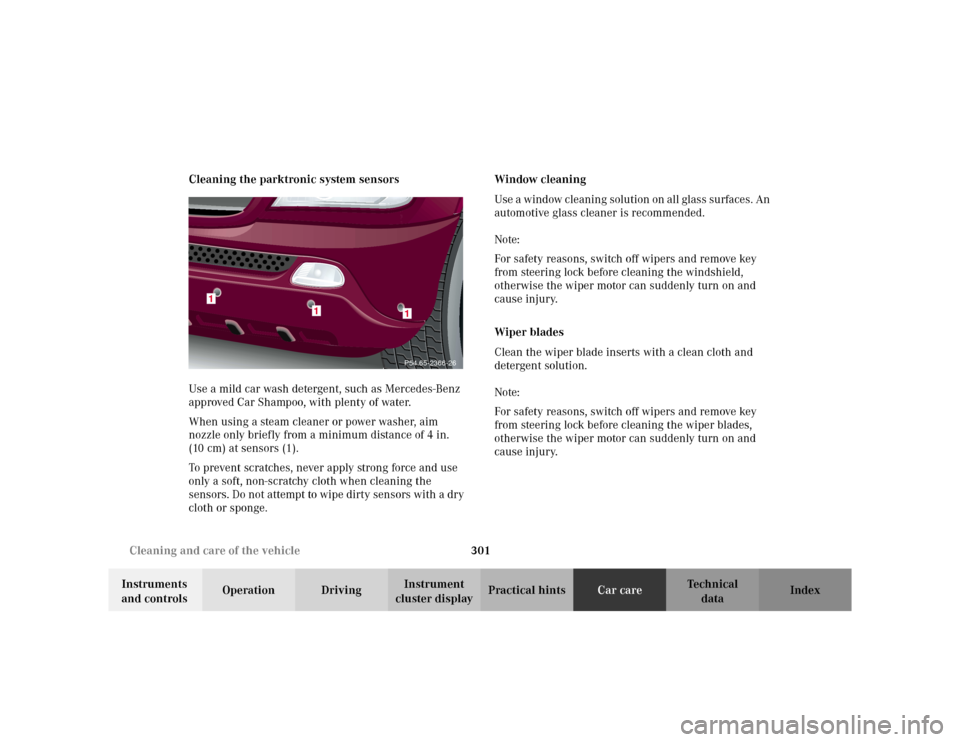
cluster displayPractical hintsCar careIndex Cleaning the parktronic system sensors
Use a mild car wash detergent, such as Mercedes-Benz
approved Car Shampoo, with plenty of water.
When using a steam cleaner or power washer, aim
nozzle only briefly from a minimum distance of 4 in.
(10 cm) at sensors (1).
To prevent scratches, never apply strong force and use
only a soft, non-scratchy cloth when cleaning the
sensors. Do not attempt to wipe dirty sensors with a dry
cloth or sponge.Window cleaning
Use a window cleaning solution on all glass surfaces. An
automotive glass cleaner is recommended.
Note:
For safety reasons, switch off wipers and remove key
from steering lock before cleaning the windshield,
otherwise the wiper motor can suddenly turn on and
cause injury.
Wiper blades
Clean the wiper blade inserts with a clean cloth and
detergent solution.
Note:
For safety reasons, switch off wipers and remove key
from steering lock before cleaning the wiper blades,
otherwise the wiper motor can suddenly turn on and
cause injury.
1
1
1P54.65-2366-26