2002 MERCEDES-BENZ ML430 climate control
[x] Cancel search: climate controlPage 122 of 342
119 Automatic climate control
Te ch n i c a l
data Instruments
and controlsOperationDrivingInstrument
cluster displayPractical hints Car care Index Rear passenger compartment climate control
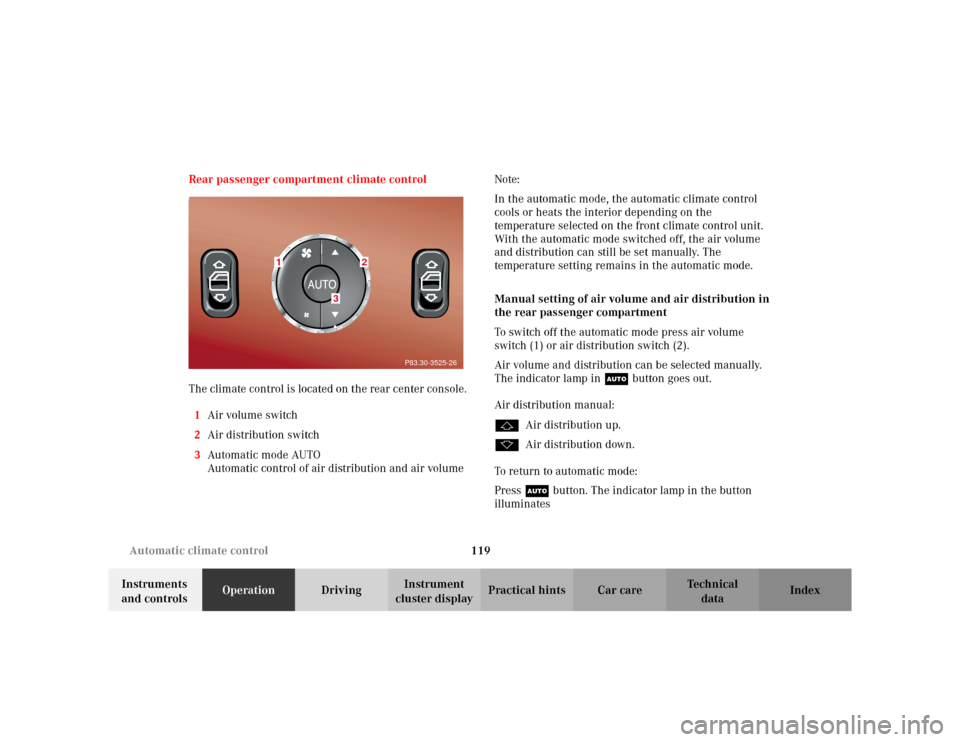
The climate control is located on the rear center console.
1Air volume switch
2Air distribution switch
3Automatic mode AUTO
Automatic control of air distribution and air volumeNote:
In the automatic mode, the automatic climate control
cools or heats the interior depending on the
temperature selected on the front climate control unit.
With the automatic mode switched off, the air volume
and distribution can still be set manually. The
temperature setting remains in the automatic mode.
Manual setting of air volume and air distribution in
the rear passenger compartment
To switch off the automatic mode press air volume
switch (1) or air distribution switch (2).
Air volume and distribution can be selected manually.
The indicator lamp in Ubutton goes out.
Air distribution manual:
jAir distribution up.
kAir distribution down.
To return to automatic mode:
Press Ubutton. The indicator lamp in the button
illuminates
P83.30-3525-26
1
2
3
Page 123 of 342
120 Automatic climate control
Te ch n i c a l
data Instruments
and controlsOperationDrivingInstrument
cluster displayPractical hints Car care Index
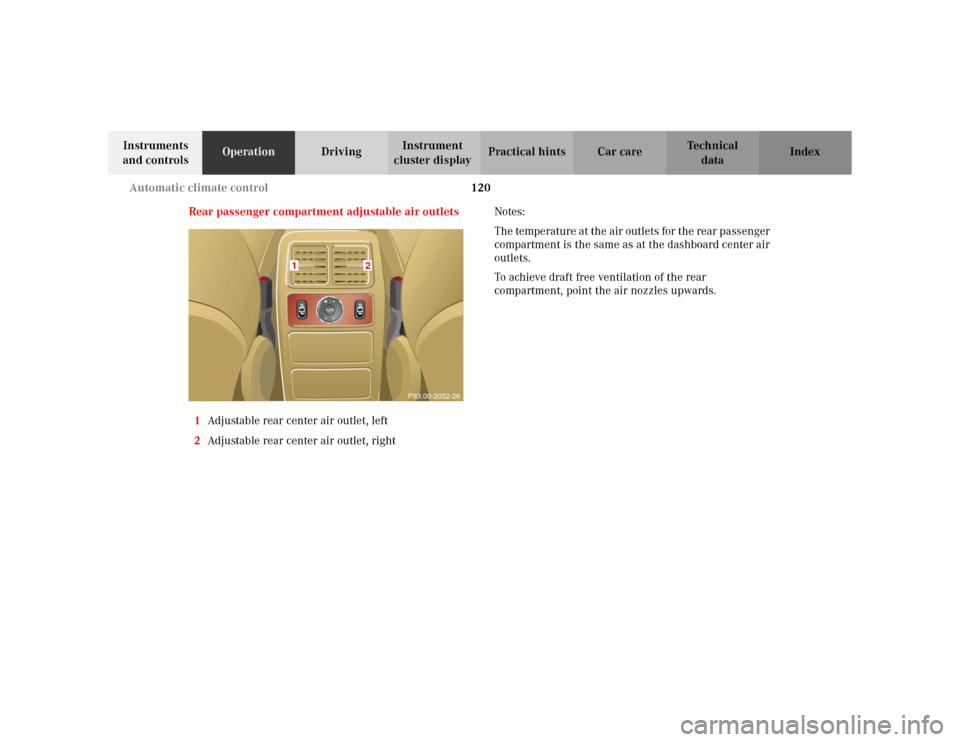
Rear passenger compartment adjustable air outlets
1Adjustable rear center air outlet, left
2Adjustable rear center air outlet, rightNotes:
The temperature at the air outlets for the rear passenger
compartment is the same as at the dashboard center air
outlets.
To achieve draft free ventilation of the rear
compartment, point the air nozzles upwards.
P83.00-2052-26
12
Page 124 of 342
121 Automatic climate control
Te ch n i c a l
data Instruments
and controlsOperationDrivingInstrument
cluster displayPractical hints Car care Index Rear window defroster
Turn the key in steering lock to position 2.
To select:
Press the Fbutton in the control panel of the
automatic air conditioner. The indicator lamp in the
button illuminates.
To c a nc el:
Press the Fbutton in the control panel of the
automatic air conditioner. The indicator lamp in the
button goes out.
Notes:
Heavy accumulation of snow and ice should be removed
before activating the defroster. The rear window defroster uses a large amount of power.
To keep the battery drain to a minimum, turn off the
defroster as soon as the rear window is clear.
The defroster is automatically turned off after
approximately 6–17 minutes of operation depending on
the outside temperature and vehicle speed.
If several power consumers are turned on
simultaneously, or the battery is only partially charged,
it is possible that the defroster will automatically turn
itself off. When this happens, the indicator lamp inside
the switch starts blinking.
As soon as the battery has sufficient voltage, the
defroster automatically turns itself back on.
Page 209 of 342

206 Driving instructions
Te ch n i c a l
data Instruments
and controlsOperationDrivingInstrument
cluster displayPractical hints Car care Index
Driving through water
120 in (50 cm)
Before driving through water, determine its depth. It
should not be deeper than approximately
20 inches (50 cm).Switch to LOW RANGE mode before driving through
water.
Switch off the exterior lamps as well as the climate
control.
Enter the water only at a shallow spot. Never take a
running start. Drive slowly, avoiding a bow wave.
Do not stop vehicle immersed in water, and do not shut
off the engine.
To dry the brakes, apply pressure to the brake pedal
several times after leaving the water.
Page 216 of 342
213 Driving instructions
Te ch n i c a l
data Instruments
and controlsOperationDrivingInstrument
cluster displayPractical hints Car care Index At very steep inclines, not manageable with selector
lever in position “1”, switch transfer case to LOW
RANGE, see page 227 for instructions on how to engage
LOW RANGE.
When going down a long hill, shift into a lower gear and
use the engine’s braking effect. Avoid riding the brakes,
thus overheating the vehicle and trailer brakes.
If the engine coolant rises to an extremely high
temperature (coolant temperature needle approaching
the red zone) when the air conditioner is on, turn off the
air conditioner. Engine coolant heat can be additionally
vented by opening the windows, switching the climate
control fan speed to high and setting the temperature
control to the maximum hot position.
Extreme care must be exercised since your vehicle with
a trailer will require additional passing distance ahead
than when driving without a trailer. Because your
vehicle and trailer is longer than your vehicle alone, you
will also need to go much farther ahead of the passed
vehicle before you can return to your lane.Parking
Wa r n i n g !
To reduce the risk of personal injury, or damage to
the vehicle powertrain, as a result of vehicle/trailer
movement, always:1. Keep right foot on brake pedal.2. Shift gear selector lever to position “N”.3. Have a second person place wheel chocks on
downhill side of left and right trailer wheels.4. Slowly release brake pedal and let vehicle and
trailer roll into chocks until stopped.5. Firmly depress parking brake pedal.6. Move gear selector lever to position “P”.7. On inclines turn front wheels towards the road
curb.
Page 302 of 342
299 Cleaning and care of the vehicle
Te ch n i c a l
data Instruments
and controlsOperation DrivingInstrument
cluster displayPractical hintsCar careIndex Scratches, corrosive deposits, corrosion or damage due
to negligent or incorrect care cannot always be removed
or repaired with the car-care products recommended
here. In such cases it is best to seek aid at your
authorized Mercedes-Benz Light Truck Center.
The following topics deal with the cleaning and care of
your vehicle and give important “how-to” information as
well as references to Mercedes-Benz approved car-care
products.
Additional information can be found in the booklet titled
“Vehicle Care Guide”.
Power washer
When using a power washer for cleaning the vehicle
always observe manufacturers’ operating instructions.
Caution!
Never use a round nozzle to power wash tires. The
intense jet of water can result in damage to the tire.
Always replace a damaged tire.
Always keep the jet of water moving across the surface.
Do not aim directly at electrical parts, electrical
connectors, seals, or other rubber parts.Tar st ai ns
Quickly remove tar stains before they dry and become
more difficult to remove. A tar remover is
recommended.
Paintwork, painted body components
Mercedes-Benz approved Paint Care should be applied
when water drops on the paint surface do not “bead up”,
normally in 3 to 5 months, depending on climate and
washing detergent used.
Mercedes-Benz approved Paint Cleaner should be
applied if paint surface shows signs of dirt embedding
(i.e. loss of gloss).
Do not apply any of these products or wax if your
vehicle is parked in the sun or if the hood is still hot.
Use the appropriate MB-Touch-Up Stick for quick and
provisional repairs of minor paint damage (i.e. chips
from stones, vehicle doors etc.).
Page 323 of 342
320 Consumer information
Te ch n i c a l
data Instruments
and controlsOperation DrivingInstrument
cluster displayPractical hints Car care Index
Consumer information
This has been prepared as required of all manufactures
of passenger cars under Title 49, Code of U.S. Federal
Regulations, Part 575 pursuant to the “National Traffic
and Motor Vehicle Safety Act of 1966”.
Uniform tire quality grading
Quality grades can be found where applicable on the
tire sidewall between tread shoulder and maximum
section width. For example:
All passenger vehicle tires must conform to federal
safety requirements in addition to these grades.Treadwear
The treadwear grade is a comparative rating based on
the wear rate of the tire when tested under controlled
conditions on a specified government test course. For
example, a tire graded 150 would wear one and one-half
(1
1/2) times as well on the government course as a tire
graded 100. The relative performance of tires depends
upon the actual conditions of their use, however, and
may depart significantly from the norm due to
variations in driving habits, service practices and
differences in road characteristics and climate.
Traction
The traction grades, from highest to lowest are AA, A, B,
and C. Those grades represent the tire’s ability to stop
on wet pavement as measured under controlled
conditions on specified government test surfaces of
asphalt and concrete. A tire marked C may have poor
traction performance. Tread wear 200 Traction AA Temperature A
Wa r n i n g !
The traction grade assigned to this tire is based on
straight ahead braking traction tests, and does not
include acceleration, cornering, hydroplaning, or
peak traction characteristics.
Page 325 of 342
322 Index
Te ch n i c a l
data Instruments
and controlsOperation DrivingInstrument
cluster displayPractical hints Car careIndex
Index
AABS (Antilock brake system) ....................................... 219
LOW RANGE – ABS .................................................. 220
Malfunction indicator lamp ..................................... 244
Adjustable steering wheel .............................................. 74
Indicator lamp ...........................................................244
Adjusting headlamp aim ...............................................290
Air conditioner refrigerant ........................................... 316
Air pump ......................................................................... 261
Air recirculation .............................................................116
Airbag deactivation system ............................................ 55
Airbag OFF indicator lamp ........................................... 244
Airbags .............................................................................. 58
Alarm system ............................................................. 36, 37
Anticorrosion/antifreeze ..................... 200, 257, 315, 319
Antiglare night position ................................................. 75
Antilock brake system (ABS) ....................................... 219
LOW RANGE – ABS .................................................. 220
Malfunction indicator lamp ..................................... 244
Antitheft alarm system ................................................... 36
Aquaplaning ................................................................... 196
AshtrayCenter console, front ................................................ 137
Rear passenger compartment ................................. 137
Automatic central locking .............................................. 33
Automatic climate control ............................................ 108
Adjustable air outlets,
rear passenger compartment .............................120
Air distribution, manual .......................................... 114
Air recirculation ........................................................ 116
Air volume, manual .................................................. 114
Defroster/Windows fogged up
on the inside ......................................................... 115
Economy mode .......................................................... 117
Programming the
basic temperature setting ................................... 113
Rear passenger compartment
climate control ...................................................... 119
Rear window defroster ............................................. 121
Residual engine heat utilization ............................. 117
Switching off the rear passenger
compartment ventilation and
rear automatic climate control ........................... 118
Switching on and off ................................................. 118
Windshield fogged up on outside ........................... 115
Automatic climate control rear
Manual setting of air volume and
air distribution in the rear passenger
compartment ......................................................... 119