Page 2 of 342
Page 9 of 342

6 Contents
Vehicle careCleaning and care of the vehicle .298
Power washer ..............................299
Tar stains .....................................299
Paintwork, painted body
components .................................299
Engine cleaning ..........................300
Vehicle washing .........................300
Ornamental moldings ................300
Headlamps, taillamps, turn signal
lenses ...........................................300
Cleaning the parktronic system
sensors ......................................... 301
Window cleaning ........................ 301
Wiper blades ............................... 301
Light alloy wheels ......................302
Instrument cluster .....................302
Steering wheel and gear selector
lever ..............................................302
Cup holder ...................................302
Seat belts .....................................302
Headliner .....................................302
Upholstery ...................................303Hard plastic trim items ............. 303
Plastic and rubber parts ........... 303
Technical dataSpare parts service ....................... 306
Warranty coverage ........................ 306
Identification labels ...................... 307
Layout of poly-V-belt drive ........... 308
Technical data ................................ 309
Fuels, coolants, lubricants etc. –
capacities .................................... 314
Engine oils ....................................... 316
Engine oil additives ....................... 316
Air conditioner refrigerant ........... 316
Brake fluid ....................................... 316
Premium unleaded gasoline ......... 317
Fuel requirements ......................... 317
Gasoline additives .......................... 318
Coolants ........................................... 318
Consumer information ................. 320
IndexIndex ................................................322
Page 43 of 342
40 Seats
Te ch n i c a l
data Instruments
and controlsOperationDrivingInstrument
cluster displayPractical hints Car care Index
Manual seats (ML 320)
We recommend to adjust the manual seat in the
following order:
1Seat, fore / aft
Lift handle (1), slide seat to desired position and
allow handle to reengage. Check for proper
engagement before driving. The position should be
as far rearward as possible, consistent with ability to
properly operate controls.2Seat cushion tilt
Raise lever (2), move seat cushion to desired
position. Release lever.
3Backrest tilt
Turn handwheel (3) until your arms are slightly
angled when holding the steering wheel.
4Head restraint height
Raising:
Pull up on head restraint.
Lowering:
Push button (4), located at top of seat back, and
push down on head restraint.
Adj ust he ad r estrain t to supp ort the back of t he head
approximately at ear level. The head restraint angle
can also be adjusted manually.
See page 45 for removing head restraints.
Page 44 of 342

41 Seats
Te ch n i c a l
data Instruments
and controlsOperationDrivingInstrument
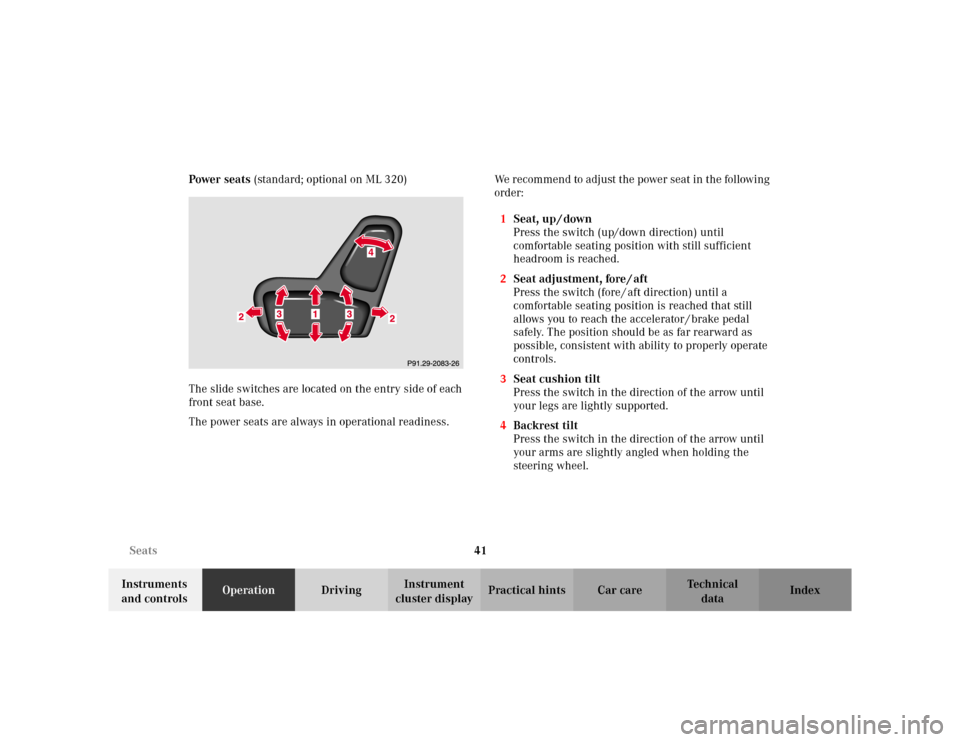
cluster displayPractical hints Car care Index Power seats (standard; optional on ML 320)
The slide switches are located on the entry side of each
front seat base.
The power seats are always in operational readiness.We recommend to adjust the power seat in the following
order:
1Seat, up / down
Press the switch (up/down direction) until
comfortable seating position with still sufficient
headroom is reached.
2Seat adjustment, fore / aft
Press the switch (fore / aft direction) until a
comfortable seating position is reached that still
allows you to reach the accelerator / brake pedal
safely. The position should be as far rearward as
possible, consistent with ability to properly operate
controls.
3Seat cushion tilt
Press the switch in the direction of the arrow until
your legs are lightly supported.
4Backrest tilt
Press the switch in the direction of the arrow until
your arms are slightly angled when holding the
steering wheel.
Page 49 of 342
46 Seats
Te ch n i c a l
data Instruments
and controlsOperationDrivingInstrument
cluster displayPractical hints Car care Index
Heated seats (optional on ML 320)
The seat heater switches are located on the center
console.
The seat heaters can be switched on with the engine
running.Press switch to turn on seat heater:
1Normal seat heating mode. One indicator lamp in
the switch lights up.
2Rapid seat heating mode. Both indicator lamps in
the switch light up.
After approximately 5 minutes in the rapid seat
heating mode, the seat heater automatically
switches to normal operation and only one indicator
lamp will stay on.
Turning off seat heater:
If one indicator lamp is on, press upper half of switch.
If both indicator lamps are on, press lower half of
switch.
If left on, the seat heater automatically turns off after
approximately 20 minutes of operation.
P54.25-2036-26
12
Page 78 of 342
75 Rear view mirrors
Te ch n i c a l
data Instruments
and controlsOperationDrivingInstrument
cluster displayPractical hints Car care Index Inside rear view mirrorUse your inside rear view mirror to determine the size
and distance of objects seen in the passenger side rear
view convex mirror.
Antiglare night position
Manual (only ML 320):
Tilt the inside rear view mirror to the antiglare night
position using the lever (1) at its lower edge.
Page 79 of 342

76 Rear view mirrors
Te ch n i c a l
data Instruments
and controlsOperationDrivingInstrument
cluster displayPractical hints Car care Index
Automatic (optional on ML 320):
With the key in steering lock position 2 and the
automatic antiglare function activated, the mirror
reflection brightness responds to changes in light
sensitivity.
To a c ti va te :
Press button (1). The green indicator lamp in the inside
rear view mirror lights up.To d e a c t i va t e :
Press button (1) again. The indicator lamp in the inside
rear view mirror goes out. The mirror brightness does
not respond to changes in light sensitivity.
Notes:
With gear selector lever in position “R”, or with the
interior lamps (except cargo compartment lamp)
switched on, the mirror brightness does not respond to
changes in light sensitivity.
The automatic antiglare function does not react, if
incoming light is not aimed directly at sensors in the
inside rear view mirror.
The antiglare function will not react for example, if the
cargo area is fully loaded.
Wa r n i n g !
In the case of an accident liquid electrolyte may
escape the mirror housing when the mirror glass
breaks.Electrolyte has an irritating effect. Do not allow the
liquid come into contact with eyes, skin, clothing,
or respiratory system. In cases it does, immediately
flush affected area with water, and seek medical
help if necessary.
Page 82 of 342

79 Rear view mirrors
Te ch n i c a l
data Instruments
and controlsOperationDrivingInstrument
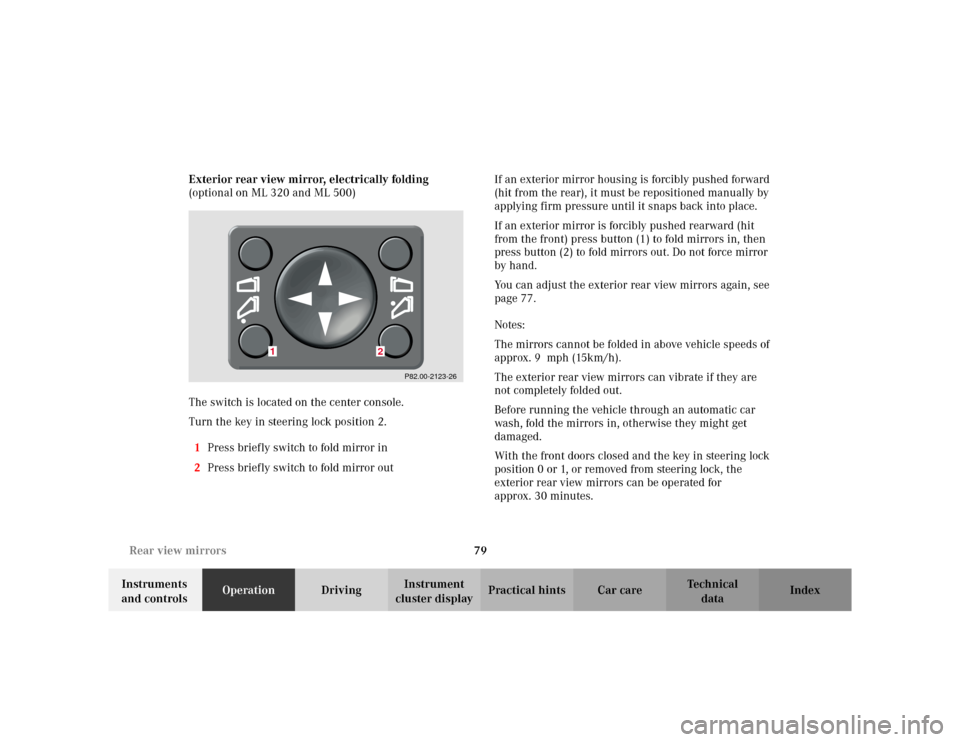
cluster displayPractical hints Car care Index Exterior rear view mirror, electrically folding
(optional on ML 320 and ML 500)
The switch is located on the center console.
Turn the key in steering lock position 2.
1Press briefly switch to fold mirror in
2Press briefly switch to fold mirror outIf an exterior mirror housing is forcibly pushed forward
(hit from the rear), it must be repositioned manually by
applying firm pressure until it snaps back into place.
If an exterior mirror is forcibly pushed rearward (hit
from the front) press button (1) to fold mirrors in, then
press button (2) to fold mirrors out. Do not force mirror
by hand.
You can adjust the exterior rear view mirrors again, see
page 77.
Notes:
The mirrors cannot be folded in above vehicle speeds of
approx. 9 mph (15km/h).
The exterior rear view mirrors can vibrate if they are
not completely folded out.
Before running the vehicle through an automatic car
wash, fold the mirrors in, otherwise they might get
damaged.
With the front doors closed and the key in steering lock
position 0 or 1, or removed from steering lock, the
exterior rear view mirrors can be operated for
approx. 30 minutes.
P82.00-2123-26
1
2