Page 115 of 342
112 Automatic climate control
Te ch n i c a l
data Instruments
and controlsOperationDrivingInstrument
cluster displayPractical hints Car care Index
Basic setting - automatic mode
To a c ti va te :
With the engine running, briefly press the Ubutton.
The indicator lamp in the Ubutton lights up. The
temperature, air volume and distribution are controlled
automatically.
Temperature can be adjusted with the temperature
control, which is located in the center.
Turning the control wheel to either the blue or red dot
switches off the temperature regulation.
To deactivate:
Briefly press the Ubutton. The indicator lamp in the
Ubutton goes out. The automatic mode is switched
off, air volume control is set to fan speed 2 and air
distribution is set to positionV.To activate basic setting:
Press Ubutton at least 3 seconds.
All functions are switched to automatic mode and
temperature is set to 72˚F (22˚C).
The rear window defroster may be switched on
manually.
P83.30-3551-21
Page 117 of 342
114 Automatic climate control
Te ch n i c a l
data Instruments
and controlsOperationDrivingInstrument
cluster displayPractical hints Car care Index
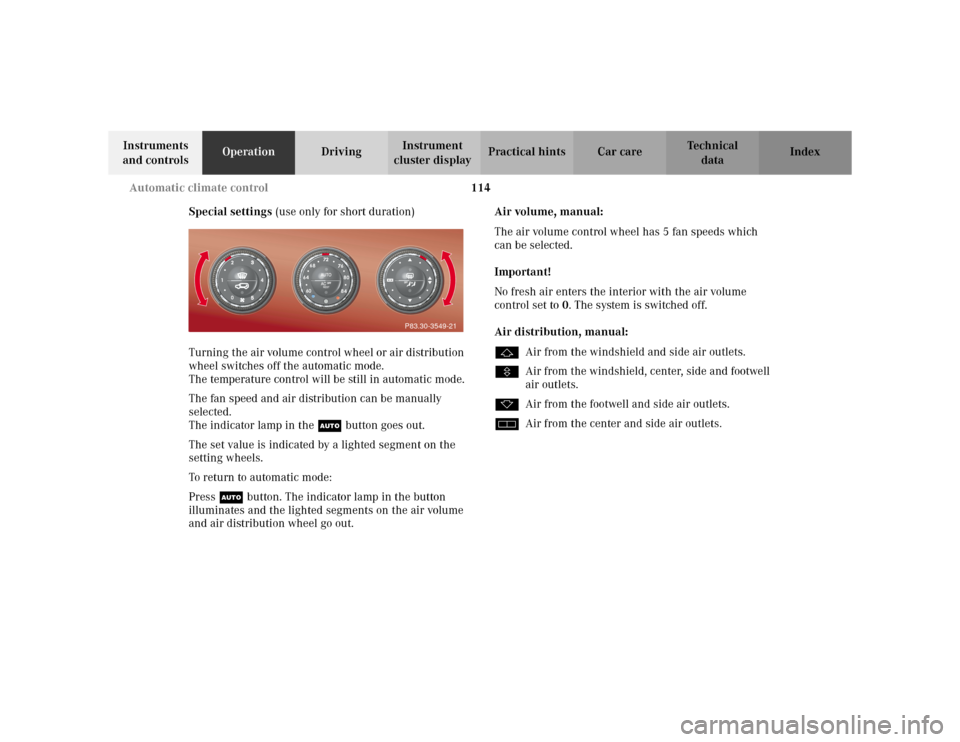
Special settings (use only for short duration)
Turning the air volume control wheel or air distribution
wheel switches off the automatic mode.
The temperature control will be still in automatic mode.
The fan speed and air distribution can be manually
selected.
The indicator lamp in the Ubutton goes out.
The set value is indicated by a lighted segment on the
setting wheels.
To return to automatic mode:
Press Ubutton. The indicator lamp in the button
illuminates and the lighted segments on the air volume
and air distribution wheel go out.Air volume, manual:
The air volume control wheel has 5 fan speeds which
can be selected.
Important!
No fresh air enters the interior with the air volume
control set to0. The system is switched off.
Air distribution, manual:
jAir from the windshield and side air outlets.
VAir from the windshield, center, side and footwell
air outlets.
kAir from the footwell and side air outlets.
hAir from the center and side air outlets.
P83.30-3549-21
Page 119 of 342
116 Automatic climate control
Te ch n i c a l
data Instruments
and controlsOperationDrivingInstrument
cluster displayPractical hints Car care Index
Air recirculation
This mode can be selected to temporarily reduce the
entry of annoying odors or dust into the vehicle’s
interior.
Outside air is not supplied to the vehicles’s interior.
To select, press briefly O button. The indicator lamp
in button lights up.
To cancel, press briefly O button again. The indicator
lamp in button goes out.
The system automatically switches from air
recirculation to fresh air, after:
•approx. 30 minutes, when the automatic climate
control switched on,
•approx. 5 minutes, when the automatic climate
control switched off.
•approx. 5 minutes, if the outside temperature is
below 45˚F (7˚C).
If the windows should fog up from the inside, switch
from recirculated air back to fresh air.Note:
To achieve the fastest possible cooling of the interior, the
automatic climate control automatically switches to air
recirculation.
The indicator lamp in the Obutton is not illuminated
when the system automatically switches to air
recirculation.
Page 126 of 342
123 Interior equipment
Te ch n i c a l
data Instruments
and controlsOperationDrivingInstrument
cluster displayPractical hints Car care Index Turn key in steering lock to position 1 or 2.
Opening the side windows:
Press k on the switch to resistance point.
Closing the side windows:
Press j on the switch to resistance point.
Release switch when window is in desired position.
Express opening and closing of windows
Press k or j on the switch past resistance point
and release – window opens or closes completely.
To interrupt procedure, briefly press j or k.
If the upward movement of the window is blocked
during the closing procedure, the window will stop
during the last few inches before closure and open
slightly.
When pressing and holding the switch j to close the
window, and upward movement of the window is
blocked during the last few inches before closure, it will
stop and reopen.
Wa r n i n g !
When closing the windows, be sure that there is no
danger of anyone being harmed by the closing
procedure.The closing procedure can be immediately reversed
by pressing the power window switch.When leaving the vehicle, always remove the key
from the steering lock, and lock the vehicle. Do not
leave children unattended in the vehicle, or with
access to an unlocked vehicle. Unsupervised use of
vehicle equipment can cause serious personal
injury.
Page 131 of 342
128 Interior equipment
Te ch n i c a l
data Instruments
and controlsOperationDrivingInstrument
cluster displayPractical hints Car care Index
Interior lighting
Lamps above instrument panel
Interior lamps above instrument panel are switched on,
and off (soft fade) delayed, when unlocking the vehicle,
or when opening a front door or closing front doors.
With doors closed, push on lamp lens to switch interior
lamps on or off.Reading lamps in inside rear view mirror
1Reading lamp, left
2Push button to switch left reading lamp on and off
3Push button to switch right reading lamp on and off
4Reading lamp, right
The reading lamps cannot be switched on and off by the
door contact switches.
RESETMOD
E
Page 134 of 342
131 Interior equipment
Te ch n i c a l
data Instruments
and controlsOperationDrivingInstrument
cluster displayPractical hints Car care Index Sun visors
Swing sun visors down to protect against sun glare.
If sunlight enters through a side window, disengage
visor from inner mounting, pivot it to the side, and slide
it to the desired position.Illuminated vanity mirrors
With the visor engaged in its inner mounting and with
key in steering lock position 1 or 2, the lamp is switched
on by opening the cover.
Wa r n i n g !
Do not use the vanity mirror while driving.
Page 188 of 342
185 Automatic transmission
Te ch n i c a l
data Instruments
and controlsOperationDrivingInstrument
cluster displayPractical hints Car care Index Maneuvering
To maneuver in tight areas, e.g. when pulling into a
parking space, control the vehicle speed by gradually
releasing the brakes. Accelerate gently and never
abruptly step on the accelerator.
To rock a vehicle out of soft ground (mud or snow),
alternately shift from forward to reverse, while applying
slight partial throttle.
Rocking a vehicle free in this manner may cause the
ABS or traction system malfunction indicator lamp to
come on. Turn off and restart the engine to clear the
malfunction indication.Towing a trailer
If the transmission hunts between gears on inclines,
manually shift to a lower gear (select “4”, “3”, “2”
or “1”). A lower gear and reduction of speed reduces the
chance of engine overloading and / or overheating.
At very steep inclines, not manageable with selector
lever in position “1”, switch transfer case to LOW
RANGE, see page 227 for instructions on how to engage
LOW RANGE.
For instructions on trailer towing refer to page 209.
Wa r n i n g !
Getting out of your vehicle with the selector lever
not fully engaged in position “P” is dangerous.
Also, when parked on an incline, position “P” alone
may not prevent your vehicle from moving,
possibly hitting people or objects.Always set the parking brake in addition to shifting
to position “P”, see page 191 for parking brake. When parked on an incline, also turn front wheel
against curb.
Wa r n i n g !
When leaving the vehicle always remove the key
from the steering lock, and lock the vehicle. Do not
leave children unattended in the vehicle, or with
access to an unlocked vehicle. Children could move
the gear selector lever from position “P”, which
could result in an accident or serious injury.
Page 197 of 342
194 Driving instructions
Te ch n i c a l
data Instruments
and controlsOperationDrivingInstrument
cluster displayPractical hints Car care Index
All checks and service work on the brake system should
be carried out by an authorized Mercedes-Benz Light
Truck Center.
Install only brake pads and brake fluid recommended by
Mercedes-Benz.Caution!
When driving down long and steep grades, relieve the
load on the brakes by shifting into a lower gear to use
the engine’s braking power. This helps prevent
overheating of the brakes and reduces brake pad wear.
After hard braking, it is advisable to drive on for some
time, rather than immediately parking, so the air stream
will cool down the brakes faster.
Driving off
Apply the service brakes to test them briefly after
driving off. Perform this procedure only when the road
is clear of other traffic.
Warm up the engine smoothly. Do not place full load on
the engine until the operating temperature has been
reached.
When starting off on a slippery surface, do not allow one
drive wheel to spin for an extended period with the ESP
switched off. Doing so may cause serious damage to the
drive train which is not covered by the Mercedes-Benz
Limited Warranty.
Wa r n i n g !
If other than recommended brake pads are
installed, or other than recommended brake fluid
is used, the braking properties of the vehicle can be
degraded to an extent that safe braking is
substantially impaired. This could result in an
accident.