Page 106 of 342
103 Fog lamp switch
Te ch n i c a l
data Instruments
and controlsOperationDrivingInstrument
cluster displayPractical hints Car care Index Fog lamp switch
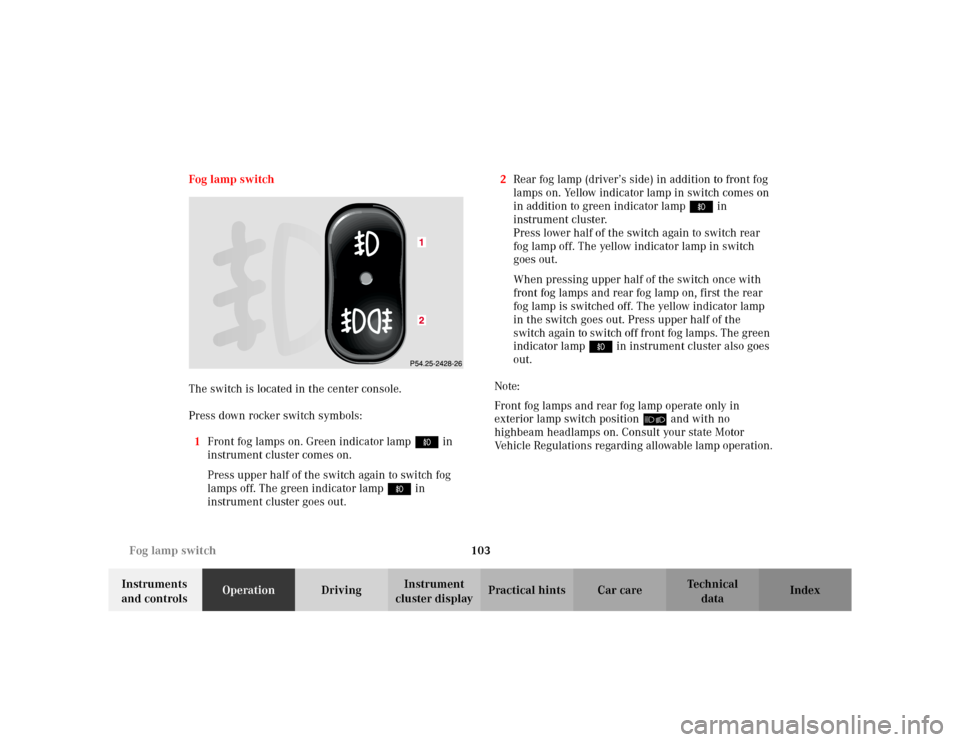
The switch is located in the center console.
Press down rocker switch symbols:
1Front fog lamps on. Green indicator lamp ‡ in
instrument cluster comes on.
Press upper half of the switch again to switch fog
lamps off. The green indicator lamp‡ in
instrument cluster goes out.2Rear fog lamp (driver’s side) in addition to front fog
lamps on. Yellow indicator lamp in switch comes on
in addition to green indicator lamp‡ in
instrument cluster.
Press lower half of the switch again to switch rear
fog lamp off. The yellow indicator lamp in switch
goes out.
When pressing upper half of the switch once with
front fog lamps and rear fog lamp on, first the rear
fog lamp is switched off. The yellow indicator lamp
in the switch goes out. Press upper half of the
switch again to switch off front fog lamps. The green
indicator lamp‡ in instrument cluster also goes
out.
Note:
Front fog lamps and rear fog lamp operate only in
exterior lamp switch position õ and with no
highbeam headlamps on. Consult your state Motor
Vehicle Regulations regarding allowable lamp operation.
Page 118 of 342
115 Automatic climate control
Te ch n i c a l
data Instruments
and controlsOperationDrivingInstrument
cluster displayPractical hints Car care Index Defrosting / Windows fogged up on the inside
To a c ti va te :
Press the Pbutton. The indicator lamp in the button
illuminates.
The automatic climate control switches automatically to:
•maximum heat and blower output
•air from the side and windshield air outlets
•Rear passenger ventilation is switched off.
To deactivate:
Press Pbutton again or Ubutton. The indicator
lamp in button goes out and the system returns to the
previous setting.
Note:
If the automatic climate control is in the defrost mode,
the rear window defroster may still be switched on
manually. No other settings are possible.Windshield fogged up on outside.
Switch on the windshield wiper.
Set air distribution wheel to positionj.
Page 119 of 342
116 Automatic climate control
Te ch n i c a l
data Instruments
and controlsOperationDrivingInstrument
cluster displayPractical hints Car care Index
Air recirculation
This mode can be selected to temporarily reduce the
entry of annoying odors or dust into the vehicle’s
interior.
Outside air is not supplied to the vehicles’s interior.
To select, press briefly O button. The indicator lamp
in button lights up.
To cancel, press briefly O button again. The indicator
lamp in button goes out.
The system automatically switches from air
recirculation to fresh air, after:
•approx. 30 minutes, when the automatic climate
control switched on,
•approx. 5 minutes, when the automatic climate
control switched off.
•approx. 5 minutes, if the outside temperature is
below 45˚F (7˚C).
If the windows should fog up from the inside, switch
from recirculated air back to fresh air.Note:
To achieve the fastest possible cooling of the interior, the
automatic climate control automatically switches to air
recirculation.
The indicator lamp in the Obutton is not illuminated
when the system automatically switches to air
recirculation.
Page 120 of 342
117 Automatic climate control
Te ch n i c a l
data Instruments
and controlsOperationDrivingInstrument
cluster displayPractical hints Car care Index Economy mode
The function of this setting corresponds to the
automatic mode. However, because the air conditioning
compressor will not engage (fuel savings), it is not
possible to air condition in this setting.
Press AC
OFF
button to activate. The indicator lamp in the
button illuminates.
Press AC
OFF
button once again to return to the previous
setting.
Important!
In the mode AC
OFF
the windows could fog up on the
inside. Switch off ACOFF
mode.Residual engine heat utilization
With the engine switched off, it is possible to continue
to heat or ventilate the interior for a short while,
dependent of the temperature set in the climate control.
Air volume and distribution are controlled
automatically.
To s e l e c t :
Turn the key in steering lock to position 1.
Press buttonT. The indicator lamp in the button
illuminates.
To s w i tch o f f :
Press buttonT. The indicator lamp in the button
goes out.
This function selection is automatically switched off,
•if turning the key in steering lock to position 2,
•after approx. 30 minutes,
•if the coolant temperature is too low and
•if the battery voltage drops.
Note:
The fan switches to a lower speed independent of the
setting of the air volume control.
Page 121 of 342
118 Automatic climate control
Te ch n i c a l
data Instruments
and controlsOperationDrivingInstrument
cluster displayPractical hints Car care Index
Switching the automatic climate control on and off
To s witch of f:
Set air volume control wheel to position0.
The indicator lamp in the Ubutton goes out.
The fresh air supply to the vehicle interior is shut off.
While driving, use this setting only temporarily,
otherwise the windshield could fog up.
To s witch on:
Press the Ubutton. The indicator lamp in the button
illuminates.Switching off the rear passenger compartment
ventilation and rear passenger climate control
For an improved cooling or heating output in the front
passenger compartment, the rear passenger
compartment ventilation can be switched off.
To s w i tch o f f :
Press the REAR-OFF button, see page 110. The indicator
lamp in the button illuminates.
The operation of the rear automatic climate control in
the center console and the fresh air supply to the rear
compartment is shut off.
To a c t i va t e :
Press REAR-OFF button again. The indicator lamp in the
button goes out.
The rear automatic climate control in the center console
switches to automatic mode and fresh air enters the rear
compartment.
For notes on the rear passenger compartment climate
control, see page 119.
Page 240 of 342
237 What you should know at the gas station
Te ch n i c a l
data Instruments
and controlsOperationDrivingInstrument
cluster displayPractical hints Car care Index • Coolant
For normal replenishing, use water (potable water
quality).
For further information (e.g. anticorrosion/
antifreeze), see page 314.
• Spark plugs
Approved spark plugs, see page 312.
• Tire pressure
For tire pressure, refer to tire pressure label inside
the fuel filler flap. See page 272 for further details.
• Air conditioner
R-134a refrigerant and special PAG lubricant, see
page 316.•Bulbs
high beam: H7(55 W),
low beam: H7 (55 W)
low beam: BiXenon D2S - 35 W (optional)
fog lamps: H8 (35 W)
fog lamps: H3 (55 W) (optional)
turn signal, parking, side marker and standing
lamps, front: 1157 (32 / 3 cp),
stop lamps: P 21 W (1073 [32 cp]),
backup lamps: P 21 W (1073 [32 cp]),
turn signal lamps, rear: P Y 21 W,
tail, parking, standing, and rear fog lamp, driver’s
side: P 21/4 W,
side marker lamp, rear: W 5 W,
license plate lamps: C 5 W (tubular),
high mounted stop lamp: P 21 W (1073 [32 cp]).
Page 289 of 342
286 Exterior lamps
Te ch n i c a l
data Instruments
and controlsOperation DrivingInstrument
cluster displayPractical hintsCar care Index
Fog lamp assembly
The foglamps are located in the front bumper.
Check and readjust foglamps at regular intervals and
when a bulb has been replaced.
Removing fog lamp assembly:
Remove foglamp holder from bumper by pressing
locking tab of fog lamp holder using a suitable tool
(e.g. screw driver). Swing fog lamp holder out of bumper
and remove fog lamp from holder.1Bulbs for fog lamps
H8 35 W
2Ta b s
Remove connector from lamp (1), turn lamp socket
towards left and pull out. Remove bulb.
Insert new bulb into lamp socket and insert into
housing. Turn socket towards right.
During fog lamp installation, make sure that fog lamp
tabs (2) firmly seat into the slots of the holder.
P82.10-2764-26
Page 290 of 342
287 Exterior lamps
Te ch n i c a l
data Instruments
and controlsOperation DrivingInstrument
cluster displayPractical hintsCar care Index Taillamp assemblies
1Stop lamp (1073 [32 cp bulb])
2Backup lamp (1073 [32 cp bulb])
3Turn signal lamp (P Y 21 W bulb)
4Tail, parking, standing lamp, driver’s side rear fog
lamp (P 21 / 4 W bulb)
5Side marker lamp W 5 WOpen liftgate.
Remove screws (1).
Remove taillamp.
Note.
Spacers are used under the taillamp mounting tabs.
During reinstallation make sure that the spacers are
properly installed onto the screws.
P82.10-2755-26