2002 MERCEDES-BENZ G500 hood release
[x] Cancel search: hood releasePage 8 of 385

5 Contents
Practical hintsFirst aid kit, vehicle tools
and jack ......................................296
CD-changer .....................................296
Fuses ................................................297
Electrical outlet .............................. 301
Stowing items in the vehicle ........ 301
Hood .................................................302
Checking engine oil level .............304
Automatic transmission
fluid level ...................................305
Engine oil consumption ................305
Coolant level ...................................306
Adding coolant ...........................306
Windshield washer/headlamp
cleaning system .........................307
Windshield and headlamp
washer fluid mixing ratio .........307Vehicle jack .................................... 308
Wheels ............................................. 310
Tire replacement ........................ 310
Rotating wheels .......................... 311
Spare wheel cover ..........................312
Spare wheel ..................................... 313
Changing wheels ............................ 314
Tire inflation pressure .................. 318
Battery .............................................. 319
Jump starting ................................. 321
Towing the vehicle ........................ 324
Transmission selector lever,
manually unlocking .................. 327
Stranded vehicle ............................ 327
Exterior lamps ............................... 328
Headlamp assembly .................. 329
Fog lamp, front ........................... 332
Turn signal lamp, front ............ 334Turn signal lamp, side ...............335
Front and rear
side marker lamps .....................337
Taillamp assemblies ..................339
License plate lamp .....................340
Rear fog lamp / Backup lamp ... 341
Changing batteries in
the electronic key .....................343
Synchronizing
remote control ............................345
Emergency operation of
sliding/pop-up roof ...................346
Manual release for
fuel filler flap .............................347
Replacing wiper blades .................348
J_G463.book Seite 5 Mittwoch, 19. September 2001 8:06 08
Page 63 of 385
60 Restraint systems
Te ch n i c a l
data Instruments
and controlsOperationDrivingInstrument
cluster displayPractical hints Car care Index
Operation of seat belts
The inertia reel stops the belt from unwinding during
sudden vehicle stops or when quickly pulling on the
belt. The locking function of the reel may be checked by
quickly pulling out the belt.
Unfastening of seat belts
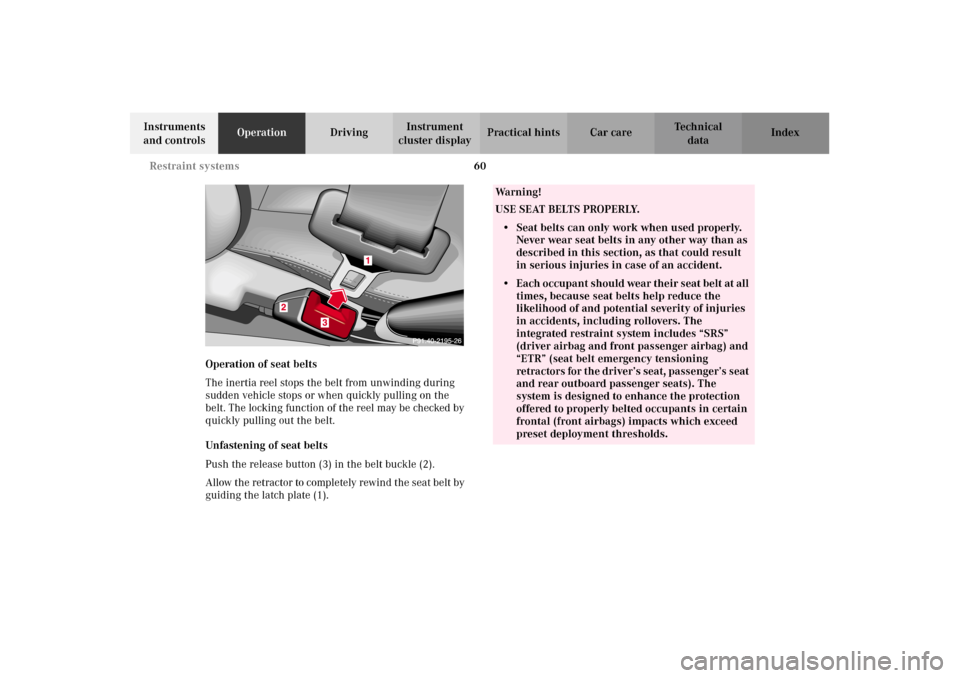
Push the release button (3) in the belt buckle (2).
Allow the retractor to completely rewind the seat belt by
guiding the latch plate (1).
Wa r n i n g !
USE SEAT BELTS PROPERLY.• Seat belts can only work when used properly.
Never wear seat belts in any other way than as
described in this section, as that could result
in serious injuries in case of an accident.• Each occupant should wear their seat belt at all
times, because seat belts help reduce the
likelihood of and potential severity of injuries
in accidents, including rollovers. The
integrated restraint system includes “SRS”
(driver airbag and front passenger airbag) and
“ETR” (seat belt emergency tensioning
retractors for the driver’s seat, passenger’s seat
and rear outboard passenger seats). The
system is designed to enhance the protection
offered to properly belted occupants in certain
frontal (front airbags) impacts which exceed
preset deployment thresholds.
J_G463.book Seite 60 Mittwoch, 19. September 2001 8:06 08
Page 268 of 385
265 Malfunction and indicator lamps
Te ch n i c a l
data Instruments
and controlsOperation DrivingInstrument
cluster displayPractical hints Car care Index On-board diagnostic system
Check engine malfunction indicator lamp
Engine malfunction indicator lamp. If the
“CHECK ENGINE” malfunction indicator
lamp comes on when the engine is running,
it indicates a malfunction of the fuel management
system, emission control system, systems which impact
emissions, or the fuel cap is not closed tight (check the
fuel cap). If the “CHECK ENGINE” lamp is illuminated
continuously and the vehicle is driving normally, you
may still drive the vehicle, however, in all cases, we
recommend that you have the system checked at your
authorized Mercedes-Benz Light Truck Center as soon
as possible.
If the “CHECK ENGINE” lamp comes on continuously
and / or the vehicle is not driving normally (e.g.
malfunction of the fuel management system or running
out of fuel), serious damage can occur to the emission
system. Please contact your authorized Mercedes-Benz
Light Truck Center immediately.The Sequential Multiport Fuel Injection (SFI) control
module monitors emission control components that
either provide input signals to or receive output signals
from the control module. Malfunctions resulting from
interruptions or failure of any of these components are
indicated by the “CHECK ENGINE” malfunction
indicator lamp in the instrument cluster and are
simultaneously stored in the SFI control module.
If the “CHECK ENGINE” malfunction indicator lamp
comes on, have the system checked at your authorized
Mercedes-Benz Light Truck Center as soon as possible.
With some exceptions, the control module switches off
the “CHECK ENGINE” malfunction indicator lamp if the
condition, causing the lamp to come on, no longer exists
during three consecutive cycles.
An on-board diagnostic connector is located in
passenger compartment on the driver’s side near hood
lock release on the upper left of footwell, allowing the
accurate identification of system malfunctions through
the readout of diagnostic trouble codes.
J_G463.book Seite 265 Mittwoch, 19. September 2001 8:06 08
Page 298 of 385
295 Contents - Practical hints
Te ch n i c a l
data Instruments
and controlsOperation DrivingInstrument
cluster displayPractical hintsCar care Index
Practical hintsFirst aid kit, vehicle tools
and jack ......................................296
CD-changer .....................................296
Fuses ................................................297
Electrical outlet .............................. 301
Stowing items in the vehicle ........ 301
Hood .................................................302
Checking engine oil level .............304
Automatic transmission
fluid level ...................................305
Engine oil consumption ................305
Coolant level ...................................306
Adding coolant ...........................306
Windshield washer/headlamp
cleaning system .........................307
Windshield and headlamp
washer fluid mixing ratio .........307Vehicle jack .................................... 308
Wheels ............................................. 310
Tire replacement ........................ 310
Rotating wheels .......................... 311
Spare wheel cover ..........................312
Spare wheel ..................................... 313
Changing wheels ............................ 314
Tire inflation pressure .................. 318
Battery .............................................. 319
Jump starting ................................. 321
Towing the vehicle ........................ 324
Transmission selector lever,
manually unlocking .................. 327
Stranded vehicle ............................ 327
Exterior lamps ............................... 328
Headlamp assembly .................. 329
Fog lamp, front ........................... 332
Turn signal lamp, front ............ 334Turn signal lamp, side ...............335
Front and rear
side marker lamps .....................337
Taillamp assemblies ..................339
License plate lamp .....................340
Rear fog lamp / Backup lamp ... 341
Changing batteries in
the electronic key .....................343
Synchronizing
remote control ............................345
Emergency operation of
sliding/pop-up roof ...................346
Manual release for
fuel filler flap .............................347
Replacing wiper blades .................348
J_G463.book Seite 295 Mittwoch, 19. September 2001 8:06 08
Page 305 of 385
302 Engine compartment
Te ch n i c a l
data Instruments
and controlsOperation DrivingInstrument
cluster displayPractical hintsCar care Index
Hood
To o pen :
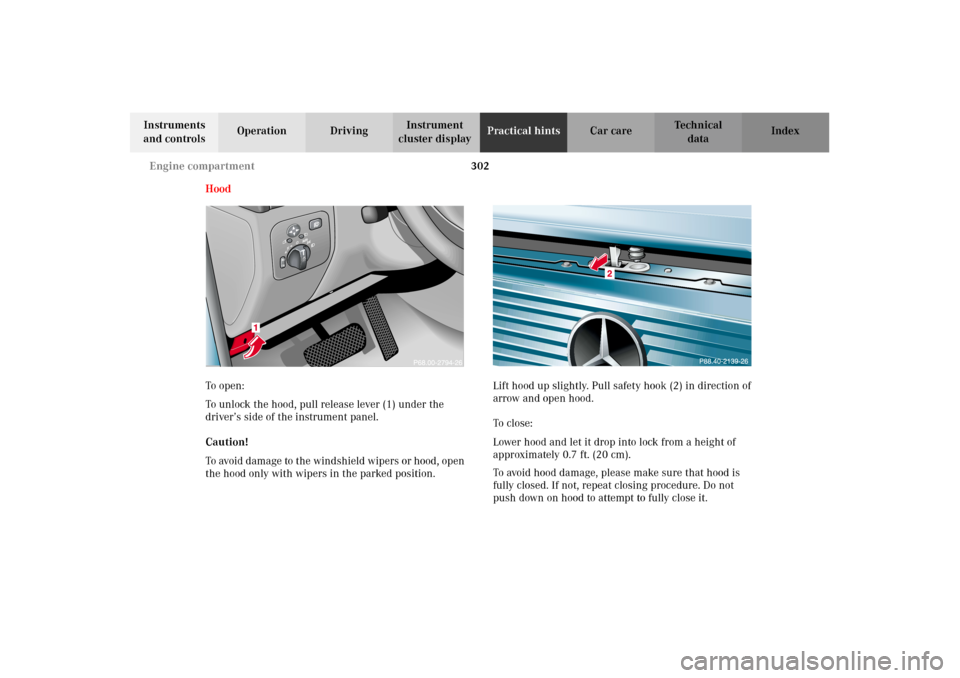
To unlock the hood, pull release lever (1) under the
driver’s side of the instrument panel.
Caution!
To avoid damage to the windshield wipers or hood, open
the hood only with wipers in the parked position.Lift hood up slightly. Pull safety hook (2) in direction of
arrow and open hood.
To c l o s e :
Lower hood and let it drop into lock from a height of
approximately 0.7 ft. (20 cm).
To avoid hood damage, please make sure that hood is
fully closed. If not, repeat closing procedure. Do not
push down on hood to attempt to fully close it.
J_G463.book Seite 302 Mittwoch, 19. September 2001 8:06 08
Page 376 of 385
373 Index
Te ch n i c a l
data Instruments
and controlsOperation DrivingInstrument
cluster displayPractical hints Car careIndex Fuel
Gasoline additives ....................................................365
Premium unleaded gasoline ................. 259, 362, 364
Fuel filler flap, manual release ...................................347
Fuel requirements ......................................................... 364
Fuel reserve warning ....................................................268
Fuels, coolants, lubricants etc. - Capacities .............. 361
Fuse box in battery box ................................................300
Fuse box in front passenger footwell ......................... 298
Fuse box in middle tunnel ........................................... 299
Fuse box in the passenger compartment ................... 297
Fuses, electrical ............................................................. 297
GGarage door opener ....................................................... 185
Gasoline
Additives .................................................................... 365
Fuel requirements ....................................................364
Premium unleaded ................................................... 364
Glove box ......................................................................... 163
HHazard warning flasher switch ................................... 139
Head restraints
Rear ............................................................................. 173
Removal ...................................................................... 173
Head restraints, front seats
Removal and installation ........................................... 51
Headlamp assembly
Halogen ...................................................................... 329
Headlamp cleaning system ........................................... 133
Headlamp mode (HEADLAMPS) .................................. 130
Heated seats, front ........................................................... 52
Heated seats, rear ............................................................ 54
High and low beam, bulb .............................................. 331
Hood ................................................................................ 302IIdentification labels ...................................................... 357
Illuminated vanity mirrors ........................................... 161
Indicator lamps in the instrument cluster ...................86
J_G463.book Seite 373 Mittwoch, 19. September 2001 8:06 08