Page 330 of 385

327 Towing
Te ch n i c a l
data Instruments
and controlsOperation DrivingInstrument
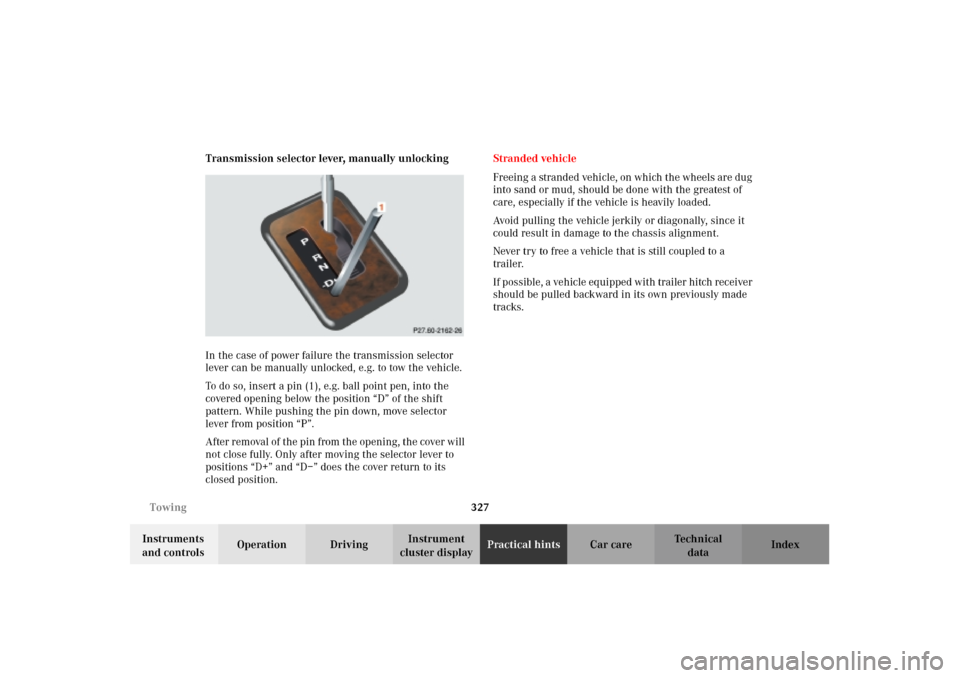
cluster displayPractical hintsCar care Index Transmission selector lever, manually unlocking
In the case of power failure the transmission selector
lever can be manually unlocked, e.g. to tow the vehicle.
To do so, insert a pin (1), e.g. ball point pen, into the
covered opening below the position “D” of the shift
pattern. While pushing the pin down, move selector
lever from position “P”.
After removal of the pin from the opening, the cover will
not close fully. Only after moving the selector lever to
positions “D+” and “D–” does the cover return to its
closed position.Stranded vehicle
Freeing a stranded vehicle, on which the wheels are dug
into sand or mud, should be done with the greatest of
care, especially if the vehicle is heavily loaded.
Avoid pulling the vehicle jerkily or diagonally, since it
could result in damage to the chassis alignment.
Never try to free a vehicle that is still coupled to a
trailer.
If possible, a vehicle equipped with trailer hitch receiver
should be pulled backward in its own previously made
tracks.
J_G463.book Seite 327 Mittwoch, 19. September 2001 8:06 08
Page 331 of 385
328 Exterior lamps
Te ch n i c a l
data Instruments
and controlsOperation DrivingInstrument
cluster displayPractical hintsCar care Index
Exterior lamps
Headlamp adjustment
Correct headlamp adjustment is extremely important.
Check and readjust headlamps at regular intervals and
when a bulb has been replaced.Replacing bulbs
To prevent a possible electrical short circuit, switch off
lamp prior to replacing a bulb.
When replacing bulbs, install only 12 volt bulbs with
the specified watt rating.
When replacing halogen bulbs do not touch glass
portion of bulb with bare hands. Use plain paper or a
clean cloth.
Wa r n i n g !
Bulbs and bulb holders can be very hot. Allow the
lamp to cool down before changing a bulb.
Halogen lamps contain pressurized gas. A bulb can
explode if you:
• touch or move it when hot,
•drop the bulb,
• scratch the bulb.Wear eye and hand protection.
J_G463.book Seite 328 Mittwoch, 19. September 2001 8:06 08
Page 332 of 385
329 Exterior lamps
Te ch n i c a l
data Instruments
and controlsOperation DrivingInstrument
cluster displayPractical hintsCar care Index Headlamp assembly (Halogen)
1Securing screw
2Head lamp trim panel
3Headlamp
4Headlamp-securing screwTo r e m ove h e a d l a mp :
Unscrew securing screws (1) and remove head lamp
trim panel (2) and seal.
Unscrew headlamp-securing screws (4) and remove
headlamp (3).
Vehicle with brush guard (MB Accessory):
The brush guard must be lowered before the headlamp
bulbs can be replaced, see page 182.
4
4
4
J_G463.book Seite 329 Mittwoch, 19. September 2001 8:06 08
Page 333 of 385
330 Exterior lamps
Te ch n i c a l
data Instruments
and controlsOperation DrivingInstrument
cluster displayPractical hintsCar care Index
5Protection cover
6Electrical connector (standing- and parking lamp)
7Electrical connector (high- and low beam)8Retainer spring
9Bulb for high- and low beam
10Bulb socket for standing- and parking lamp
J_G463.book Seite 330 Mittwoch, 19. September 2001 8:06 08
Page 334 of 385

331 Exterior lamps
Te ch n i c a l
data Instruments
and controlsOperation DrivingInstrument
cluster displayPractical hintsCar care Index Bulbs for low and high beam
H4 60 / 55W 12V
Remove protection cover (5) and pull off electrical
connector (6).
Unclip retainer spring (8) and take out bulb (9).
Insert new bulb so that the base locates in the recess on
the holder.
Clip in retainer spring (8), plug the electrical
connector (6) onto the bulb (9) and press on protection
cover (5).
Bulbs for parking and standing lamp
T 4W 12V
Pull off electrical connector (6) from the bulb (10).
Push bulb (10) into socket, turn counterclockwise and
remove.
Insert new bulb (10) in socket, push in and turn
clockwise until it clicks in.
Plug electrical connector (6) onto the bulb (10).To reinstall headlamp:
Insert headlamp (3) and screw in headlamp-securing
screws (4).
Install head lamp trim panel (2) and seal and screw in
securing screws (1).
J_G463.book Seite 331 Mittwoch, 19. September 2001 8:06 08
Page 335 of 385
332 Exterior lamps
Te ch n i c a l
data Instruments
and controlsOperation DrivingInstrument
cluster displayPractical hintsCar care Index
Fog lamp, front
1Securing screw
2Fog lamp trim panel
3Fog lamp
4Fog lamp-securing screw
5Fog lamp adjustment screwTo r e m ove fo g l a mp :
Unscrew securing screws (1) and remove fog lamp trim
panel (2).
Unscrew fog lamp-securing screws (4) and remove fog
lamp (3).
Note:
Do not turn fog lamp adjustment screw (5). In this case
fog lamp must be adjusted.
1
1
3
2
4
45
J_G463.book Seite 332 Mittwoch, 19. September 2001 8:06 08
Page 336 of 385
333 Exterior lamps
Te ch n i c a l
data Instruments
and controlsOperation DrivingInstrument
cluster displayPractical hintsCar care Index 6Electrical connector
7Retainer spring
8Bulb socket for fog lamp Pull off electrical connector (6) and unclip retainer
spring (7).
Pull out bulb socket (8).
Insert new bulb so that the base locates in the recess on
the holder.
Clip in retainer spring (7) and plug the electrical
connector (6) together.
To reinstall fog lamp:
Insert fog lamp (3) and screw in fog lamp-securing
screws (4).
Install fog lamp trim panel (2) and screw in securing
screws (1).
67
8
J_G463.book Seite 333 Mittwoch, 19. September 2001 8:06 08
Page 337 of 385
334 Exterior lamps
Te ch n i c a l
data Instruments
and controlsOperation DrivingInstrument
cluster displayPractical hintsCar care Index
Turn signal lamp, front
1Securing screw
2Turn signal lens
3Bulb for turn signal lamp
PY 21W 12V (1156NA[cp 32])Unscrew securing screws (1) and remove turn signal
lens (2).
Push bulb (3) into socket, turn counterclockwise and
remove.
Insert new bulb (3) in socket, push in and turn
clockwise until it clicks in.
Install turn signal lens (2) and screw in securing
screws (1).
Do not overtighten the securing screws, as this could
cause the turn signal lens to break.
J_G463.book Seite 334 Mittwoch, 19. September 2001 8:06 08