2002 MERCEDES-BENZ E430 Remove tire
[x] Cancel search: Remove tirePage 7 of 350

4 Contents
AIRBAG OFF indicator lamp .....239
Malfunction and warning
messages in the
multifunction display ...............240
DISPLAY DEFECTIVE ................ 241
BATTERY / ALTERNATOR .........242
ABS-SYSTEM ...............................243
BRAKE ASSIST ...........................243
BRAKE LINING WEAR ..............244
BRAKE FLUID .............................244
PARKING BRAKE .......................245
ENGINE FAN ...............................245
COOLANT (coolant level) ..........246
COOLANT TEMP. ........................247
LIGHTING SYSTEM ....................248
LIGHT SENSOR ...........................249
REMOVE KEY .............................249
STEERING GEAR OIL .................250
ENGINE OIL LEVEL ................... 251
WASHER FLUID ..........................252
ELEC. STABIL. PROG.
(Electronic stability program) ..253
TELE AID .....................................253
Practical hintsFirst aid kit ..................................... 256
Stowing things in the vehicle ...... 256
Fuses ............................................... 257
Hood ................................................ 259
Checking engine oil level ............. 262
Automatic transmission
fluid level ................................... 263
Coolant level ................................... 263
Adding coolant ........................... 264
Windshield and headlamp
washer system .......................... 265
Windshield and headlamp
washer fluid mixing ratio ........ 265
Spare wheel, vehicle tools,
storage compartment ............... 266
Vehicle jack .................................... 267
Wheels ............................................ 268
Tire replacement ....................... 268
Rotating wheels ......................... 269
Spare wheel .................................... 270
Spare wheel bolts ...................... 270Spare wheel .................................... 271
Changing wheels ...........................273
Tire inflation pressure ..................278
Battery .............................................280
Jump starting ..................................282
Towing the vehicle .........................285
Transmission selector lever,
manually unlocking ..................287
Exterior lamps ................................288
Headlamp assembly ...................289
Taillamp assemblies ..................292
Changing batteries
in the electronic main key ......294
Synchronizing
remote control ............................296
Emergency engine shut-down .....296
Rear seat cushion ..........................297
Emergency operation of
sliding / pop-up roof .................298
Manual release for
fuel filler flap .............................299
Replacing wiper blade insert .......300
Roof rack .........................................302
W210.book Seite 4 Mittwoch, 30. Mai 2001 11:45 11
Page 206 of 350
203 Driving instructions
Technical
data Instruments
and controlsOperationDrivingInstrument
cluster displayPractical hints Car care Index Driving instructions
Drive sensibly - Save Fuel
Fuel consumption, to a great extent, depends on driving
habits and operating conditions.
To save fuel you should:
•keep tires at the recommended inflation pressures,
•remove unnecessary loads,
•remove roof rack when not in use,
•allow engine to warm up under low load use,
•avoid frequent acceleration and deceleration,
•have all maintenance work performed at regular
intervals by an authorized Mercedes-Benz Center.
Fuel consumption is also increased by driving in cold
weat her, i n stop -and -go traf f ic, on short trip s an d i n hilly
country.Drinking and driving
Ped al s
Wa r n i n g !
Drinking or taking drugs and driving can be a very
dangerous combination. Even a small amount of
alcohol or drugs can affect your reflexes,
perceptions and judgement.The possibility of a serious or even fatal accident is
sharply increased when you drink or take drugs
and drive.Please don’t drink or take drugs and drive or allow
anyone to drive after drinking or taking drugs.Wa r n i n g !
Keep driver’s foot area clear at all times. Objects
stored in this area may impair pedal movement.
W210.book Seite 203 Mittwoch, 30. Mai 2001 11:45 11
Page 209 of 350
206 Driving instructions
Technical
data Instruments
and controlsOperationDrivingInstrument
cluster displayPractical hints Car care Index
Parking
Important!
It is advisable to set the parking brake whenever
parking or leaving the vehicle. In addition, move
selector lever to position “P”.
When parking on hills, always set the parking brake.Tires
Tread wear indicators (TWI) are required by law. These
indicators are located in six places on the tread
circumference and become visible at a tread depth of
approximately
1/16 in (1.5 mm), at which point the tire is
considered worn and should be replaced.
The tread wear indicator appears as a solid band across
the tread.
Wa r n i n g !
To reduce the risk of personal injury as a result of
vehicle movement, before
turning off the engine
and leaving the vehicle, always:
1. Keep right foot on the service brake pedal.
2. Firmly depress parking brake pedal.
3. Move the selector lever to position “P”.
4. Slowly release the service brake pedal.
5. Turn front wheels towards the road curb.
6. Turn the electronic key to steering lock
position 0 and remove.
7. Take the electronic key and lock vehicle when
leaving.
Wa r n i n g !
If you feel a sudden significant vibration or ride
disturbance, or you suspect that possible damage to
your vehicle has occurred, you should turn on the
hazard warning flashers, carefully slow down, and
drive with caution to an area which is a safe
distance from the roadway.Inspect the tires and under the vehicle for possible
damage. If the vehicle or tires appear unsafe, have
it towed to the nearest Mercedes-Benz Center or
tire dealer for repairs.
W210.book Seite 206 Mittwoch, 30. Mai 2001 11:45 11
Page 212 of 350
209 Driving instructions
Technical
data Instruments
and controlsOperationDrivingInstrument
cluster displayPractical hints Car care Index Snow chains
Use only snow chains that are tested and recommended
by Mercedes-Benz. Your authorized Mercedes-Benz
Center will be glad to advise you on this subject.
Chains should only be used on the rear wheels. Follow
the manufacturer’s mounting instructions.
Snow chains should only be driven on snow covered
roads at speeds not to exceed 30 mph (50 km / h).
Remove chains as soon as possible when driving on
roads without snow.
When driving with snow chains, press the ESP control
switch to OFF, see page 220.
Model E 55 AMG:
Use of snow chains is not permissible with tire size
275 / 35 ZR 18.Winter driving instructions
The most important rule for slippery or icy roads is to
drive sensibly and to avoid abrupt acceleration, braking
and steering maneuvers. Do not use the cruise control
system under such conditions.
When the vehicle is in danger of skidding, move
selector lever to position “N”. Try to keep the vehicle
under control by corrective steering action.
Road salts and chemicals can adversely affect braking
efficiency. Increased pedal force may become necessary
to produce the normal brake effect. We therefore
recommend depressing the brake pedal periodically
when traveling at length on salt-strewn roads. This can
bring road salt impaired braking efficiency back to
normal. A prerequisite is, however, that this be done
without endangering other drivers on the road.
If the vehicle is parked af ter being driven on salt treated
roads, the braking ef f iciency should be tested as soon as
possible after driving is resumed while observing the
safety rules in the previous paragraph.
Exceeding the maximum speed for which tires are
rated can lead to sudden tire failure causing loss of
vehicle control and resulting in personal injury
and possible death.
W210.book Seite 209 Mittwoch, 30. Mai 2001 11:45 11
Page 269 of 350

266 Spare wheel
Technical
data Instruments
and controlsOperation DrivingInstrument
cluster displayPractical hintsCar care Index
Spare wheel, vehicle tools, storage compartment
1Trunk floor
2Handle
3Luggage bowl
4Vehicle toolsLift trunk floor and engage handle in upper edge of the
trunk.
To remove spare tire:
Turn luggage bowl counterclockwise and remove.
To store spare tire:
Place spare tire in wheel well and secure it with luggage
bowl. Turn luggage bowl clockwise to its stop.
Note:
Always lower trunk floor before closing trunk lid.
P40.10-2244-26
1
2
34
W210.book Seite 266 Mittwoch, 30. Mai 2001 11:45 11
Page 272 of 350
269 Tires, Wheels
Technical
data Instruments
and controlsOperation DrivingInstrument
cluster displayPractical hintsCar care Index Rotating wheels
Rotation of wheels does not apply to model E 55 AMG
with summer tires.
The wheels can be rotated according to the degree of
tire wear while retaining the same direction of travel.
Rotating, however, should be carried out at as
recommended by the tire manufacturer, before the
characteristic tire wear pattern (shoulder wear on front
wheels and tread center wear on rear wheels) becomes
visible, as otherwise the driving properties deteriorate.
Important!
Unidirectional tires must always be mounted with arrow
on tire sidewall pointing in direction of vehicle forward
movement.Notes:
Thoroughly clean the inner side of the wheels any time
you rotate the wheels or wash the vehicle underside.
The use of retread tires is not recommended. Retread
tires may adversely affect the handling characteristics
and safety of the vehicle.
Dented or bent rims can cause tire pressure loss and
damage to the tire beads. For this reason, check rims for
damage at regular intervals. The rim flanges must be
checked for wear before a tire is mounted. Remove
burrs, if any.
Check and ensure proper tire inflation pressure after
rotating the wheels. For tire inflation pressure see
page 278.
W210.book Seite 269 Mittwoch, 30. Mai 2001 11:45 11
Page 277 of 350
274 Tires, Wheels
Technical
data Instruments
and controlsOperation DrivingInstrument
cluster displayPractical hintsCar care Index
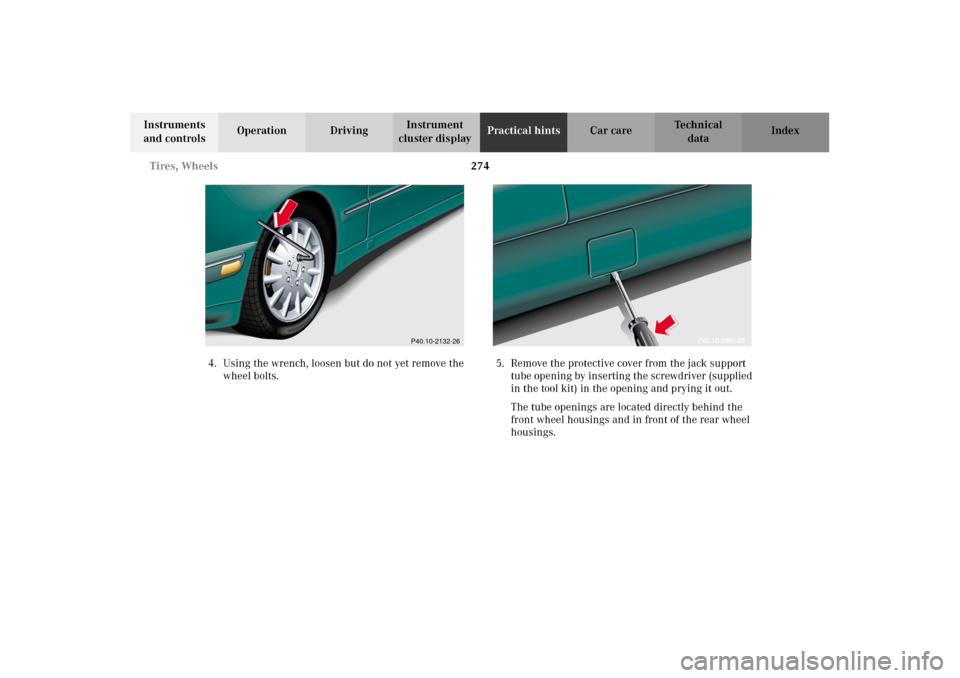
4. Using the wrench, loosen but do not yet remove the
wheel bolts.5. Remove the protective cover from the jack support
tube opening by inserting the screwdriver (supplied
in the tool kit) in the opening and prying it out.
The tube openings are located directly behind the
front wheel housings and in front of the rear wheel
housings.
P40.10-2132-26
W210.book Seite 274 Mittwoch, 30. Mai 2001 11:45 11
Page 278 of 350
275 Tires, Wheels
Technical
data Instruments
and controlsOperation DrivingInstrument
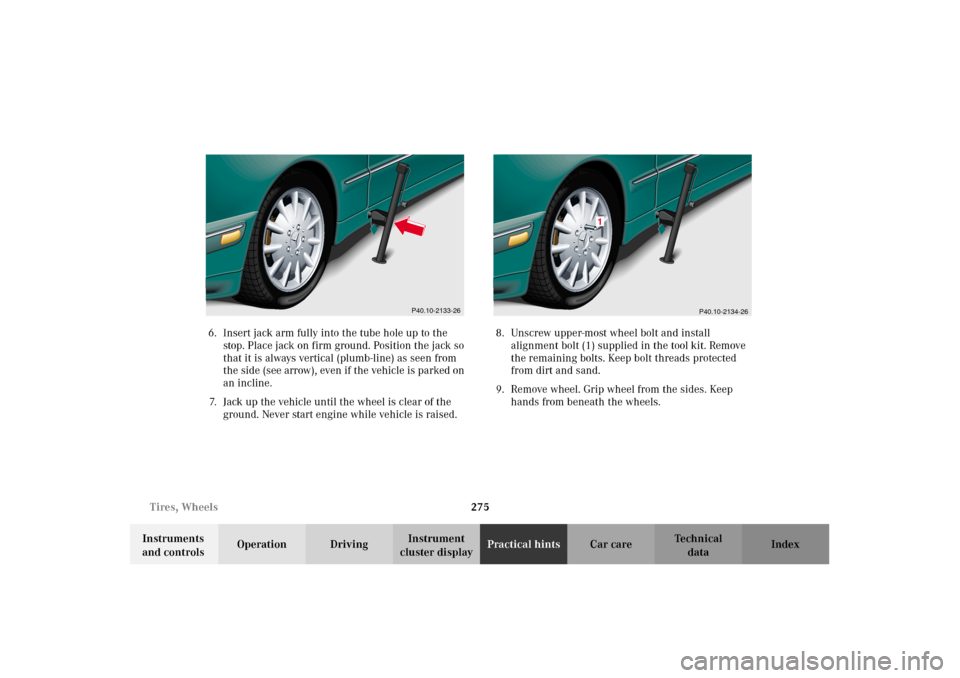
cluster displayPractical hintsCar care Index 6. Insert jack arm fully into the tube hole up to the
stop. Place jack on firm ground. Position the jack so
that it is always vertical (plumb-line) as seen from
the side (see arrow), even if the vehicle is parked on
an incline.
7. Jack up the vehicle until the wheel is clear of the
ground. Never start engine while vehicle is raised.8. Unscrew upper-most wheel bolt and install
alignment bolt (1) supplied in the tool kit. Remove
the remaining bolts. Keep bolt threads protected
from dirt and sand.
9. Remove wheel. Grip wheel from the sides. Keep
hands from beneath the wheels.
P40.10-2133-26
P40.10-2134-26
1
W210.book Seite 275 Mittwoch, 30. Mai 2001 11:45 11