Page 282 of 350
279 Tires, Wheels
Technical
data Instruments
and controlsOperation DrivingInstrument
cluster displayPractical hintsCar care Index If a tire constantly loses air, it should be inspected for
damage.
The spare tire should be checked periodically for
condition and inflation. Spare tire will age and become
worn over time even if never used, and thus should be
inspected and replaced when necessary.
Wa r n i n g !
Do not overinflate tires. Overinflating tires can
result in sudden deflation (blowout) because they
are more likely to become punctured or damaged
by road debris, potholes etc.. Follow recommended
inflation pressures.Do not overload the tires by exceeding the specified
vehicle capacity weight (as indicated by the label
on the driver’s door latch post). Overloading the
tires can overheat them, possibly causing a
blowout.
W210.book Seite 279 Mittwoch, 30. Mai 2001 11:45 11
Page 288 of 350

285 Towing the vehicle
Technical
data Instruments
and controlsOperation DrivingInstrument
cluster displayPractical hintsCar care Index Towing the vehicleImportant!
When towing the vehicle, please, note the following:
With the automatic central locking activated and the
electronic key in steering lock position 2, the vehicle
doors lock if the lef t front wheel as well as the right rear
wheel are turning at vehicle speeds of approximately
9 mph (15 km / h) or more.
To prevent the vehicle door locks from locking,
deactivate the automatic central locking.
The rear towing eye is located at the right, below the
bumper.
Wa r n i n g
Prior to towing the vehicle with all wheels on the
ground, make certain that the electronic key is in
steering lock position 2. The maximum towing
speed and distance with the vehicle on the ground
is 30 mph and 30 miles.If the electronic key is left in the steering lock
position 0 for an extended period of time, it can no
longer be turned in the lock. In this case, the
steering is locked. To unlock, remove electronic key
from steering lock and reinsert.
W210.book Seite 285 Mittwoch, 30. Mai 2001 11:45 11
Page 289 of 350

286 Towing the vehicle
Technical
data Instruments
and controlsOperation DrivingInstrument
cluster displayPractical hintsCar care Index
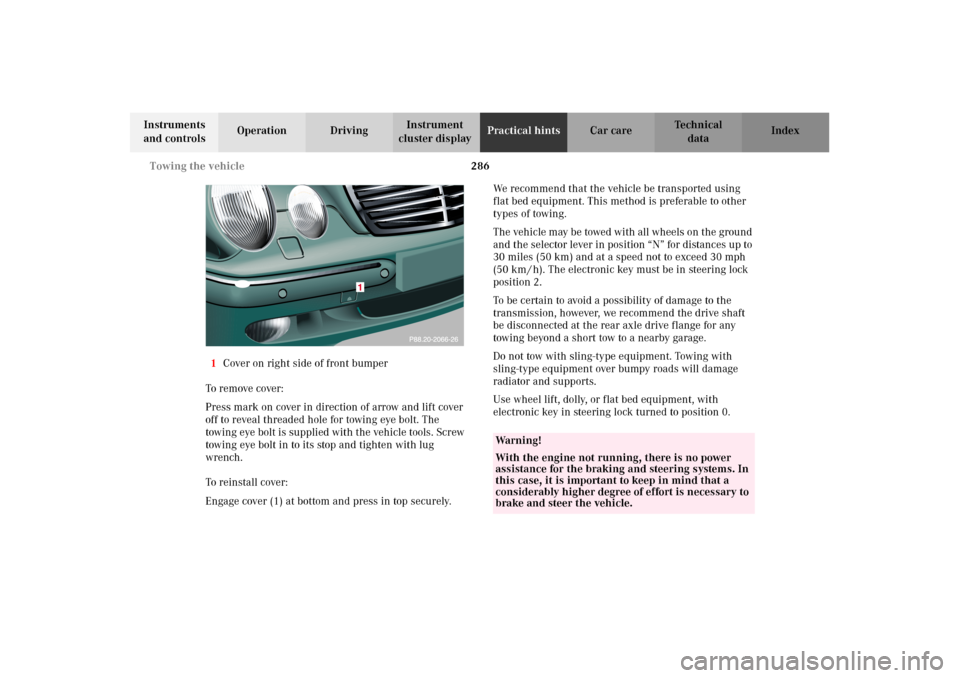
1Cover on right side of front bumper
To remove cover:
Press mark on cover in direction of arrow and lift cover
off to reveal threaded hole for towing eye bolt. The
towing eye bolt is supplied with the vehicle tools. Screw
towing eye bolt in to its stop and tighten with lug
wrench.
To reinstall cover:
Engage cover (1) at bottom and press in top securely.We recommend that the vehicle be transported using
flat bed equipment. This method is preferable to other
types of towing.
The vehicle may be towed with all wheels on the ground
and the selector lever in position “N” for distances up to
30 miles (50 km) and at a speed not to exceed 30 mph
(50 km / h). The electronic key must be in steering lock
position 2.
To be certain to avoid a possibility of damage to the
transmission, however, we recommend the drive shaft
be disconnected at the rear axle drive flange for any
towing beyond a short tow to a nearby garage.
Do not tow with sling-type equipment. Towing with
sling-type equipment over bumpy roads will damage
radiator and supports.
Use wheel lift, dolly, or flat bed equipment, with
electronic key in steering lock turned to position 0.
Wa r n i n g !
With the engine not running, there is no power
assistance for the braking and steering systems. In
this case, it is important to keep in mind that a
considerably higher degree of effort is necessary to
brake and steer the vehicle.
W210.book Seite 286 Mittwoch, 30. Mai 2001 11:45 11
Page 290 of 350

287 Towing the vehicle
Technical
data Instruments
and controlsOperation DrivingInstrument
cluster displayPractical hintsCar care Index Note:
To signal turns while being towed with hazard warning
flasher in use, turn electronic key in steering lock to
position 2 and activate combination switch for left or
right turn signal in usual manner – only the selected
turn signal will operate.
Upon canceling the turn signal, the hazard warning
flasher will operate again.
Caution!
If the vehicle is towed with the front axle raised, the
engine must be shut off (electronic key in steering lock
position 0 or 1). Otherwise, the ESP will immediately be
engaged and will apply the rear wheel brakes.
Switch off the tow-away alarm, see page 44, and the
automatic center locking on page 35.Transmission selector lever, manually unlocking
In the case of power failure the transmission selector
lever can be manually unlocked, e.g. to tow the vehicle.
To do so, insert a pin (1), e.g. ball point pen, into the
covered opening below the position “D” of the shift
pattern. While pushing the pin down, move selector
lever from position “P”.
Af ter removal of the pin from the opening, the cover will
not close fully. Only after moving the selector lever to
positions “D+” and “D–” does the cover return to its
closed position.
W210.book Seite 287 Mittwoch, 30. Mai 2001 11:45 11
Page 296 of 350
293 Exterior lamps
Technical
data Instruments
and controlsOperation DrivingInstrument
cluster displayPractical hintsCar care Index Side marker lamp, front
Side marker lamp, front (5 W / 4 cp bulb)
From inside wheel house (arrow) reach behind side
marker lamp and press tab. Remove lamp from bumper
and take out bulb.High mounted stop lamp,
Additional turn signals on the exterior mirror
The high mounted stop lamp (3rd brake lamp), and the
additional turn signals on the exterior mirrors are
equipped with LED’s.
Have the system checked at an authorized
Mercedes-Benz Center if a malfunction occurs.
W210.book Seite 293 Mittwoch, 30. Mai 2001 11:45 11
Page 306 of 350

303 Contents – Vehicle care
Technical
data Instruments
and controlsOperation DrivingInstrument
cluster displayPractical hintsCar careIndex
Vehicle careCleaning and care
of the vehicle .............................304
Power washer ..............................305
Tar stains .....................................305
Paintwork, painted body
components .................................305
Engine cleaning ..........................306
Vehicle washing .........................306
Ornamental moldings ................306
Headlamps, taillamps,
turn signal lenses ......................306
Cleaning the parktronic
system sensors ...........................307Window cleaning /
glass sunroof .............................. 307
Wiper blades .............................. 307
Light alloy wheels ..................... 308
Instrument cluster ..................... 308
Steering wheel and
gear selector lever ..................... 308
Cup holder .................................. 308
Seat belts ..................................... 308
Headliner and shelf
below rear window .................... 308
Upholstery .................................. 309
Hard plastic trim items ............. 309
Plastic and rubber parts ........... 309
W210.book Seite 303 Mittwoch, 30. Mai 2001 11:45 11
Page 309 of 350

306 Cleaning and care of the vehicle
Technical
data Instruments
and controlsOperation DrivingInstrument
cluster displayPractical hintsCar careIndex
Engine cleaning
Prior to cleaning the engine compartment make sure to
protect electrical components and connectors from the
intrusion of water and cleaning agents.
Corrosion protection, such as MB Anticorrosion Wax
should be applied to the engine compartment after
every engine cleaning. Before applying, all control
linkage bushings and joints should be lubricated. The
poly-V-belt and all pulleys should be protected from any
wax.
Ve h i c l e w a s h i n g
Do not use hot water or wash your vehicle in direct
sunlight. Use only a mild car wash detergent, such as
Mercedes-Benz approved Car Shampoo.
Thoroughly spray the vehicle with a diffused jet of
water. Direct only a very weak spray towards the
ventilation intake. Use plenty of water and rinse the
sponge and chamois frequently.
Rinse with clear water and thoroughly wipe dry with a
chamois. Do not allow cleaning agents to dry on the
finish.Due to the width of the vehicle, prior to running the
vehicle through an automatic car wash, fold back the
outside mirrors to prevent them from getting damaged.
In the winter, thoroughly remove all traces of road salt
as soon as possible.
When washing the underbody, do not forget to clean the
inner sides of the wheels.
Ornamental moldings
For regular cleaning and care of very dirty chrome-
plated parts, use a chrome cleaner.
Headlamps, taillamps, turn signal lenses
Use a mild car wash detergent, such as Mercedes-Benz
approved Car Shampoo, with plenty of water.
To prevent scratches, never apply strong force and use
only a soft, non-scratchy cloth when cleaning the lenses.
Do not attempt to wipe dirty lenses with a dry cloth or
sponge.
W210.book Seite 306 Mittwoch, 30. Mai 2001 11:45 11
Page 311 of 350

308 Cleaning and care of the vehicle
Technical
data Instruments
and controlsOperation DrivingInstrument
cluster displayPractical hintsCar careIndex
Light alloy wheels
Mercedes-Benz approved Wheel Care should be used for
regular cleaning of the light alloy wheels.
If possible, clean wheels once a week with Mercedes-
Benz approved Wheel Care, using a soft bristle brush
and a strong spray of water.
Follow instructions on container.
Note:
Use only acid-free cleaning materials. The acid could
lead to corrosion.
Instrument cluster
Use a gentle dishwashing detergent or mild detergent
for delicate fabrics as a washing solution. Wipe with a
cloth moistened in lukewarm solution. Do not use
scouring agents.
Steering wheel and gear selector lever
Wipe with a damp cloth and dry thoroughly or clean
with Mercedes-Benz approved Leather Care.Cup holder
Use a gentle dishwashing detergent or mild detergent
for delicate fabrics as a washing solution. Wipe with a
cloth moistened in lukewarm solution. Do not use
scouring agents.
Seat belts
The webbing must not be treated with chemical
cleaning agents. Use only clear, lukewarm water and
soap. Do not dry the webbing at temperatures above
176
°F (80
°C) or in direct sunlight.
Headliner and shelf below rear window
Clean with soft bristle brush, or use a dry-shampoo
cleaner in case of excessive dirt.
Wa r n i n g !
Do not bleach or dye seat belts as this may severely
weaken them. In a crash they may not be able to
provide adequate protection.
W210.book Seite 308 Mittwoch, 30. Mai 2001 11:45 11