2002 MERCEDES-BENZ E WAGON change wheel
[x] Cancel search: change wheelPage 78 of 354
75 Restraint systems
Te ch n i c a l
data Instruments
and controlsOperationDrivingInstrument
cluster displayPractical hints Car care Index Safety guidelines for the seat belt, emergency
tensioning retractor and airbag
If you believe that, even with the use of these
guidelines, it would be safer for your rear seat
occupants to have both rear door mounted side
airbags deactivated, then deactivation can be
accomplished upon your written election to do so at
your authorized Mercedes-Benz Center at an
additional cost. Please contact your local
authorized Mercedes-Benz Center or call our
Customer Assistance Center at 1-800-FOR-
MERCedes (1-800-367-6372) for details.Wa r n i n g !
• Damaged seat belts or belts that were highly
stressed in an accident must be replaced and
their anchoring points must also be checked.
Use only belts installed or supplied by an
authorized Mercedes-Benz Center.• Do not pass belts over sharp edges.• Do not make any modification that could
change the effectiveness of the belts.
• Airbags and ETR’s are designed to function on
a one-time-only basis. An airbag or emergency
tensioning retractor (ETR) that was activated
must be replaced.• No modifications of any kind may be made to
any components or wiring of the “SRS”. This
includes changing or removing any component
or part of the “SRS”, the installation of
additional trim material, badges etc. over the
steering wheel hub, front passenger airbag
cover, door trim panels, or door frame trims,
and installation of additional electrical /
electronic equipment on or near “SRS”
components and wiring. Keep area between
airbags and occupants free of objects (e.g.
packages, purses, umbrellas, etc.).• Do not hang items such as coat hangers from
the coat hooks or handles over the door. These
items may turn into projectiles and cause head
and other injuries when curtain airbag is
deployed.• An airbag system component within the
steering wheel gets hot after the airbag has
inflated. Do not touch.
Page 101 of 354

98 Multifunction steering wheel, multifunction display
Te ch n i c a l
data Instruments
and controlsOperationDrivingInstrument
cluster displayPractical hints Car care Index
CD player (optional)1Audio system is switched off.
2The CD player is switched on.
3The number of the CD currently playing is displayed
if you are using a CD changer.
4Track number.
The radio must be switched on.
The CD player must be switched on.
Press the è or ÿ button repeatedly until
display (2) appears.
Press the j or k button repeatedly until the
required track number (4) is displayed.
Pressing the è or ÿ button displays the next or
previous system.
Note:
To select a CD from the magazine, press a number on
the audio or the (optional) COMAND system located in
center dashboard.
Page 125 of 354
122 Combination switch
Te ch n i c a l
data Instruments
and controlsOperationDrivingInstrument
cluster displayPractical hints Car care Index
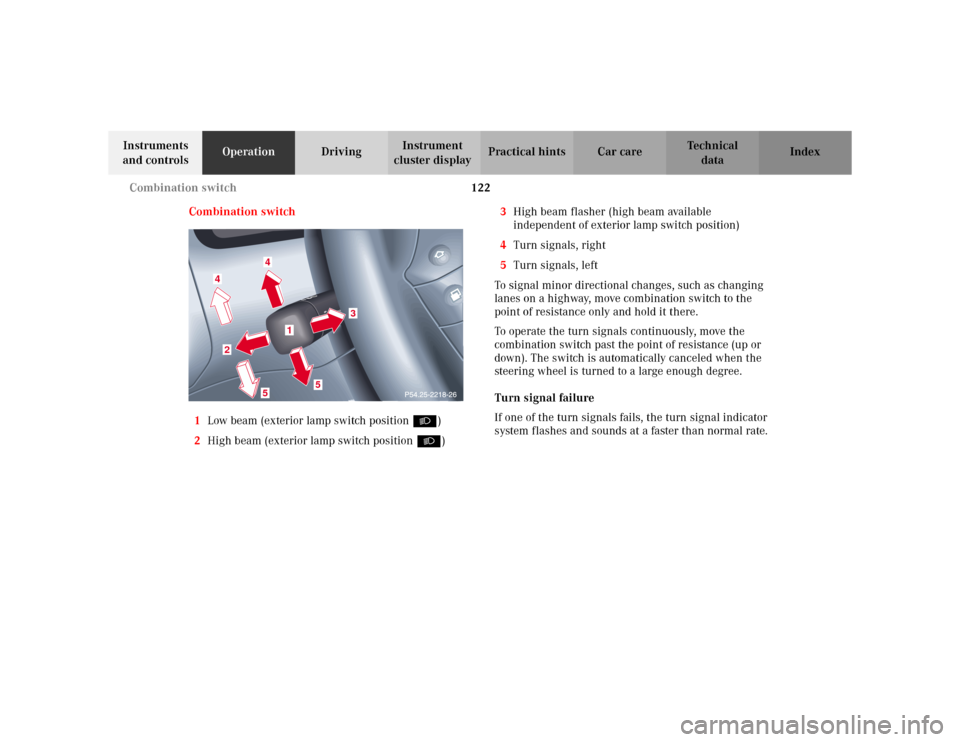
Combination switch
1Low beam (exterior lamp switch position B)
2High beam (exterior lamp switch position B)3High beam flasher (high beam available
independent of exterior lamp switch position)
4Turn signals, right
5Turn signals, left
To signal minor directional changes, such as changing
lanes on a highway, move combination switch to the
point of resistance only and hold it there.
To operate the turn signals continuously, move the
combination switch past the point of resistance (up or
down). The switch is automatically canceled when the
steering wheel is turned to a large enough degree.
Turn signal failure
If one of the turn signals fails, the turn signal indicator
system flashes and sounds at a faster than normal rate.
4
4
2
5
5
3
1
Page 223 of 354

220 Driving instructions
Te ch n i c a l
data Instruments
and controlsOperationDrivingInstrument
cluster displayPractical hints Car care Index
Winter driving
Have your vehicle winterized at your authorized
Mercedes-Benz Center before the onset of winter.
•Change the engine oil if the engine contains an oil
which is not approved for winter operation. For
viscosity (SAE / CCMC class) and filling quantity,
see page 328.
•Check engine coolant anticorrosion / antifreeze
concentration.•Additive for the windshield washer and headlamp
cleaning system: Add MB Concentrate “S” to a
premixed windshield washer solvent / antifreeze
which is formulated for below freezing
temperatures, see page 276.
•Test battery: Battery capacity drops with decreasing
ambient temperature. A well charged battery helps
to ensure that the engine can be started, even at low
ambient temperatures.
•Tires: We recommend M+S rated radial-ply tires on
all four wheels for the winter season. Observe
permissible maximum speed for M+S rated
radial-ply tires and the legal speed limit.
Note:
In winter operation, the maximum effectiveness of the
antilock brake system (ABS) or electronic stability
program (ESP) can only be achieved with M+S rated
radial-ply tires and / or snow chains recommended by
Mercedes-Benz. Snow chains maximize performance.
Wa r n i n g !
If the vehicle becomes stuck in snow, make sure
that snow is kept clear of the exhaust pipe and
from around the vehicle with engine running.
Otherwise, deadly carbon monoxide (CO) gases may
enter vehicle interior resulting in unconsciousness
and death.To assure sufficient fresh air ventilation, open a
window slightly on the side of the vehicle not
facing the wind.
Page 226 of 354
223 Driving systems
Te ch n i c a l
data Instruments
and controlsOperationDrivingInstrument
cluster displayPractical hints Car care Index 3Canceling
To cancel the cruise control, briefly push lever to
position 3.
When you step on the brake pedal or the vehicle
speed drops below approximately 20 mph
(30 km / h), for example when driving upgrade, the
cruise control will be canceled.
If the cruise control cancels by itself and remains
inoperative until the engine is restarted, have the
system checked at your authorized Mercedes-Benz
Center as soon as possible.
4Resume
If the lever is briefly pushed to position 4 when
driving at a speed exceeding approximately 20 mph
(30 km / h), the vehicle resumes the speed which
was set prior to the cancellation of the cruise
control. The last memorized speed is canceled when
the electronic key in the steering lock is turned to
position 1 or O.Important!
Moving gear selector lever to position “N” switches the
cruise control off.
Wa r n i n g !
Only use the cruise control if the traffic and
weather conditions make it advisable to travel at a
steady speed.
• The use of cruise control can be dangerous on
winding roads or in heavy traffic because
conditions do not allow safe driving at a steady
speed.• The use of cruise control can be dangerous on
slippery roads. Rapid changes in tire adhesion
can result in wheel spin and loss of control.The “Resume” function should only be operated if
the driver is fully aware of the previously set speed
and wishes to resume this particular preset speed.
Page 281 of 354
278 Vehicle jack
Te ch n i c a l
data Instruments
and controlsOperation DrivingInstrument
cluster displayPractical hintsCar care Index
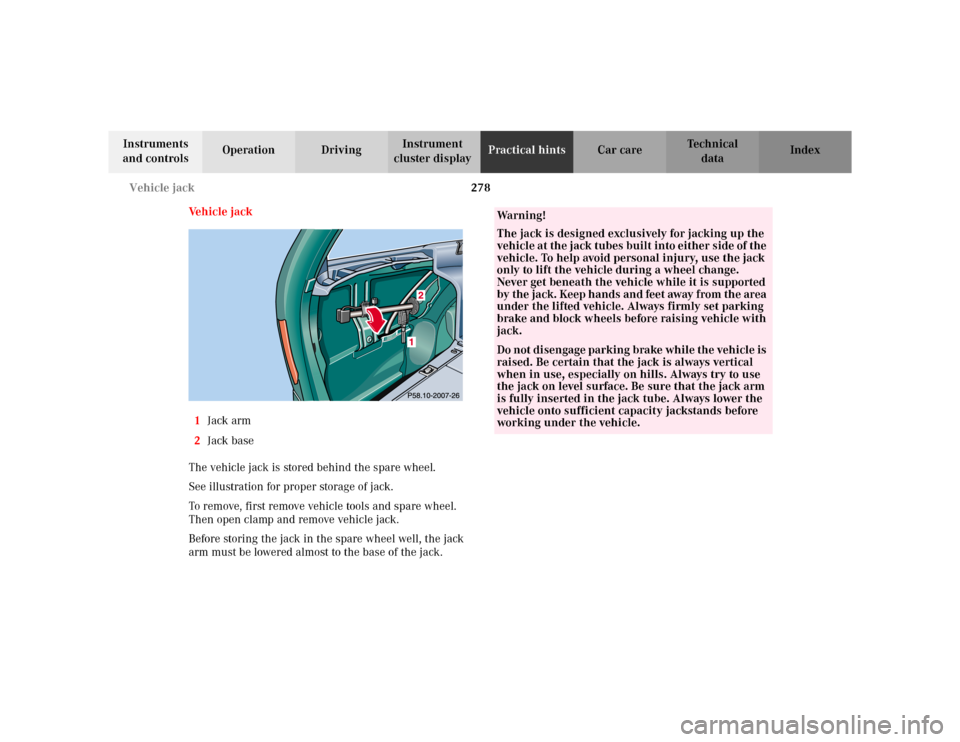
Ve h i c l e j a c k
1Jack arm
2Jack base
The vehicle jack is stored behind the spare wheel.
See illustration for proper storage of jack.
To remove, first remove vehicle tools and spare wheel.
Then open clamp and remove vehicle jack.
Before storing the jack in the spare wheel well, the jack
arm must be lowered almost to the base of the jack.
Wa r n i n g !
The jack is designed exclusively for jacking up the
vehicle at the jack tubes built into either side of the
vehicle. To help avoid personal injury, use the jack
only to lift the vehicle during a wheel change.
Never get beneath the vehicle while it is supported
by the jack. Keep hands and feet away from the area
under the lifted vehicle. Always firmly set parking
brake and block wheels before raising vehicle with
jack.Do not disengage parking brake while the vehicle is
raised. Be certain that the jack is always vertical
when in use, especially on hills. Always try to use
the jack on level surface. Be sure that the jack arm
is fully inserted in the jack tube. Always lower the
vehicle onto sufficient capacity jackstands before
working under the vehicle.
Page 285 of 354
282 Tires, Wheels
Te ch n i c a l
data Instruments
and controlsOperation DrivingInstrument
cluster displayPractical hintsCar care Index
Changing wheelsMove vehicle to a level area which is a safe distance
from the roadway.
1. Set parking brake and turn on hazard warning
flasher.
2. Move selector lever to position “P” and turn off
engine.
3. Prevent vehicle from rolling away by blocking
wheels with wheel chocks (not supplied with
vehicle) or sizable wood block or stone. When
changing a wheel on a hill, place chocks on the
downhill side blocking both wheels of the other
axle. On a level road, place one chock in front of and
one behind the wheel that is diagonally opposite to
the wheel being changed.
Wa r n i n g !
The jack is designed exclusively for jacking up the
vehicle at the jack tubes built into either side of the
vehicle. To help avoid personal injury, use the jack
only to lift the vehicle during a wheel change.
Never get beneath the vehicle while it is supported
by the jack. Keep hands and feet away from the area
under the lifted vehicle. Always firmly set parking
brake and block wheels before raising vehicle with
jack.Do not disengage parking brake while the vehicle is
raised. Be certain that the jack is always vertical
when in use, especially on hills. Always try to use
the jack on level surface. Be sure that the jack arm
is fully inserted in the jack tube. Always lower the
vehicle onto sufficient capacity jackstands before
working under the vehicle.
Page 290 of 354
287 Tires, Wheels
Te ch n i c a l
data Instruments
and controlsOperation DrivingInstrument
cluster displayPractical hintsCar care Index Tire inflation pressure
A table (see fuel filler flap) lists the tire inflation
pressures specified for Mercedes-Benz recommended
tires as well as for the varying operating conditions.
Important!
Tire pressure changes by approximately 1.5 psi (0.1 bar)
per 18
°F (10
°C) of air temperature change. Keep this in
mind when checking tire pressure inside a garage -
especially in the winter.
Example:
If garage temperature = approximately +68
°F (+20
°C)
and ambient temperature = approximately +32
°F (0
°C)
then the adjusted air pressure = specified air pressure
+3 psi (+0.2 bar).Tire pressures listed for light loads are minimum values
offering high driving comfort. Increased inflation
pressures for heavy loads produce favorable handling
characteristics with lighter loads and are perfectly
permissible. The ride of the vehicle, however, will
become somewhat harder.
Tire temperature and pressure increase with the vehicle
speed. Tire pressure should therefore only be checked
and corrected on cold tires. Correct tire pressure in
warm tires only if pressure has dropped below the
pressure listed in the table and the respective operating
conditions are taken into consideration.
An underinflated tire due to a slow leak (e.g. due to a
nail in the tire) may cause damage such as tread
separation, bulging etc.. Regular tire pressure checks
(including the spare tire) at intervals of no more than
14 days are therefore essential.