Page 269 of 354
266 First aid kit
Te ch n i c a l
data Instruments
and controlsOperation DrivingInstrument
cluster displayPractical hintsCar care Index
First aid kit
1First aid kitThe first aid kit is stored in the cargo area behind the
right hand side trim panel.
To open trim panel:
Release lock and fold down.
Note:
If trim panel was fully removed, make certain to insert
pins (arrows) into retainers in floor when reinstalling.
P86.10-2008-26
11
Page 271 of 354
268 Fuses
Te ch n i c a l
data Instruments
and controlsOperation DrivingInstrument
cluster displayPractical hintsCar care Index
2Lock for auxiliary fuse box and battery cover
3Fuse box and battery cover4Auxiliary fuse box below right rear bench seat
To gain access, fold seat cushion forward. Rotate lock (2)
counterclockwise and remove cover.
Note:
When reinstalling cover (3) make certain that tabs
(arrows) are inserted.
4
P54.15-2128-26
Page 272 of 354
269 Fuses
Te ch n i c a l
data Instruments
and controlsOperation DrivingInstrument
cluster displayPractical hintsCar care Index 5Auxiliary fuse box to left of exterior lamp switch
To again access, open door, pry off cover and
remove.Electrical outlet
The electrical outlet is located in the rear compartment
on the left side.
To gain access, flip cover up. If locked, first unlock by
inserting for instance a small coin and turning it to the
left.
Note:
The cover is lockable by inserting, for instance a small
coin and turning it to the right.
Maximum capacity: 180 W.
5
P82.00-2029-26
Page 274 of 354
271 Engine compartment
Te ch n i c a l
data Instruments
and controlsOperation DrivingInstrument
cluster displayPractical hintsCar care Index To o p e n :
To unlock the hood, pull release lever (1) under the
driver’s side of the instrument panel. At the same time a
handle will extend out of the radiator grill (it may be
necessary to lift the hood up slightly).
Caution!
To avoid damage to the windshield wiper or hood, open
the hood only with wiper in the parked position.
P68.00-2431-26
Page 275 of 354
272 Engine compartment
Te ch n i c a l
data Instruments
and controlsOperation DrivingInstrument
cluster displayPractical hintsCar care Index
Pull handle (2) to its stop out of radiator grill and open
hood (do not pull up on handle).To c l o s e :
Lower hood and let it drop into lock from a height of
approximately 1 ft. (30 cm), assisting with hands placed
flat on edges of hood (3).
To avoid hood damage, please make sure that hood is
fully closed. If not, repeat closing procedure. Do not
push down on hood to attempt to fully close it.
Page 278 of 354

275 Engine compartment
Te ch n i c a l
data Instruments
and controlsOperation DrivingInstrument
cluster displayPractical hintsCar care Index Adding coolant
If coolant has to be added, a 50/50 mixture of water and
MB anticorrosion / antifreeze should be added.
The drain plugs for the cooling system are located on
the right side of the engine block and at the bottom of
the radiator.
Anticorrosion / antifreeze, see page 332.
Wa r n i n g !
In order to avoid possibly serious burns:
• Use extreme caution when opening the hood if
there are any signs of steam or coolant leaking
from the cooling system, or if the coolant
temperature gauge indicates that the coolant is
overheated.
• Do not remove pressure cap on coolant
reservoir if engine temperature is above 194
°F
(90
°C). Allow engine to cool down before
removing cap. The coolant reservoir contains
hot fluid and is under pressure.
• Using a rag, slowly open cap approximately
1/2
turn to relieve excess pressure. If opened
immediately, scalding hot fluid and steam will
be blown out under pressure.
• Do not spill antifreeze on hot engine parts.
Antifreeze contains ethylene glycol which may
burn if it comes into contact with hot engine
parts.
Page 280 of 354
277 Spare wheel
Te ch n i c a l
data Instruments
and controlsOperation DrivingInstrument
cluster displayPractical hintsCar care Index Spare wheel, vehicle tools
1Trim panel, left side
2Vehicle tools
To o pen tr im p an el :
Release lock and fold down.
Note:
If trim panel was fully removed, make certain to insert
pins (arrows) into retainers in floor when reinstalling.3Spare wheel mounting screw with handle
To remove spare wheel:
Remove vehicle tools. Turn spare wheel mounting screw
counterclockwise and remove.
To store spare wheel:
Place spare wheel in wheel well and secure with spare
wheel mounting screw. Store vehicle tools.
3
Page 281 of 354

278 Vehicle jack
Te ch n i c a l
data Instruments
and controlsOperation DrivingInstrument
cluster displayPractical hintsCar care Index
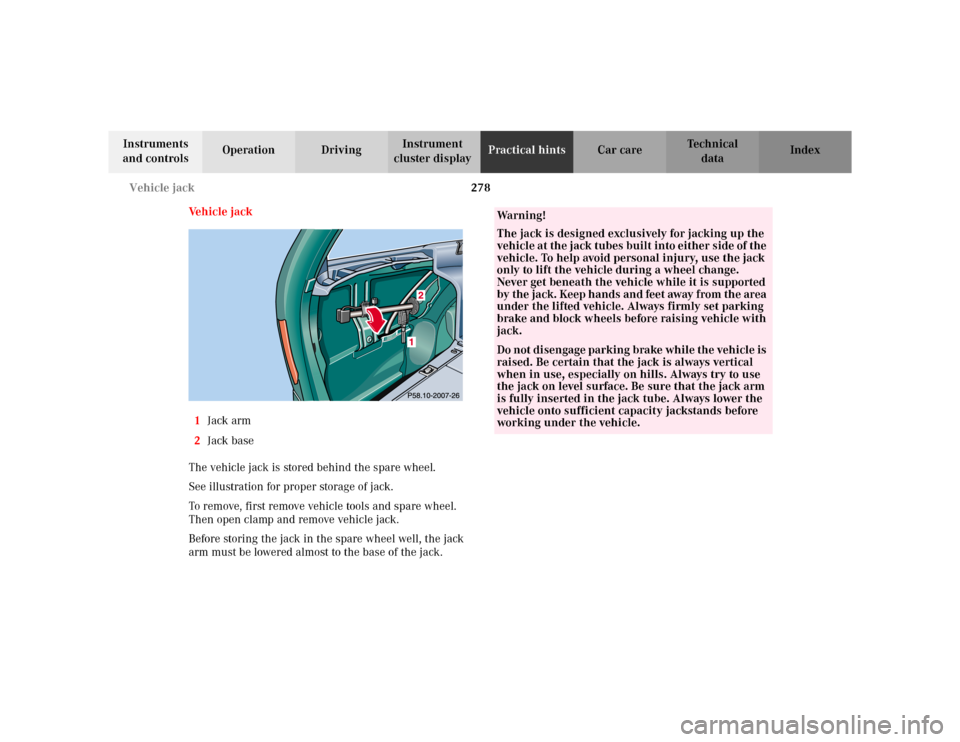
Ve h i c l e j a c k
1Jack arm
2Jack base
The vehicle jack is stored behind the spare wheel.
See illustration for proper storage of jack.
To remove, first remove vehicle tools and spare wheel.
Then open clamp and remove vehicle jack.
Before storing the jack in the spare wheel well, the jack
arm must be lowered almost to the base of the jack.
Wa r n i n g !
The jack is designed exclusively for jacking up the
vehicle at the jack tubes built into either side of the
vehicle. To help avoid personal injury, use the jack
only to lift the vehicle during a wheel change.
Never get beneath the vehicle while it is supported
by the jack. Keep hands and feet away from the area
under the lifted vehicle. Always firmly set parking
brake and block wheels before raising vehicle with
jack.Do not disengage parking brake while the vehicle is
raised. Be certain that the jack is always vertical
when in use, especially on hills. Always try to use
the jack on level surface. Be sure that the jack arm
is fully inserted in the jack tube. Always lower the
vehicle onto sufficient capacity jackstands before
working under the vehicle.