2002 MERCEDES-BENZ CLK55AMG wheel
[x] Cancel search: wheelPage 268 of 330

265 Tires, Wheels
Technical
data Instruments
and controlsOperation DrivingInstrument
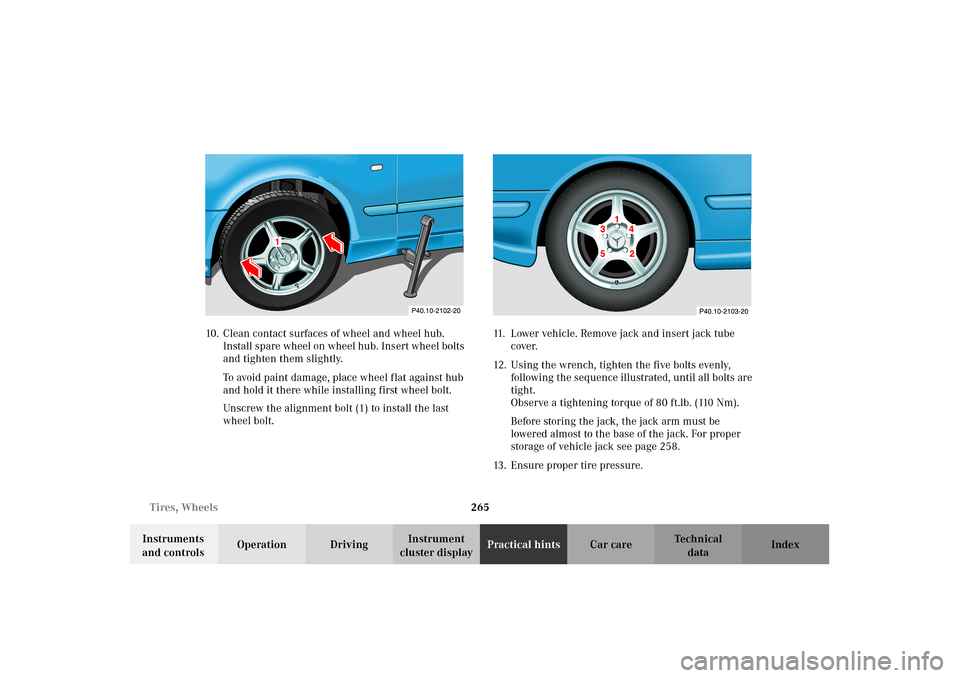
cluster displayPractical hintsCar care Index 10. Clean contact surfaces of wheel and wheel hub.
Install spare wheel on wheel hub. Insert wheel bolts
and tighten them slightly.
To avoid paint damage, place wheel flat against hub
and hold it there while installing first wheel bolt.
Unscrew the alignment bolt (1) to install the last
wheel bolt.11. Lower vehicle. Remove jack and insert jack tube
cover.
12. Using the wrench, tighten the five bolts evenly,
following the sequence illustrated, until all bolts are
tight.
Observe a tightening torque of 80 ft.lb. (110 Nm).
Before storing the jack, the jack arm must be
lowered almost to the base of the jack. For proper
storage of vehicle jack see page 258.
13. Ensure proper tire pressure.
1
1
J_C208_II.book Seite 265 Donnerstag, 31. Mai 2001 10:13 10
Page 269 of 330

266 Tires, Wheels
Technical
data Instruments
and controlsOperation DrivingInstrument
cluster displayPractical hintsCar care Index
Wa r n i n g !
Always replace wheel bolts that are damaged or
rusted.Never apply oil or grease to wheel bolts.Damaged wheel hub threads should be repaired
immediately.Incorrect mounting bolts or improperly tightened
mounting bolts can cause the wheel to come off.
This could cause an accident. Be sure to use the
correct mounting bolts.
Wa r n i n g !
The spare wheel rim is for temporary use only. Use
for over a total of 12 000 miles (20 000 km)
(aggregate of all uses) may cause wheel rim failure
leading to an accident and possible injuries.The dimensions of the spare wheel are different
from those of the road wheels of the rear axle. As a
result, the vehicle handling characteristics change
when driving with a spare wheel mounted on the
rear axle.The spare wheel should only be used temporarily,
and replaced with a regular road wheel as quick as
possible.
J_C208_II.book Seite 266 Donnerstag, 31. Mai 2001 10:13 10
Page 270 of 330

267 Tires, Wheels
Technical
data Instruments
and controlsOperation DrivingInstrument
cluster displayPractical hintsCar care Index Tire inflation pressure
A table (see fuel filler flap) lists the tire inflation
pressures specified for Mercedes-Benz recommended
tires as well as for the varying operating conditions.
Important!
Tire pressure changes by approx. 1.5 psi (0.1 bar) per
18
°F (10
°C) of air temperature change. Keep this in
mind when checking tire pressure inside a garage –
especially in the winter.
Example:
If garage temperature = approx. +68
°F (+20
°C) and
ambient temperature = approx. +32
°F (0
°C) then the
adjusted air pressure = specified air pressure +3 psi
(+0.2 bar).Tire pressures listed for light loads are minimum values
offering high driving comfort. Increased inflation
pressures for heavy loads produce favorable handling
characteristics with lighter loads and are perfectly
permissible. The ride of the vehicle, however, will
become somewhat harder.
Tire temperature and pressure increase with the vehicle
speed. Tire pressure should therefore only be checked
and corrected on cold tires. Correct tire pressure in
warm tires only if pressure has dropped below the
pressure listed in the table and the respective operating
conditions are taken into consideration.
An underinflated tire due to a slow leak (e.g. due to a
nail in the tire) may cause damage such as tread
separation, bulging etc.. Regular tire pressure checks
(including the spare tire) at intervals of no more than
14 days are therefore essential.
J_C208_II.book Seite 267 Donnerstag, 31. Mai 2001 10:13 10
Page 275 of 330

272 Towing
Technical
data Instruments
and controlsOperation DrivingInstrument
cluster displayPractical hintsCar care Index
Towing the vehicle
Important!
When towing the vehicle, please, note the following:
With the automatic central locking activated and the
electronic key in steering lock position 2, the vehicle
doors lock if the left front wheel as well as the right rear
wheel are turning at vehicle speeds of approx. 9 mph
(15 km/h) or more.
To prevent the vehicle door locks from locking,
deactivate the automatic central locking, see page 36.The rear towing eye is located at the right, below the
bumper. The front towing eye is located on the
passenger side behind the grille in the bumper panel.
Grille removal:
Hold left and right end of grille and pull out.
Grille installation:
Engage left and right end of grille and press in securely.
Wa r n i n g !
Prior to towing the vehicle with all wheels on the
ground, make certain that the electronic key is in
steering lock position 2. The maximum towing
speed and distance with the vehicle on the ground
is 30 mph (50 km/h) and 30 miles (50 km).If the electronic key is left in the steering lock
position 0 for an extended period of time, it can no
longer be turned in the lock. In this case, the
steering is locked. To unlock, remove electronic key
from steering lock and reinsert.
P88.20-2027-26
J_C208_II.book Seite 272 Donnerstag, 31. Mai 2001 10:13 10
Page 276 of 330

273 Towing
Technical
data Instruments
and controlsOperation DrivingInstrument
cluster displayPractical hintsCar care Index We recommend that the vehicle be transported using
flat bed equipment. This method is preferable to other
types of towing.
The vehicle may be towed with all wheels on the ground
and the selector lever in position “N” for distances up to
30 miles (50 km) and at a speed not to exceed 30 mph
(50 km/h). The electronic key must be in steering lock
position 2.
To be certain to avoid a possibility of damage to the
transmission, however, we recommend the drive shaft
be disconnected at the rear axle drive flange for any
towing beyond a short tow to a nearby garage.
Do not tow with sling-type equipment. Towing with
sling-type equipment over bumpy roads will damage
radiator and supports.
Use wheel lift, dolly, or flat bed equipment, with
electronic key in steering lock turned to position 0.Note:
To signal turns while being towed with hazard warning
flasher in use, turn electronic key in steering lock to
position 2 and activate combination switch for left or
right turn signal in usual manner – only the selected
turn signal will operate.
Upon canceling the turn signal, the hazard warning
flasher will operate again.
Caution!
If the vehicle is towed with the front axle raised, the
engine must be shut off (electronic key in steering lock
position 0 or 1). Otherwise, the ESP will immediately be
engaged an d will app ly t he r ear wheel b rakes . Swi tch o f f
the tow-away alarm (see page 44) as well as the ESP (see
page 220).
Wa r n i n g !
With the engine not running, there is no power
assistance for the braking and steering systems. In
this case, it is important to keep in mind that a
considerably higher degree of effort is necessary to
brake and steer the vehicle.
J_C208_II.book Seite 273 Donnerstag, 31. Mai 2001 10:13 10
Page 294 of 330

291 Contents – Vehicle care
Technical
data Instruments
and controlsOperation DrivingInstrument
cluster displayPractical hintsCar careIndex
Vehicle careCleaning and care
of the vehicle .............................292
Power washer ..............................293
Tar stains .....................................293
Paintwork, painted body
components .................................293
Engine cleaning ..........................294
Vehicle washing .........................294
Ornamental moldings ................294
Headlamps, taillamps,
turn signal lenses ......................294Window cleaning ....................... 295
Wiper blade ................................ 295
Light alloy wheels ..................... 295
Instrument cluster ..................... 295
Steering wheel and
gear selector lever ..................... 295
Cup holder .................................. 296
Seat belts ..................................... 296
Hard plastic trim items ............. 296
Headliner and shelf
below rear window .................... 296
Upholstery .................................. 296
Plastic and rubber parts ........... 296
J_C208_II.book Seite 291 Donnerstag, 31. Mai 2001 10:13 10
Page 297 of 330

294 Cleaning and care of the vehicle
Technical
data Instruments
and controlsOperation DrivingInstrument
cluster displayPractical hintsCar careIndex
Engine cleaning
Prior to cleaning the engine compartment make sure to
protect electrical components and connectors from the
intrusion of water and cleaning agents.
Corrosion protection, such as MB Anticorrosion Wax
should be applied to the engine compartment after
every engine cleaning. Before applying, all control
linkage bushings and joints should be lubricated. The
poly-V-belt and all pulleys should be protected from any
wax.
Ve h i c l e w a s h i n g
Do not use hot water or wash your vehicle in direct
sunlight. Use only a mild car wash detergent, such as
Mercedes-Benz approved Car Shampoo.
Thoroughly spray the vehicle with a diffused jet of
water. Direct only a very weak spray towards the
ventilation intake. Use plenty of water and rinse the
sponge and chamois frequently.
Rinse with clear water and thoroughly wipe dry with a
chamois. Do not allow cleaning agents to dry on the
finish.In the winter, thoroughly remove all traces of road salt
as soon as possible.
When washing the underbody, do not forget to clean the
inner sides of the wheels.
Ornamental moldings
For regular cleaning and care of very dirty chrome-
plated parts, use a chrome cleaner.
Headlamps, taillamps, turn signal lenses
Use a mild car wash detergent, such as Mercedes-Benz
approved Car Shampoo, with plenty of water.
To prevent scratches, never apply strong force and use
only a soft, non-scratchy cloth when cleaning the lenses.
Do not attempt to wipe dirty lenses with a dry cloth or
sponge.
J_C208_II.book Seite 294 Donnerstag, 31. Mai 2001 10:13 10
Page 298 of 330

295 Cleaning and care of the vehicle
Technical
data Instruments
and controlsOperation DrivingInstrument
cluster displayPractical hintsCar careIndex Window cleaning
Use a window cleaning solution on all glass surfaces. An
automotive glass cleaner is recommended.
Note:
For safety reasons, switch off wiper and remove
electronic key from steering lock before cleaning the
windshield, otherwise the wiper motor can suddenly
turn on and cause injury.
Wiper blade
Clean the wiper blade rubber with a clean cloth and
detergent solution.
Note:
For safety reasons, remove electronic key from steering
lock before cleaning the wiper blade, otherwise the
wiper motor can suddenly turn on and cause injury.Light alloy wheels
Mercedes-Benz approved Wheel Care should be used for
regular cleaning of the light alloy wheels.
If possible, clean wheels once a week with
Mercedes-Benz approved Wheel Care, using a soft
bristle brush and a strong spray of water.
Follow instructions on container.
Note:
Use only acid-free cleaning materials. The acid could
lead to corrosion.
Instrument cluster
Use a gentle dishwashing detergent or mild detergent
for delicate fabrics as a washing solution. Wipe with a
cloth moistened in lukewarm solution. Do not use
scouring agents.
Steering wheel and gear selector lever
Wipe with a damp cloth and dry thoroughly or clean
with Mercedes-Benz approved Leather Care.
J_C208_II.book Seite 295 Donnerstag, 31. Mai 2001 10:13 10