Page 253 of 346

250 First aid kit
Technical
data Instruments
and controlsOperation DrivingInstrument
cluster displayPractical hintsCar care Index
First aid kit
The first aid kit is stored in the left trunk well.
Shelf below rear window
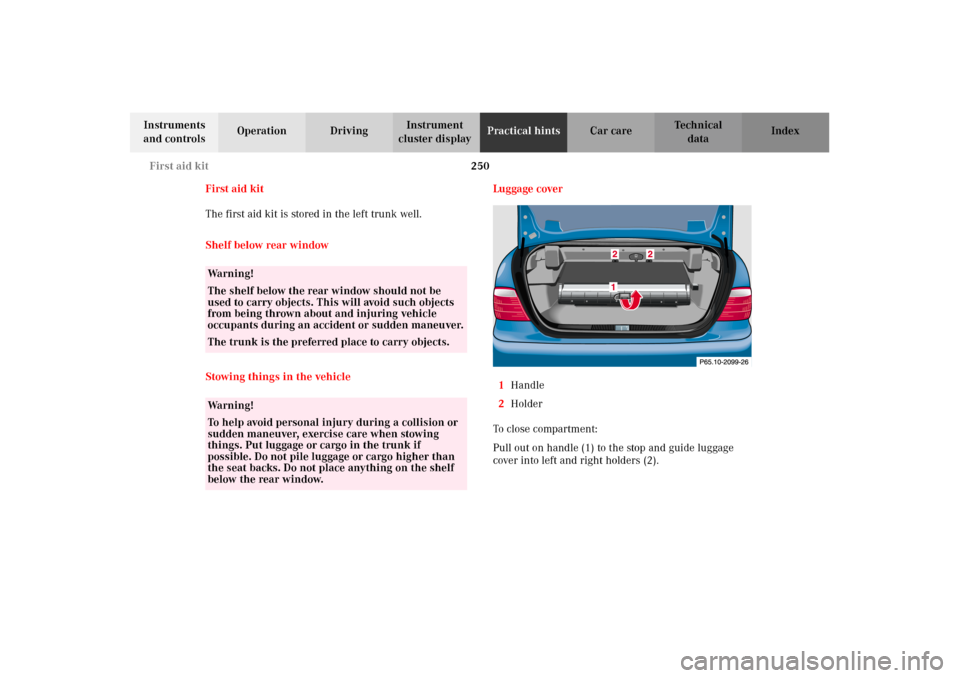
Stowing things in the vehicleLuggage cover
1Handle
2Holder
To c l o s e c o mp a r t m e n t :
Pull out on handle (1) to the stop and guide luggage
cover into left and right holders (2).
Wa r n i n g !
The shelf below the rear window should not be
used to carry objects. This will avoid such objects
from being thrown about and injuring vehicle
occupants during an accident or sudden maneuver.
The trunk is the preferred place to carry objects.Wa r n i n g !
To help avoid personal injury during a collision or
sudden maneuver, exercise care when stowing
things. Put luggage or cargo in the trunk if
possible. Do not pile luggage or cargo higher than
the seat backs. Do not place anything on the shelf
below the rear window.
J_A208.book Seite 250 Donnerstag, 31. Mai 2001 9:35 09
Page 276 of 346

273 Battery
Technical
data Instruments
and controlsOperation DrivingInstrument
cluster displayPractical hintsCar care Index Therefore, we strongly recommend that you have the
battery charge checked frequently, and corrected if
necessary, especially if you use the vehicle less than
approximately 200 miles (300 km) per month,
mostly for short distance trips, or if it is not used for
long periods of time.
Only charge a battery with a battery charger after the
battery has been disconnected from the vehicle’s
electrical circuit.
Always disconnect the battery negative lead first and
connect last.
When removing and connecting the battery, always
make sure that all electrical consumers are off and the
electronic key is in steering lock position 0. The battery
and its filler caps must always be securely installed
when the vehicle is in operation. During removal and
installation always protect the disconnected battery
positive (+) terminal with the cover attached to the
battery.
While the engine is running the battery terminal clamps
must not be loosened or detached, otherwise the
generator and other electronic components would be
damaged.Notes:
After reconnecting the battery also set the clock (see
page 106) resynchronize the front seats (see page 49),
front seat head restraints (see page 49), the express
feature of the power windows (see page 147), and the
electronic stability program (ESP) (see page 221).
If the soft top is in a half open position, it also has to be
synchronized. To do so, raise and lock soft top manually
(see page 291).
Battery recycling
Batteries contain material that can harm the
environment with improper disposal.
Large 12 Volt storage batteries contain lead.
Recycling of batteries is the preferred method of
disposal.
Many states require sellers of batteries to accept old
batteries for recycling.
J_A208.book Seite 273 Donnerstag, 31. Mai 2001 9:35 09
Page 294 of 346

291 Emergency operation of soft top
Technical
data Instruments
and controlsOperation DrivingInstrument
cluster displayPractical hintsCar care Index Raising soft top manually
In case of malfunction, the power soft top can also be
raised manually. This procedure should be performed
with great care by two persons.
We r ecom men d to take off your watch or ot her j ewelry to
prevent personal injury.
A combination open-end / hex-socket wrench in the
vehicle tool kit is required for this job.
1. Engage parking brake.
2. Lower windows and open doors.
3. Lower roll bar with roll bar switch.
Note:
If the roll bar cannot be lowered, carefully guide the
soft top across the roll bar. Lift the rear window over
the roll bar.
4. For safety reasons, remove electronic key from
steering lock. Important!
Ensure that the trunk lid is closed while raising the soft
top manually. Otherwise there is the possibility of
contact between the trunk lid and the soft top
compartment cover.
Wa r n i n g !
Do not place your hands near the roll bar, soft top
frame, upper windshield area or soft top storage
compartment or between the soft top rods while the
soft top is being raised and locked. Serious personal injury may occur.
J_A208.book Seite 291 Donnerstag, 31. Mai 2001 9:35 09
Page 297 of 346
294 Emergency operation of soft top
Technical
data Instruments
and controlsOperation DrivingInstrument
cluster displayPractical hintsCar care Index
9. Do not place soft top frame (5) onto windshield
header.
10. Place rear window section of soft top (6) in its
vertical position.
11. Close soft top compartment cover (2) by placing
hands near edges (arrows). The soft top
compartment cover must lock in the first notch of
compartment cover catch.12. Lock soft top storage compartment:
Place open-end wrench (1) on bolt between backrest
and soft top compartment cover. Turn wrench (1) in
direction of arrow to its stop and remove.
6
P77.30-2033-26
5
4
2
1
P77.30-2030-26
J_A208.book Seite 294 Donnerstag, 31. Mai 2001 9:35 09
Page 298 of 346
295 Emergency operation of soft top
Technical
data Instruments
and controlsOperation DrivingInstrument
cluster displayPractical hintsCar care Index 13. Lower rear window section of soft top (6).
14. Open trunk lid with mechanical key and carefully
guide luggage cover (page 250) into its storage
compartment.15. Insert hex-socket wrench (7) to lock the soft top bow.
Press soft top bow down onto soft top compartment
cover.
Insert and turn wrench in direction of arrow (8) to
lock soft top bow.
6
P77.30-2032-26
J_A208.book Seite 295 Donnerstag, 31. Mai 2001 9:35 09
Page 304 of 346

301 Contents – Vehicle care
Technical
data Instruments
and controlsOperation DrivingInstrument
cluster displayPractical hintsCar careIndex
Vehicle careCleaning and care
of the vehicle .............................302
Power washer ..............................303
Paintwork, painted body
components .................................303
Engine cleaning ..........................304
Tar stains .....................................304
Vehicle washing .........................304
Ornamental moldings ................304
Headlamps, taillamps,
turn signal lenses ......................305
Window cleaning ........................305
Plastic and rubber parts ............305Wiper blade ................................ 305
Light alloy wheels ..................... 305
Instrument cluster ..................... 306
Steering wheel and
gear selector lever ..................... 306
Cup holder .................................. 306
Seat belts ..................................... 306
Headliner .................................... 306
Upholstery .................................. 307
Hard plastic trim items ............. 307
Plastic and rubber parts ........... 307
Wind screen .............................. 307
Rubber weatherstrip ................ 307
Soft top ........................................ 308
J_A208.book Seite 301 Donnerstag, 31. Mai 2001 9:35 09
Page 305 of 346

302 Cleaning and care of the vehicle
Technical
data Instruments
and controlsOperation DrivingInstrument
cluster displayPractical hintsCar careIndex
Cleaning and care of the vehicle
In operation, your vehicle is subjected to varying
external influences which, if gone unchecked, can
attack the paintwork as well as the underbody and
cause lasting damage.
Such damage is caused not only by extreme and varying
climatic conditions, but also by air polution, road salt,
tar, gravel and stone chipping. Grease and oil, fuel,
coolant, brake fluid, bird droppings, insects, tree resins
etc. should be removed immediately to avoid paint
damage. Frequent washing reduces and/or eliminates
the aggressiveness and potency of the above adverse
influences.More frequent washings are necessary to deal with
unfavorable conditions; for example, near the ocean, in
industrial areas (smoke, exhaust emissions), or during
winter operation.
You should check your vehicle from time to time for
stone chipping or other damage. Any damage should be
repaired as soon as possible to prevent the start of
corrosion.
In doing so, do not neglect the underside of the vehicle.
A prerequisite for a thorough check is a washing of the
underbody followed by a thorough inspection. Damaged
areas need to be reundercoated.
Your vehicle has been treated at the factory with a wax-
base rustproofing in the body cavities which will last for
the lifetime of the vehicle. Post-production treatment is
neither necessary nor recommended by Mercedes-Benz
because of the possibility of incompatibility between
materials used in the production process and others
applied later.
We have selected car-care products and compiled
recommendations which are specially matched to our
vehicles and which always reflect the latest technology.
You can obtain Mercedes-Benz approved car-care
products at your authorized Mercedes-Benz Center.
Wa r n i n g !
Many cleaning products can be hazardous. Some
are poisonous, others are flammable. Always follow
the instructions on the particular container.
Always open your vehicle’s doors or windows when
cleaning the inside.Never use fluids or solvents that are not designed
for cleaning your vehicle.
J_A208.book Seite 302 Donnerstag, 31. Mai 2001 9:35 09
Page 308 of 346

305 Cleaning and care of the vehicle
Technical
data Instruments
and controlsOperation DrivingInstrument
cluster displayPractical hintsCar careIndex Headlamps, taillamps, turn signal lenses
Use a mild car wash detergent, such as Mercedes-Benz
approved Car Shampoo, with plenty of water.
To prevent scratches, never apply strong force and use
only a soft, non-scratchy cloth when cleaning the lenses.
Do not attempt to wipe dirty lenses with a dry cloth or
sponge.
Window cleaning
Use a window cleaning solution on all glass surfaces. An
automotive glass cleaner is recommended.
Note:
For safety reasons, switch off wiper and remove
electronic key from steering lock before cleaning the
windshield, otherwise the wiper motor can suddenly
turn on and cause injury.
Plastic and rubber parts
Do not use oil or wax on these parts.Wiper blade
Clean the wiper blade rubber with a clean cloth and
detergent solution.
Note:
For safety reasons, remove electronic key from steering
lock before cleaning the wiper blade, otherwise the
wiper motor can suddenly turn on and cause injury.
Light alloy wheels
Mercedes-Benz approved Wheel Care should be used for
regular cleaning of the light alloy wheels.
If possible, clean wheels once a week with Mercedes-
Benz approved Wheel Care, using a soft bristle brush
and a strong spray of water.
Follow instructions on container.
Note:
Use only acid-free cleaning materials. The acid could
lead to corrosion.
J_A208.book Seite 305 Donnerstag, 31. Mai 2001 9:35 09