2002 MERCEDES-BENZ CLK-CLASS window
[x] Cancel search: windowPage 166 of 341

163 Soft top
Te ch n i c a l
data Instruments
and controlsOperationDrivingInstrument
cluster displayPractical hints Car care Index 5. Press lock button (1) and fold down locking
handle (2).
6. Turn locking handle 90
° clockwise and pull soft top
frame carefully down until it meets the windshield
header attachment points.
Turn locking handle counterclockwise to the stop to
lock the soft top.
Fold locking handle up until it locks in place.
The indicator lamp in the soft top switch goes out –
the lowering procedure is completed. If the soft top switch is held or is released and pressed
again within approximately 2 seconds, the side
windows will close. If the roll bar was previously in the
upright position, it will return to that position.
The side windows can also be closed/opened later on.
Press/lift soft top switch twice and hold, see page 144.
However, the side windows and the roll bar can also be
activated using their respective switches, see page 142
and page 48.
P77.30-2070-26
12
ProCarManuals.com
Page 168 of 341

165 Soft top
Te ch n i c a l
data Instruments
and controlsOperationDrivingInstrument
cluster displayPractical hints Car care Index If the indicator lamp in the soft top switch blinks slowly
while activating the switch,
•the battery voltage may be insufficient – start
engine and let it run while activating switch,
•the system may be overheated (for example after
lowering or raising the soft top approx. 5
consecutive times) – after approx. 10 minutes the
soft top switch may be activated again.
If indicator lamp in the soft top switch blinks rapidly
while activating the switch,
•the trunk lid and/or the luggage cover may be open,
and need to be closed,
•the soft top is still locked during the opening
procedure and needs to be unlocked,
•the opening/closing procedure is interrupted.
In this case the soft top needs to be synchronized.
Turn electronic key in steering lock back to
position 0, and then to position 2. Activate soft top
switch again. The soft top should now be operational
again.
If the indicator lamp continues to blink, raise the soft
top manually, see page 288. Have the system checked at your authorized
Mercedes-Benz Center as soon as possible.
Notes:
If the roll bar was raised automatically, the process of
raising or lowering the soft top will take somewhat
longer, as the roll bar must first be lowered.
Whenever possible, park vehicle in the shade as
continuous exposure to sun rays can prematurely
deteriorate the soft top material.
The soft top may become moldy and receive permanent
creases if it is kept in the storage compartment for an
extended period.
Therefore, we recommend raising and airing it
thoroughly with the side windows open (do not expose
it to the sun) at regular intervals during the wet and
cold seasons.
To prevent damage, the soft top must be dry and clean
before lowering it into the storage compartment. There
is the possibility of sharp-edged dirt particles damaging
the soft top or scratching the rear window.
ProCarManuals.com
Page 169 of 341

166 Wind screen
Te ch n i c a l
data Instruments
and controlsOperationDrivingInstrument
cluster displayPractical hints Car care Index
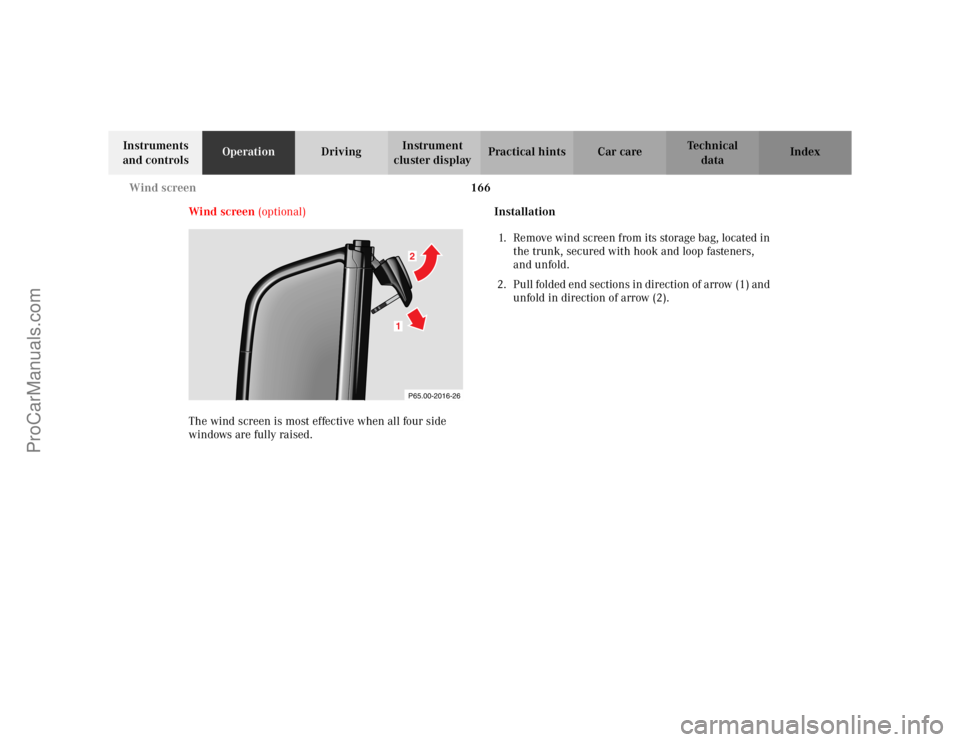
Wind screen (optional)
The wind screen is most effective when all four side
windows are fully raised.Installation
1. Remove wind screen from its storage bag, located in
the trunk, secured with hook and loop fasteners,
and unfold.
2. Pull folded end sections in direction of arrow (1) and
unfold in direction of arrow (2).
P65.00-2016-26
1
2
ProCarManuals.com
Page 180 of 341

177 Emission control
Te ch n i c a l
data Instruments
and controlsOperationDrivingInstrument
cluster displayPractical hints Car care Index Emission control
Certain systems of the engine serve to keep the toxic
components of the exhaust gases within permissible
limits required by law.
These systems, of course, will function properly only
when maintained strictly according to factory
specifications. Any adjustments on the engine should,
therefore, be carried out only by qualified Mercedes-
Benz authorized center technicians. Engine adjustments
should not be altered in any way. Moreover, the
specified service jobs must be carried out regularly
according to Mercedes-Benz servicing requirements.
For details refer to the Service Booklet.
Wa r n i n g !
Inhalation of exhaust gas is hazardous to your
health. All exhaust gas contains carbon monoxide,
and inhaling it can cause unconsciousness and
lead to death.Do not run the engine in confined areas (such as a
garage) which are not properly ventilated. If you
think that exhaust gas fumes are entering the
vehicle while driving, have the cause determined
and corrected immediately. If you must drive under
these conditions, drive only with at least one
window fully open.
ProCarManuals.com
Page 188 of 341

185 Tele Aid
Te ch n i c a l
data Instruments
and controlsOperationDrivingInstrument
cluster displayPractical hints Car care Index Important!
If the indicator lamp continues to flash or the system
does not reset, contact the Response Center at
1-800-756-9018 (in the USA) or 1-888-923-8367 (in
Canada), or Mercedes-Benz Customer Assistance at
1-800-FOR-MERCedes (1-800-367-6372) in the USA or
Customer Service at 1-800-387-0100 in Canada.
Notes:
The indicator lamp in the respective button flashes until
the call is concluded. Calls can only be terminated by a
Response Center or Customer Assistance Center
representative except Roadside Assistance and
Information calls, which can also be terminated by
pressing ìbutton on the multifunction steering
wheel.When a Tele Aid call has been initiated, the audio
system or the COMAND system audio (only vehicles
with COMAND) is muted and the selected mode (radio,
tape or CD) pauses. The optional cellular phone (if
installed) switches off. If you must use this phone, the
vehicle must be parked. Disconnect the coiled cord and
place the call. The COMAND navigation system (if
engaged) will continue to run. The display in the
instrument cluster is available for use and spoken
commands are only available by pressing the RPT
button on the COMAND unit. A pop-up window will
appear in the COMAND display to indicate that a Tele
Aid call is in progress.
ProCarManuals.com
Page 192 of 341

189 Steering lock
Te ch n i c a l
data Instruments
and controlsOperationDrivingInstrument
cluster displayPractical hints Car care Index Important!
If the electronic key is left in the steering lock position 0
for an extended period of time, it can no longer be
turned in the lock. In this case, remove electronic key
from steering lock and reinsert.
Caution!
To prevent accelerated battery discharge and a possible
dead battery, always remove the electronic key from the
steering lock. Do not leave the electronic key in steering
lock position 0.Notes:
A warning sounds when the driver’s door is opened
while the electronic key is in steering lock position 1
or 0.
If the electronic key cannot be turned in the steering
lock, the vehicle battery may not be sufficiently charged.
See battery on page 270 or jump starting on page 271.
With the engine at idle speed, the charging rate of the
alternator (output) is limited.
It is therefore recommended that you turn off
unnecessary electrical consumers while driving in stop-
and-go traf fic. This precaution helps to avoid draining of
the battery.
Unnecessary strain on the battery and charging system
may be minimized by turning off the following power
consumers, for example: Heated seats, rear window
defroster. In addition, the automatic climate air volume
control should be set to the lowest position.
The steering lock can only be unlocked with the vehicle
battery properly charged and connected.
ProCarManuals.com
Page 211 of 341

208 Driving instructions
Te ch n i c a l
data Instruments
and controlsOperationDrivingInstrument
cluster displayPractical hints Car care Index
If the vehicle is parked after being driven on salt treated
roads, the braking efficiency should be tested as soon as
possible after driving is resumed while observing the
safety rules in the previous paragraph.Winter driving
Have your vehicle winterized at your authorized
Mercedes-Benz Center before the onset of winter.
•Check engine coolant anticorrosion/antifreeze
concentration.
•Additive for the windshield washer and headlamp
cleaning system: Add MB Concentrate “S” to a
premixed windshield washer solvent/antifreeze
which is formulated for below freezing temperatures
see page 255.
•Test battery: Battery capacity drops with decreasing
ambient temperature. A well charged battery helps
to ensure that the engine can be started, even at low
ambient temperatures.
•Tires: We recommend M+S rated radial-ply tires on
all four wheels for the winter season. Observe
permissible maximum speed for M+S rated
radial-ply tires and the legal speed limit.
In winter operation, the maximum effectiveness of the
antilock brake system (ABS) or of the electronic stability
program (ESP) can only be achieved with M+S rated
radial-ply tires and / or snow chains recommended by
Mercedes-Benz. Snow chains maximize performance.
Wa r n i n g !
If the vehicle becomes stuck in snow, make sure
that snow is kept clear of the exhaust pipe and
from around the vehicle with engine running.
Otherwise, deadly carbon monoxide (CO) gases may
enter vehicle interior resulting in unconsciousness
and death.To assure sufficient fresh air ventilation, open a
window slightly on the side of the vehicle not
facing the wind.
ProCarManuals.com
Page 248 of 341

245
Te ch n i c a l
data Instruments
and controlsOperation DrivingInstrument
cluster displayPractical hintsCar care Index
Practical hintsFirst aid kit .....................................246
Shelf below rear window ..............246
Stowing things in the vehicle ......246
Luggage cover .................................246
Fuses ................................................248
Hood .................................................250
Checking engine oil level .............252
Automatic transmission fluid
level .............................................253
Coolant level ...................................253
Adding coolant ...........................254
Windshield washer / headlamp
cleaning system .........................255
Windshield and headlamp washer
fluid mixing ratio .......................255Spare wheel, vehicle tools, storage
compartment ............................. 256
Vehicle jack .................................... 257
Wheels ............................................ 258
Tire replacement ....................... 258
Rotating wheels ......................... 259
Spare wheel .................................... 260
Spare wheel bolts .......................... 260
Spare wheel bolts ...................... 260
Spare wheel .................................... 260
Changing wheels ........................... 263
Tire inflation pressure ................. 268
Battery ............................................. 270
Jump starting ..................................271
Towing the vehicle ........................ 273
Exterior lamps ............................... 277
Headlamp assembly .................. 278
Taillamp assemblies .................. 280Adjusting headlamp aim ...............282
Changing batteries in the electronic
key ...............................................285
Synchronizing remote
control .........................................287
Raising soft top manually .............288
Antenna ...........................................295
Manual release for fuel filler
flap ..............................................296
Replacing wiper blade insert .......296
ProCarManuals.com