2002 MERCEDES-BENZ CLK-CLASS oil
[x] Cancel search: oilPage 248 of 341

245
Te ch n i c a l
data Instruments
and controlsOperation DrivingInstrument
cluster displayPractical hintsCar care Index
Practical hintsFirst aid kit .....................................246
Shelf below rear window ..............246
Stowing things in the vehicle ......246
Luggage cover .................................246
Fuses ................................................248
Hood .................................................250
Checking engine oil level .............252
Automatic transmission fluid
level .............................................253
Coolant level ...................................253
Adding coolant ...........................254
Windshield washer / headlamp
cleaning system .........................255
Windshield and headlamp washer
fluid mixing ratio .......................255Spare wheel, vehicle tools, storage
compartment ............................. 256
Vehicle jack .................................... 257
Wheels ............................................ 258
Tire replacement ....................... 258
Rotating wheels ......................... 259
Spare wheel .................................... 260
Spare wheel bolts .......................... 260
Spare wheel bolts ...................... 260
Spare wheel .................................... 260
Changing wheels ........................... 263
Tire inflation pressure ................. 268
Battery ............................................. 270
Jump starting ..................................271
Towing the vehicle ........................ 273
Exterior lamps ............................... 277
Headlamp assembly .................. 278
Taillamp assemblies .................. 280Adjusting headlamp aim ...............282
Changing batteries in the electronic
key ...............................................285
Synchronizing remote
control .........................................287
Raising soft top manually .............288
Antenna ...........................................295
Manual release for fuel filler
flap ..............................................296
Replacing wiper blade insert .......296
ProCarManuals.com
Page 253 of 341

250 Engine compartment
Te ch n i c a l
data Instruments
and controlsOperation DrivingInstrument
cluster displayPractical hintsCar care Index
Hood
Wa r n i n g !
To help prevent personal injury, stay clear of
moving parts when the hood is open and the engine
is running. Be sure the hood is properly closed
before driving. When closing hood, use extreme
caution not to catch hands or fingers.The radiator fan may continue to run for
approximately 30 seconds or even restart after the
engine has been turned off. Stay clear from fan
blades.
The engine is equipped with a transistorized
ignition system. Because of the high voltage it is
dangerous to touch any components (ignition coils,
spark plug sockets, diagnostic socket) of the
ignition system
• with the engine running,
• while starting the engine,
• if ignition is “on” and the engine is turned
manually.If you see flames, steam or smoke coming from the
engine compartment, or if the coolant temperature
gauge indicates that the engine is overheated, do
not open the hood. Move away from vehicle and do
not open the hood until the engine has cooled. If
necessary, call a fire department.
ProCarManuals.com
Page 255 of 341

252 Engine compartment
Te ch n i c a l
data Instruments
and controlsOperation DrivingInstrument
cluster displayPractical hintsCar care Index
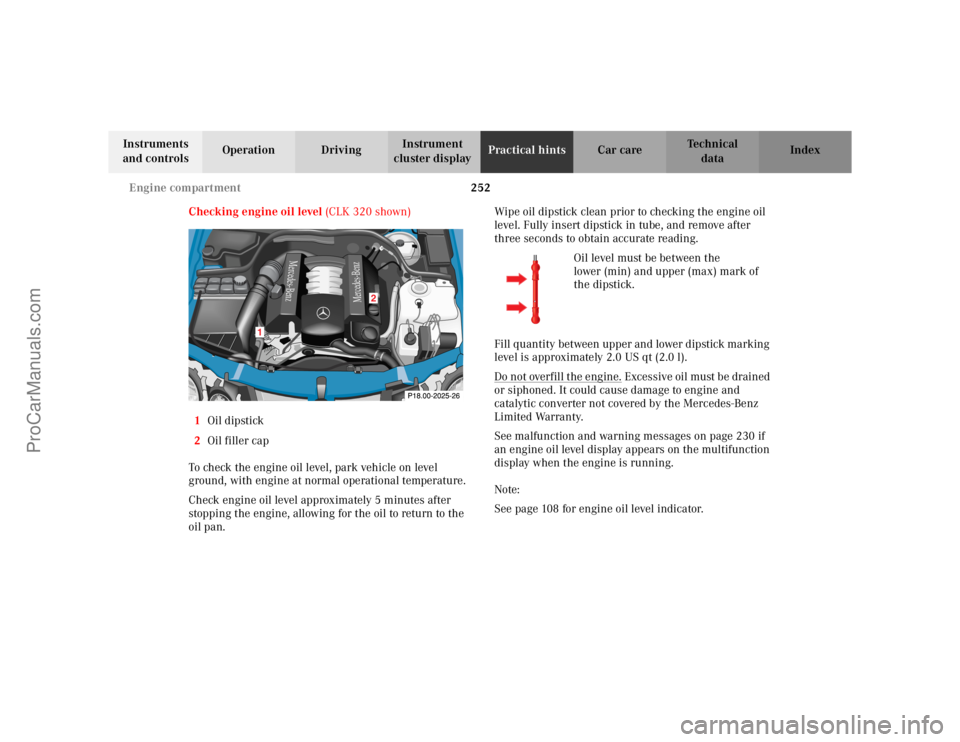
Checking engine oil level (CLK 320 shown)
1Oil dipstick
2Oil filler cap
To check the engine oil level, park vehicle on level
ground, with engine at normal operational temperature.
Check engine oil level approximately 5 minutes after
stopping the engine, allowing for the oil to return to the
oil pan.Wipe oil dipstick clean prior to checking the engine oil
level. Fully insert dipstick in tube, and remove after
three seconds to obtain accurate reading.
Oil level must be between the
lower (min) and upper (max) mark of
the dipstick.
Fill quantity between upper and lower dipstick marking
level is approximately 2.0 US qt (2.0 l).
Do not overfill the engine.
Excessive oil must be drained
or siphoned. It could cause damage to engine and
catalytic converter not covered by the Mercedes-Benz
Limited Warranty.
See malfunction and warning messages on page 230 if
an engine oil level display appears on the multifunction
display when the engine is running.
Note:
See page 108 for engine oil level indicator.
Mercedes-Benz
Mercedes-Benz
2
1
ProCarManuals.com
Page 270 of 341

267 Tires, Wheels
Te ch n i c a l
data Instruments
and controlsOperation DrivingInstrument
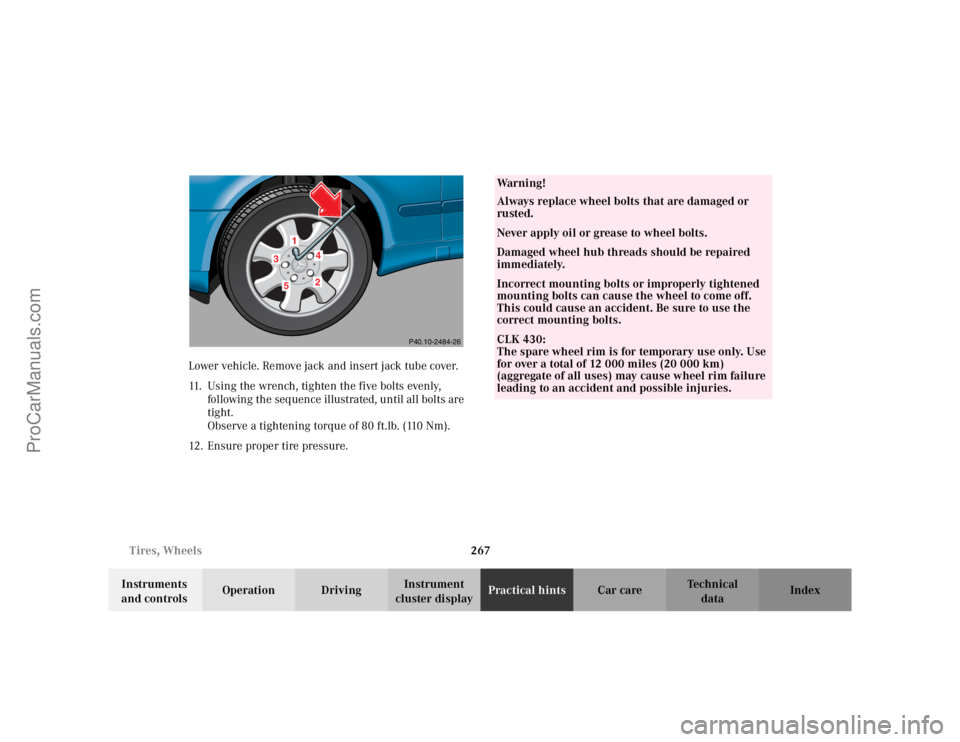
cluster displayPractical hintsCar care Index Lower vehicle. Remove jack and insert jack tube cover.
11. Using the wrench, tighten the five bolts evenly,
following the sequence illustrated, until all bolts are
tight.
Observe a tightening torque of 80 ft.lb. (110 Nm).
12. Ensure proper tire pressure.
34
2
5
P40.10-2484-26
Wa r n i n g !
Always replace wheel bolts that are damaged or
rusted.Never apply oil or grease to wheel bolts.Damaged wheel hub threads should be repaired
immediately.Incorrect mounting bolts or improperly tightened
mounting bolts can cause the wheel to come off.
This could cause an accident. Be sure to use the
correct mounting bolts.CLK 430:
The spare wheel rim is for temporary use only. Use
for over a total of 12 000 miles (20 000 km)
(aggregate of all uses) may cause wheel rim failure
leading to an accident and possible injuries.
ProCarManuals.com
Page 303 of 341

300 Cleaning and care of the vehicle
Instruments
and controlsOperation DrivingInstrument
cluster displayPractical hints IndexTe ch n i c a l
data Car care
Cleaning and care of the vehicle
In operation, your vehicle is subjected to varying
external influences which, if gone unchecked, can
attack the paintwork as well as the underbody and
cause lasting damage.
Such damage is caused not only by extreme and varying
climatic conditions, but also by air polution, road salt,
tar, gravel and stone chipping. Grease and oil, fuel,
coolant, brake fluid, bird droppings, insects, tree resins
etc. should be removed immediately to avoid paint
damage. Frequent washing reduces and/or eliminates
the aggressiveness and potency of the above adverse
influences.More frequent washings are necessary to deal with
unfavorable conditions; for example, near the ocean, in
industrial areas (smoke, exhaust emissions), or during
winter operation.
You should check your vehicle from time to time for
stone chipping or other damage. Any damage should be
repaired as soon as possible to prevent the start of
corrosion.
In doing so, do not neglect the underside of the vehicle.
A prerequisite for a thorough check is a washing of the
underbody followed by a thorough inspection. Damaged
areas need to be reundercoated.
Your vehicle has been treated at the factory with a wax-
base rustproofing in the body cavities which will last for
the lifetime of the vehicle. Post-production treatment is
neither necessary nor recommended by Mercedes-Benz
because of the possibility of incompatibility between
materials used in the production process and others
applied later.
We have selected car-care products and compiled
recommendations which are specially matched to our
vehicles and which always reflect the latest technology.
You can obtain Mercedes-Benz approved car-care
products at your authorized Mercedes-Benz Center.
Wa r n i n g !
Many cleaning products can be hazardous. Some
are poisonous, others are flammable. Always follow
the instructions on the particular container.
Always open your vehicle’s doors or windows when
cleaning the inside.Never use fluids or solvents that are not designed
for cleaning your vehicle.
ProCarManuals.com
Page 306 of 341

303 Cleaning and care of the vehicle
Te ch n i c a l
data Instruments
and controlsOperation DrivingInstrument
cluster displayPractical hintsCar careIndex Headlamps, taillamps, turn signal lenses
Use a mild car wash detergent, such as Mercedes-Benz
approved Car Shampoo, with plenty of water.
To prevent scratches, never apply strong force and use
only a soft, non-scratchy cloth when cleaning the lenses.
Do not attempt to wipe dirty lenses with a dry cloth or
sponge.
Window cleaning
Use a window cleaning solution on all glass surfaces. An
automotive glass cleaner is recommended.
Note:
For safety reasons, switch off wiper and remove
electronic key from steering lock before cleaning the
windshield, otherwise the wiper motor can suddenly
turn on and cause injury.
Plastic and rubber parts
Do not use oil or wax on these parts.Wiper blade
Clean the wiper blade rubber with a clean cloth and
detergent solution.
Note:
For safety reasons, remove electronic key from steering
lock before cleaning the wiper blade, otherwise the
wiper motor can suddenly turn on and cause injury.
Light alloy wheels
Mercedes-Benz approved Wheel Care should be used for
regular cleaning of the light alloy wheels.
If possible, clean wheels once a week with Mercedes-
Benz approved Wheel Care, using a soft bristle brush
and a strong spray of water.
Follow instructions on container.
Note:
Use only acid-free cleaning materials. The acid could
lead to corrosion.
ProCarManuals.com
Page 308 of 341

305 Cleaning and care of the vehicle
Te ch n i c a l
data Instruments
and controlsOperation DrivingInstrument
cluster displayPractical hintsCar careIndex Upholstery
Using aftermarket seat covers or wearing clothing that
have the tendency to give off coloring (e.g. when wet
etc.) may cause the upholstery to become permanently
discolored. By lining the seats with a proper
intermediate cover, contact-discoloration will be
prevented.
Leather Upholstery
Wipe leather upholstery with a damp cloth and dry
thoroughly or clean with Mercedes-Benz approved
Leather Care. Exercise particular care when cleaning
perforated leather as its underside should not become
wet.
MB Tex Upholstery
Pour Mercedes-Benz approved Interior Care onto soft
lint-free cloth and apply with light pressure.Hard plastic trim items
Pour Mercedes-Benz approved Interior Care onto soft
lint-free cloth and apply with light pressure.
Plastic and rubber parts
Do not use oil or wax on these parts.
Wind screen
Use only water or mild detergent to clean the wind
screen.
Rubber weatherstrip
The door and windshield header rubber weatherstrip
material should be cared for at regular intervals with a
silicon-based car care product.
ProCarManuals.com
Page 309 of 341

306 Cleaning and care of the vehicle
Instruments
and controlsOperation DrivingInstrument
cluster displayPractical hints IndexTe ch n i c a l
data Car care
Soft top
Clean soft top with soft top raised and locked. Lower the
soft top into the storage compartment only if the soft top
is completely dry. If the soft top is kept in the storage
compartment for a lengthy period, raise it and air out
with the windows open about every 4 months.
Dry cleaning:
Brush top (always from front to rear) with a soft-bristled
brush.
We t c l e a n i n g :
Brush the dry top. Wash with a mild detergent and an
ample supply of lukewarm water by wiping with a soft-
bristled brush or sponge from front to rear. Then rinse
thoroughly with clear water.
If only parts of the top have been washed, wet the entire
top and allow it to air-dry before lowering it into the
storage compartment.
Do not use sharp-edged instruments for the removal of
ice and snow. Notes:
When you run the vehicle through an automatic car
wash, never use hot-wax for conservation.
Depending on the operation mode of the car wash, there
is the possibility of water drops entering the vehicle’s
interior.
Never use a power washer to clean the soft top, as you
may damage the soft top material.
Remove bird droppings immediately. The organic acid
damages the material and causes the soft top to leak.
In general, regular spraying or cleansing with clear
water is sufficient to keep the top clean.
Wash the top only when heavily soiled.
Light colored soft tops should be cleaned frequently to
prevent spots and dirt from setting in, which could stain
and discolor the soft top material permanently.
Caution!
Never use any gasoline, thinner, tar and stain removers,
glass cleaner, or similar organic solvents to clean the
soft top or wind screen. They will cause damage which
is not covered by the Mercedes-Benz Limited Warranty.
ProCarManuals.com