Page 114 of 430

111 Memory function
Te ch n i c a l
data Instruments
and controlsOperationDrivingInstrument
cluster displayPractical hints Car care Index Memory function
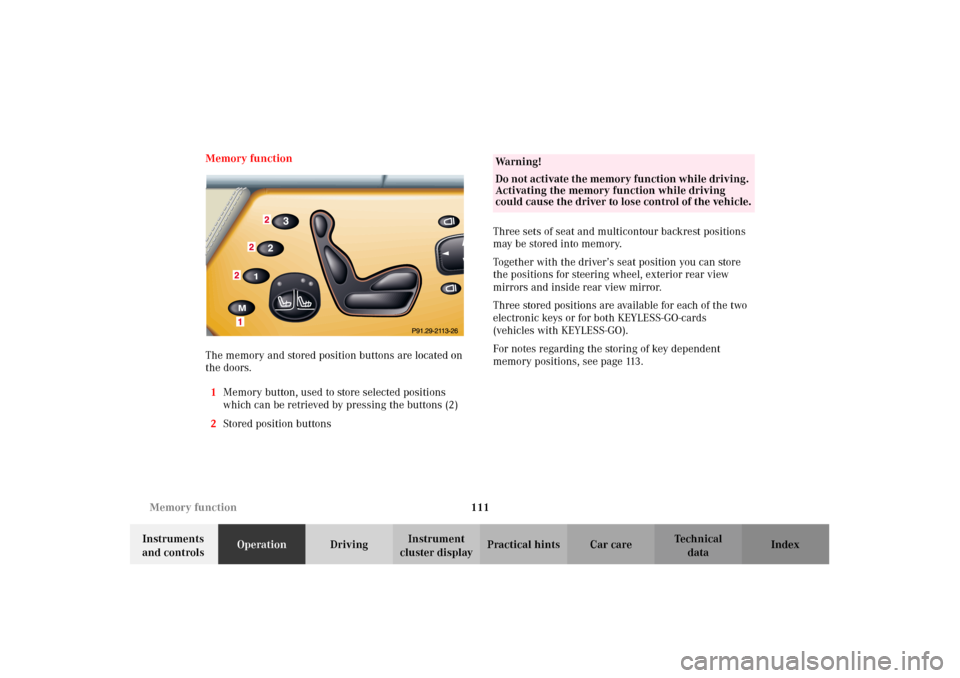
The memory and stored position buttons are located on
the doors.
1Memory button, used to store selected positions
which can be retrieved by pressing the buttons (2)
2Stored position buttonsThree sets of seat and multicontour backrest positions
may be stored into memory.
Together with the driver’s seat position you can store
the positions for steering wheel, exterior rear view
mirrors and inside rear view mirror.
Three stored positions are available for each of the two
electronic keys or for both KEYLESS-GO-cards
(vehicles with KEYLESS-GO).
For notes regarding the storing of key dependent
memory positions, see page 113.
Wa r n i n g !
Do not activate the memory function while driving.
Activating the memory function while driving
could cause the driver to lose control of the vehicle.
J_OM_215.book Seite 111 Mittwoch, 30. Mai 2001 2:01 14
Page 124 of 430

121 Multifunction steering wheel, multifunction display
Te ch n i c a l
data Instruments
and controlsOperationDrivingInstrument
cluster displayPractical hints Car care Index Depending on your vehicle’s equipment, you may use
the buttons on the multifunction steering wheel to call
up, control and set the following systems in the
multifunction display:
1Trip odometer and main odometer, see page 119 and
page 124
Flexible service system (FSS), see page 150
Tire inflation pressure monitor, see page 153
Engine oil level indicator, see page 157
2Audio systems, see page 126
Radio, see page 126
CD player, see page 127
Cassette player, see page 128
3Telephone, see page 1294Navigation system, see page 134
5Distronic (DTR), see page 259
6Trip computer, see page 136
After start
After reset
Range
7Malfunction message memory, see page 138
8Individual settings, see page 140
9Malfunction messages are stored in memory (7),
see page 138.
Press theè orÿ button repeatedly until the
required system is displayed.
The display advances by one system each time the
button is pressed.
You may call up additional displays within some of these
categories by pressing thej or kbutton.
J_OM_215.book Seite 121 Mittwoch, 30. Mai 2001 2:01 14
Page 175 of 430
172 Automatic climate control
Te ch n i c a l
data Instruments
and controlsOperationDrivingInstrument
cluster displayPractical hints Car care Index
Dust filter
Nearly all dust particles and pollen are filtered out
before outside air enters the passenger compartment
through the air distribution system.Automatic maximum cooling (MAXCOOL)
With the automatic climate control set to automatic, the
system will automatically switch to maximum cooling
output when necessary to achieve the set temperature
quickly, see page 173. The display shows
“AUTO MAXCOOL”.
The temperature setting cannot be changed during
maximum cooling operation.
Note:
By pressing one of the temperature buttons, the system
will display briefly (approx. 5 seconds) the set
temperature in the display.
J_OM_215.book Seite 172 Mittwoch, 30. Mai 2001 2:01 14
Page 179 of 430

176 Automatic climate control
Te ch n i c a l
data Instruments
and controlsOperationDrivingInstrument
cluster displayPractical hints Car care Index
Windshield fogged on the outside
Switch on the windshield wiper.
Press on both U buttons until they click in.
Theh, jand ksymbols will no longer be
visible.
Air recirculation
Select air recirculation:
The indicator lamp in the Obutton is not
illuminated.
Press buttonO briefly. The indicator lamp in the
button illuminates.
Switch off the air recirculation:
The indicator lamp in the Obutton is illuminated.
Press buttonO briefly. The indicator lamp in the
button will go out.Switching on air recirculation and activating
convenience closing of power windows and sliding/
pop-up roof:
The indicator lamp in the button O is not
illuminated.
Press and hold button O until the side windows and
the sliding / pop-up roof are closed. The indicator lamp
in the button lights up.
Switching off air recirculation and activating
convenience opening of power windows and sliding/
pop-up roof:
The indicator lamp in the button O is illuminated.
Press and hold button O until the side windows and
the sliding / pop-up roof are in the desired position.
J_OM_215.book Seite 176 Mittwoch, 30. Mai 2001 2:01 14
Page 183 of 430

180 Automatic climate control
Te ch n i c a l
data Instruments
and controlsOperationDrivingInstrument
cluster displayPractical hints Car care Index
Switching the automatic climate control on and off
To s witch of f:
Press buttonM. The display shows “0”.
The fresh air supply to the vehicle interior is shut off.
While driving, use this setting only temporarily,
otherwise the windshield could fog up.
To s witch on:
•press buttonM orP,
•press one of the U buttons so that it pops out and
then click it back in,
•press one of the temperature selector buttons or the
air volume switch.Front center console storage compartment
ventilation
The front center console compartment has its own air
outlet.
To open: Slide the lever up.
To close: Slide the lever down.
The air volume is dependent on the setting of:
•air distribution control,
•air volume control,
•air outlets in the dashboard.
The air temperature is about the same as that of the
dashboard air outlets. It cannot be regulated separately.
Notes:
The compartment can get very warm due to its confined
space. When storing heat sensitive objects in the
compartment, close the air outlet while heating the
passenger compartment.
Do not allow articles to obstruct the air outlet in the
storage compartment.
J_OM_215.book Seite 180 Mittwoch, 30. Mai 2001 2:01 14
Page 200 of 430

197 Interior equipment
Te ch n i c a l
data Instruments
and controlsOperationDrivingInstrument
cluster displayPractical hints Car care Index Storage space below the armrest
To open: Press button (7) and raise the armrest.
To close: Lower the armrest until it engages in lock.
Notes:
The storage compartment can be heated or cooled, see
page 180.
The compartment can get very warm due to its confined
space. When storing heat sensitive objects in the
compartment, close the air outlet while heating the
passenger compartment.
Do not obstruct the air outlet in the storage
compartment.
The storage space below the armrest is illuminated with
the exterior lamps switched on.Storage compartment under the front seats
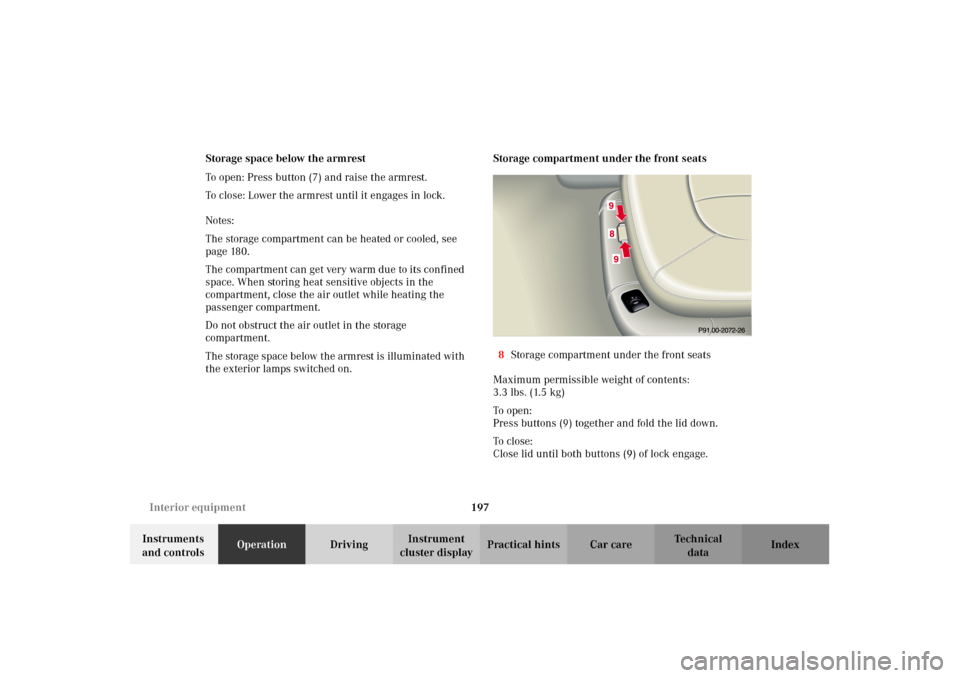
8Storage compartment under the front seats
Maximum permissible weight of contents:
3.3 lbs. (1.5 kg)
To o p e n :
Press buttons (9) together and fold the lid down.
To c l o s e :
Close lid until both buttons (9) of lock engage.
J_OM_215.book Seite 197 Mittwoch, 30. Mai 2001 2:01 14
Page 212 of 430

209 Garage door opener
Te ch n i c a l
data Instruments
and controlsOperationDrivingInstrument
cluster displayPractical hints Car care Index For operation in the USA only: This device complies
with Part 15 of the FCC Rules. Operation is subject to
the following two conditions:
(1) This device may not cause harmful interference, and
(2) this device must accept any interference received,
including interference that may cause undesired
operation.
Any unauthorized modification to this device could void
to the user’s authority to operate the equipment.
Programming or reprogramming the integrated
remote control:
1. Turn electronic key in starter switch to position 1
or 2.
2. Hold the end of the hand-held transmitter of the
device you wish to train approximately 2 to 5 inches
(5 cm to 12 cm) away from the surface of the
integrated remote control located on the inside rear
view mirror, keeping the indicator lamp in view.3. Using both hands, simultaneously push the hand-
held transmitter button and the desired integrated
remote control button. Do not release the buttons
until completing step 4.
4. The indicator lamp on the integrated remote control
will flash, first slowly and then rapidly. When the
indicator lamp flashes rapidly, both buttons may be
released (the rapid flashing lamp indicates
successful programming of the new frequency
signal). To program the remaining two buttons,
follow steps 1 through 4.
Note:
If, after repeated attempts, you do not successfully
program the integrated remote control device to learn
the signal of the hand-held transmitter, the garage door
opener could be equipped with the “rolling code
feature”.
J_OM_215.book Seite 209 Mittwoch, 30. Mai 2001 2:01 14
Page 214 of 430
211 Garage door opener
Te ch n i c a l
data Instruments
and controlsOperationDrivingInstrument
cluster displayPractical hints Car care Index Operation of remote control:
1. Turn electronic key in starter switch to position 1
or 2.
2. Select and press the appropriate button to activate
the remote controlled device. The integrated remote
control transmitter continues to send the signal as
long as the button is pressed – up to 20 seconds.Erasing the remote control memory:
1. Turn electronic key in starter switch to position 1
or 2.
2. Simultaneously holding down the left and right side
buttons for approximately 20 seconds, or until the
control lamp blinks rapidly, will erase the codes of
all three channels.
J_OM_215.book Seite 211 Mittwoch, 30. Mai 2001 2:01 14