Page 192 of 430

189 Interior equipment
Te ch n i c a l
data Instruments
and controlsOperationDrivingInstrument
cluster displayPractical hints Car care Index Interior lighting
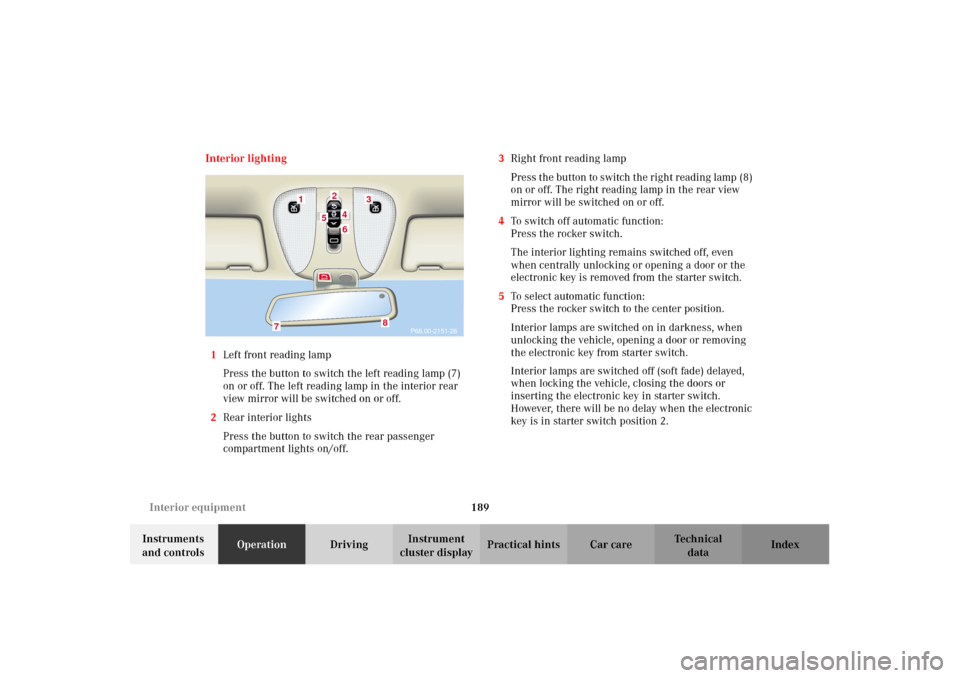
1Left front reading lamp
Press the button to switch the left reading lamp (7)
on or off. The left reading lamp in the interior rear
view mirror will be switched on or off.
2Rear interior lights
Press the button to switch the rear passenger
compartment lights on/off.3Right front reading lamp
P re ss t he button to s witch t he r ight r eadi ng lamp (8 )
on or off. The right reading lamp in the rear view
mirror will be switched on or off.
4To switch off automatic function:
Press the rocker switch.
The interior lighting remains switched off, even
when centrally unlocking or opening a door or the
electronic key is removed from the starter switch.
5To select automatic function:
Press the rocker switch to the center position.
Interior lamps are switched on in darkness, when
unlocking the vehicle, opening a door or removing
the electronic key from starter switch.
Interior lamps are switched off (soft fade) delayed,
when locking the vehicle, closing the doors or
inserting the electronic key in starter switch.
However, there will be no delay when the electronic
key is in starter switch position 2.
P68.00-2151-26
1
3
24
5
6
7
8
J_OM_215.book Seite 189 Mittwoch, 30. Mai 2001 2:01 14
Page 193 of 430

190 Interior equipment
Te ch n i c a l
data Instruments
and controlsOperationDrivingInstrument
cluster displayPractical hints Car care Index
Note:
The time delay for the interior light to switch off after
the electronic key is removed from the starter switch
can be adjusted in the individual setting menu
“LIGHTING” – “INTERIOR LAMP DELAYED SHUT-OFF”.
Seepage144.
To prevent the vehicle battery from being discharged
with doors open, all interior lamps switch off after
approximately 5 minutes, when the electronic key
removed or in starter switch position 0.
6Interior lamps, front:
Press rocker switch in to switch front interior and
reading lamps on. The front interior lighting stays
on while the rocker switch is pressed in.
Switching off the front interior lighting:
Press rocker switch to position (4) or (5).
Courtesy lighting
The interior of your vehicle is equipped with various
different lighting installations to help you to orient
yourself better in the dark.Entrance lamps, exit lamps
With exterior lamps on or electronic key in starter
switch position 1, the lamps in the door trays illuminate.
The lights will remain on for approximately 5 minutes if
the electronic key is in starter switch position 0 and
exterior lamps are switched off.
Footwell lighting
With parking lamps on, the driver and front passenger
footwell is illuminated.
Center console lighting
Turn the electronic key in the starter switch to
position 1. The center console is illuminated from the
inside rear view mirror.
Door entry lamps
The appropriate entry lamp switches on if a door is
opened in darkness and if the interior lighting is
switched to automatic function.
The entry lamp switches off automatically when the
door is closed.
J_OM_215.book Seite 190 Mittwoch, 30. Mai 2001 2:01 14
Page 291 of 430
288 Parking system
Te ch n i c a l
data Instruments
and controlsOperationDrivingInstrument
cluster displayPractical hints Car care Index
Warning indicators
1Frame
2SegmentsVisual and audible signals indicate to the driver the
relative distance between the vehicle and an obstacle.
Warning indicators for the front area are located above
the left and center air outlets in the dashboard.
Warning indicators for the rear area are integrated in
the rear headliner.
The frames (1) are illuminated when the Parktronic is
engaged.
Each warning indicator has 6 yellow and 2 red
segments (2).
As soon as the sensors detect an obstacle, one or more
segments light up, depending on the distance. An
intermittent acoustic warning will also sound as the
seventh segment lights up and a constant acoustic
warning lasting a maximum of 3 seconds will sound for
the eighth segment.
2
1
P54.65-2043-26
J_OM_215.book Seite 288 Mittwoch, 30. Mai 2001 2:01 14
Page 292 of 430
289 Parking system
Te ch n i c a l
data Instruments
and controlsOperationDrivingInstrument
cluster displayPractical hints Car care Index Monitoring reach of sensors
Front bumper:
Rear bumper:The first yellow segment lights up at these distances.
Additional segments light up as the vehicle comes
closer to the obstacle.
Minimum distance between vehicle and obstacle at
which the system stops indicating: Center approx. 40 in (100 cm)
Corner approx. 24 in (60 cm)
Center approx. 48 in (120 cm)
Corner approx. 32 in (80 cm)
Front corners approx. 6 in (15 cm)
Front center and rear approx. 8 in (20 cm)
J_OM_215.book Seite 289 Mittwoch, 30. Mai 2001 2:01 14
Page 316 of 430

313 Malfunction and warning messages
Te ch n i c a l
data Instruments
and controlsOperation DrivingInstrument
cluster displayPractical hints Car care IndexIn t he case of bulb failures in certain lamps, ot her lamps
will substitute. See page 360 for instructions on
replacing bulbs.
* C = Category, see page 303
1 The display or the system is malfunctioning.
2 The brake lamps are switching on after a delay or are permanently
on – visit workshop immediately.
3 The brake lamps comprise several light emitting diodes. The
warning message will only appear if all light emitting diodes have
stopped working.
4 Other bulbs will be brought into use as replacements when certain
lamps blow. FRONT FOGLAMP, R CHECK LAMPS! 2
REAR FOGLAMP CHECK LAMPS! 2
REVERSE LAMP, L CHECK LAMPS! 2
REVERSE LAMP, R CHECK LAMPS! 2
TAIL LAMP, L CHECK LAMPS!
SUBSTITUTE LAMP ON!
4
2
TAIL LAMP, R CHECK LAMPS!
SUBSTITUTE LAMP ON!
4
2
STANDING LAMP, L CHECK LAMPS!
SUBSTITUTE LAMP ON!
4
2
STANDING LAMP, R CHECK LAMPS!
SUBSTITUTE LAMP ON!
4
2 Line 1 Line 2 C*
J_OM_215.book Seite 313 Mittwoch, 30. Mai 2001 2:01 14
Page 378 of 430
375 Emergency operation of sliding/pop-up roof
Te ch n i c a l
data Instruments
and controlsOperation DrivingInstrument
cluster displayPractical hintsCar care Index Emergency operation of sliding/pop-up roof
The sliding /pop-up roof can be opened or closed
manually should an electrical malfunction occur.
The sliding /pop-up roof drive is located behind the lens
of the left interior overhead light.
Pry off the interior light lens (1) using a screwdriver.
Turn electronic key in starter switch to position 1 or 2.Obtain crank (2) (supplied with vehicle) and insert
through hole.
To slide roof closed or to raise the roof at the rear:
turn crank clockwise.
To slide the roof open or to lower the roof at the rear:
turn crank counterclockwise.
See page 188 for instructions on synchronizing the
sliding /pop-up roof after closing manually.
P77.00-2022-26
1
P77.00-2023-26
2
J_OM_215.book Seite 375 Mittwoch, 30. Mai 2001 2:01 14
Page 382 of 430

379 Contents - Vehicle care
Te ch n i c a l
data Instruments
and controlsOperation DrivingInstrument
cluster displayPractical hintsCar careIndex
Vehicle careCleaning and care of
the vehicle ..................................380
Power washer .............................. 381
Tar stains .....................................382
Paintwork, painted body
components .................................382
Engine cleaning ..........................382
Vehicle washing .........................382Ornamental moldings ............... 383
Headlamps, taillamps,
turn signal lenses ...................... 383
Cleaning the Distronic
system sensor ............................. 384
Cleaning the parktronic
system sensors ........................... 384
Wiper blades .............................. 385
Light alloy wheels ..................... 386
Instrument cluster ..................... 387Steering wheel and
gear selector lever ......................387
Cup holder ...................................387
Seat belts .....................................388
Headliner and shelf
below rear window .....................388
Leather upholstery .....................388
Hard plastic trim items .............388
Plastic and rubber parts ............388
J_OM_215.book Seite 379 Mittwoch, 30. Mai 2001 2:01 14
Page 391 of 430

388 Cleaning and care of the vehicle
Te ch n i c a l
data Instruments
and controlsOperation DrivingInstrument
cluster displayPractical hintsCar careIndex
Seat belts
The webbing must not be treated with chemical
cleaning agents. Use only clear, lukewarm water and
soap. Do not dry the webbing at temperatures above
176
°F (80
°C) or in direct sunlight.
Headliner and shelf below rear window
Clean with soft bristle brush, or use a dry-shampoo
cleaner in case of excessive dirt.Leather upholstery
Using aftermarket seat covers or wearing clothing that
have the tendency to give off coloring (e.g. when wet
etc.) may cause the upholstery to become permanently
discolored. By lining the seats with a proper
intermediate cover, contact-discoloration will be
prevented.
Wipe leather upholstery with a damp cloth and dry
thoroughly or clean with Mercedes-Benz approved
Leather Care. Exercise particular care when cleaning
perforated leather as its underside should not become
wet.
Hard plastic trim items
Pour Mercedes-Benz approved Interior Care onto soft
lint-free cloth and apply with light pressure.
Plastic and rubber parts
Do not use oil or wax on these parts.
Wa r n i n g !
Do not bleach or dye seat belts as this may severely
weaken them. In a crash they may not be able to
provide adequate protection.
J_OM_215.book Seite 388 Mittwoch, 30. Mai 2001 2:01 14