Page 99 of 406

96 Memory function
Te ch n i c a l
data Instruments
and controlsOperationDrivingInstrument
cluster displayPractical hints Car care Index
Storing positions into memory:
With the electronic key in starter switch position 1 or 2
or with the relevant door open and the electronic key
inserted in the starter switch.
Adjust the seat to the desired position.
Driver’s seat:
You can also adjust the steering wheel and the exterior
rear view mirrors electrically for the driver’s seat. See
page 91 for exterior rear view mirror adjustment and
page 89 for steering wheel adjustment.
Turn button (2) to selected memory position.
Push memory button (1), release and push the position
button (2) within 3 seconds.Recalling positions from memory:
To recall a seat / steering wheel / exterior rear view
mirror position, turn button (2) to selected memory
position and press to recall.
The seat / steering wheel / exterior rear view mirror
movement stops when the button is released.
Caution!
Do not operate the power seats using the memory
button if the backrest is in an excessively reclined
position. Doing so could cause damage to front or rear
seats.
First move backrest to an upright position.
OM_203.book Seite 96 Donnerstag, 31. Mai 2001 11:57 11
Page 102 of 406

99 Instrument cluster
Te ch n i c a l
data Instruments
and controlsOperationDrivingInstrument
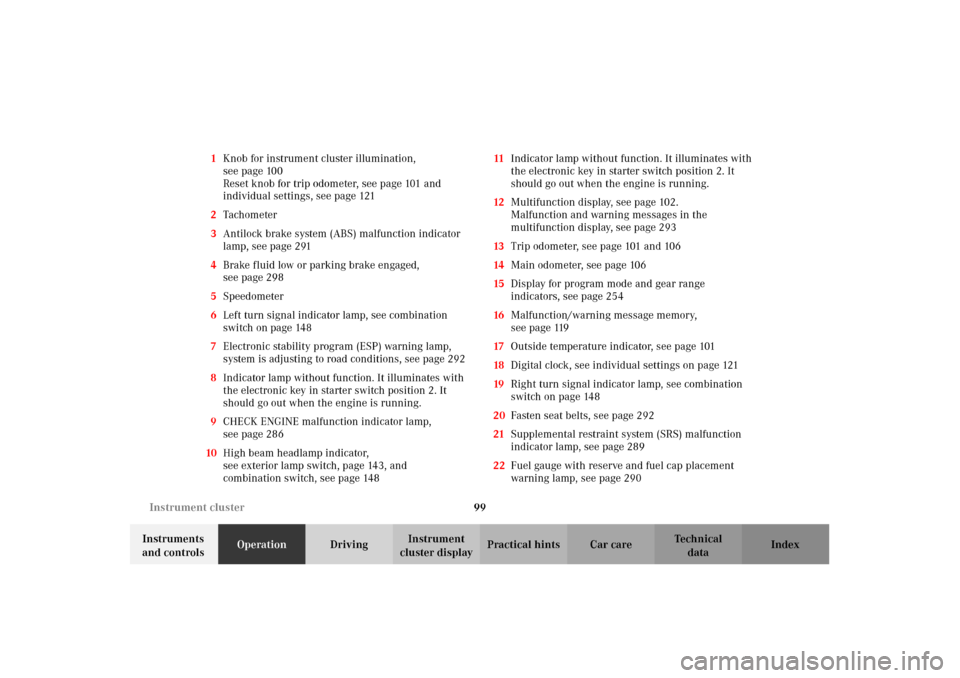
cluster displayPractical hints Car care Index 1Knob for instrument cluster illumination,
seepage100
Reset knob for trip odometer, see page 101 and
individual settings, see page 121
2Tachometer
3Antilock brake system (ABS) malfunction indicator
lamp, see page 291
4Brake fluid low or parking brake engaged,
seepage298
5Speedometer
6Left turn signal indicator lamp, see combination
switch on page 148
7Electronic stability program (ESP) warning lamp,
system is adjusting to road conditions, see page 292
8Indicator lamp without function. It illuminates with
the electronic key in starter switch position 2. It
should go out when the engine is running.
9CHECK ENGINE malfunction indicator lamp,
seepage286
10High beam headlamp indicator,
seeexterior lamp switch, page143, and
combination switch, see page 14811Indicator lamp without function. It illuminates with
the electronic key in starter switch position 2. It
should go out when the engine is running.
12Multifunction display, see page 102.
Malfunction and warning messages in the
multifunction display, see page 293
13Trip odometer, see page 101 and 106
14Main odometer, see page 106
15Display for program mode and gear range
indicators, see page 254
16Malfunction/warning message memory,
seepage119
17Outside temperature indicator, see page 101
18Digital clock, see individual settings on page 121
19Right turn signal indicator lamp, see combination
switch on page 148
20Fasten seat belts, see page 292
21Supplemental restraint system (SRS) malfunction
indicator lamp, see page 289
22Fuel gauge with reserve and fuel cap placement
warning lamp, see page 290
OM_203.book Seite 99 Donnerstag, 31. Mai 2001 11:57 11
Page 103 of 406

100 Instrument cluster
Te ch n i c a l
data Instruments
and controlsOperationDrivingInstrument
cluster displayPractical hints Car care Index
Activating instrument cluster display
The instrument cluster is activated by:
•Opening the door
1.
•Pressing button (1) on the instrument cluster
1.
•Turning the electronic key in starter switch to
position 1 or 2.
•Switching on the exterior lamps.
Instrument cluster illumination
The instrument cluster illumination is dimmed or
brightened automatically to suit daylight lighting
conditions.
The instrument cluster illumination will also be
adjusted when the vehicle’s exterior lamps are switched
on.
1 The instrument cluster is activated for approximately 30 seconds.
Display illumination, changing basic settings for driving
at dusk or in darkness:
Rotate adjusting knob (1) clockwise – instrument lamp
intensity increases.
Rotate adjusting knob (1) counterclockwise –
instrument lamp intensity decreases.
Note:
It is not possible to select a basic brightness setting in
daylight – the intensity is adjusted automatically.
OM_203.book Seite 100 Donnerstag, 31. Mai 2001 11:57 11
Page 108 of 406
105 Multifunction steering wheel, multifunction display
Te ch n i c a l
data Instruments
and controlsOperationDrivingInstrument
cluster displayPractical hints Car care Index 1Multifunction display
2Multifunction steering wheel
Turn the electronic key in starter switch to position 1
or 2.Press button:
3è for next system
4ÿ for previous system
5j for next display in system
6k for previous display in system
7æ to increase the volume, see page 136
8ç to decrease the volume, see page 136
9í to dial a telephone number, see page 111
10ì to end a call
See page 111 for telephone and page 115 for
instructions on answering an incoming call.
11Horn pad
Press the è or ÿ button repeatedly until the
required system is displayed.
The display advances by one system each time the
button is pressed.
You may call up additional displays in some systems by
pressing the j or k button.
P 68.10-2232-27
OM_203.book Seite 105 Donnerstag, 31. Mai 2001 11:57 11
Page 112 of 406
109 Multifunction steering wheel, multifunction display
Te ch n i c a l
data Instruments
and controlsOperationDrivingInstrument
cluster displayPractical hints Car care Index CD player1Radio system is switched off.
2The CD player is switched on.
3The number of the CD currently playing is displayed
if you are using a CD changer.
4Track number.
“TITLE” appears on vehicles with COMAND system.
“TRACK” appears on vehicles with audio system.
The radio must be switched on.
The CD player must be switched on.
Press the è or ÿ button repeatedly until
display (2) appears.
Press the j or k button repeatedly until the
required track number (4) is displayed.
Pressing the è or ÿ button displays the next or
previous system.
Note:
To select a CD from the magazine, press a number on
the audio system or the (optional) COMAND system key
pad located in the center dashboard.
P 54.30-3635-27
OM_203.book Seite 109 Donnerstag, 31. Mai 2001 11:57 11
Page 121 of 406
118 Multifunction steering wheel, multifunction display
Te ch n i c a l
data Instruments
and controlsOperationDrivingInstrument
cluster displayPractical hints Car care Index
To reset the short “AFTER START” (1) or long
“AFTER RESET” distance memory (2):
Call up the relevant display (1 or 2) using the j or
k button and press the reset knob on the instrument
cluster, see page 98, until the values are reset to “0”.Note:
The “AFTER START” trip odometer reading is
automatically reset after four hours of electronic key not
being in starter switch position 1 or 2.
OM_203.book Seite 118 Donnerstag, 31. Mai 2001 11:57 11
Page 122 of 406

119 Multifunction steering wheel, multifunction display
Te ch n i c a l
data Instruments
and controlsOperationDrivingInstrument
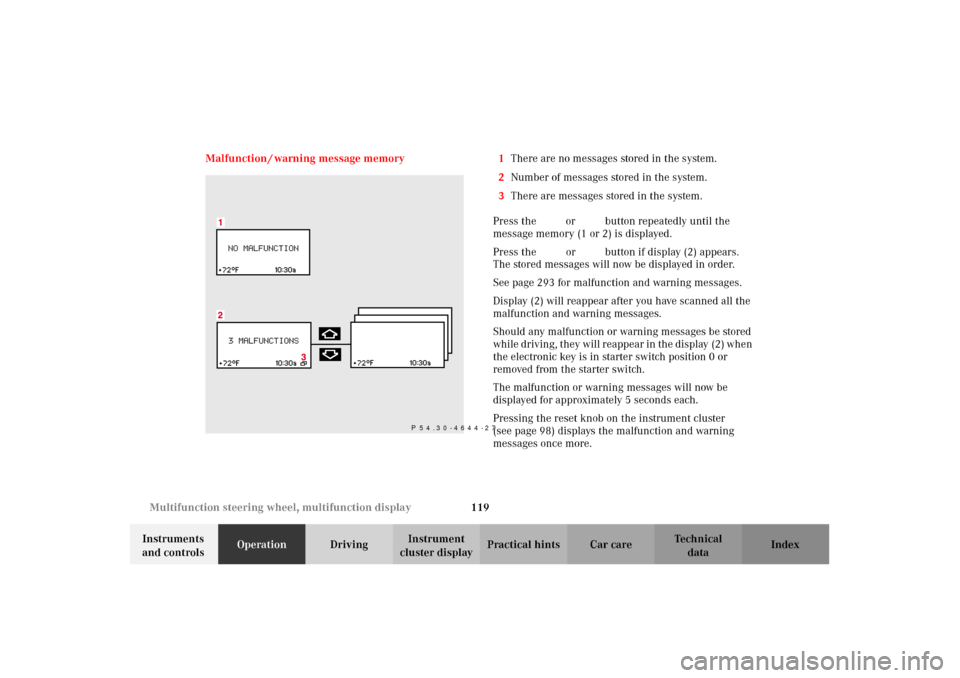
cluster displayPractical hints Car care Index Malfunction / warning message memory 1There are no messages stored in the system.
2Number of messages stored in the system.
3There are messages stored in the system.
Press the è or ÿ button repeatedly until the
message memory (1 or 2) is displayed.
Press the j or k button if display (2) appears.
The stored messages will now be displayed in order.
See page 293 for malfunction and warning messages.
Display (2) will reappear after you have scanned all the
malfunction and warning messages.
Should any malfunction or warning messages be stored
while driving, they will reappear in the display (2) when
the electronic key is in starter switch position 0 or
removed from the starter switch.
The malfunction or warning messages will now be
displayed for approximately 5 seconds each.
Pressing the reset knob on the instrument cluster
(see page 98) displays the malfunction and warning
messages once more.
P 54.30-4644-27
OM_203.book Seite 119 Donnerstag, 31. Mai 2001 11:57 11
Page 123 of 406

120 Multifunction steering wheel, multifunction display
Te ch n i c a l
data Instruments
and controlsOperationDrivingInstrument
cluster displayPractical hints Car care Index
The message memory will be cleared when the
electronic key is turned in the starter switch to
position 1 or 2. Should any subsequent faults occur,
they will be displayed in the message memory.
Pressing the è or ÿ button displays the next or
previous system.Important!
Malfunction and warning messages are only indicated
for certain systems and displayed to a low level of detail.
The malfunction and warning messages are simply a
reminder with respect to the operation of certain
systems and do not replace the driver’s responsibility to
maintain the vehicle’s operating safety by having all
required maintenance and safety checks performed on
the vehicle and by bringing the vehicle to an authorized
Mercedes-Benz Center to address the malfunction and
warning messages. See page 293, for malfunction and
warning messages.
OM_203.book Seite 120 Donnerstag, 31. Mai 2001 11:57 11