2002 MERCEDES-BENZ C230 KOMPRESSOR COUPE reset memory
[x] Cancel search: reset memoryPage 100 of 399

97 Instrument cluster
Te ch n i c a l
data Instruments
and controlsOperationDrivingInstrument
cluster displayPractical hints Car care Index 1Knob for instrument cluster illumination,
seepage99
Reset knob for trip odometer, see page 101 and
individual settings, see page 121
2Tachometer
3Speedometer
4Left turn signal indicator lamp, see combination
switch on page 148
5Electronic stability program (ESP) warning lamp,
see page 288
6Indicator lamp without function. It illuminates with
the electronic key in starter switch position 2. It
should go out when the engine is running.
7Right turn signal indicator lamp, see combination
switch on page 148
8Indicator lamp without function. It illuminates with
the electronic key in starter switch position 2. It
should go out when the engine is running.9Multifunction display, see page 102
Malfunction and warning messages in the
multifunction display, see page 290
10Trip odometer, see page 101 and 106
11Main odometer, see page 106
12Display for program mode and gear range
indicators, page 249
13Malfunction/warning message memory,
seepage119
14Outside temperature indicator, see page 100
15Digital clock
To set the time, see individual settings on page 121
16Fuel gauge with reserve warning lamp, see page 286
Page 106 of 399

103 Multifunction steering wheel, multifunction display
Te ch n i c a l
data Instruments
and controlsOperationDrivingInstrument
cluster displayPractical hints Car care Index Depending on your vehicle’s equipment, you may use
the buttons on the multifunction steering wheel to call
up, control and set the following systems in the
multifunction display:
1Trip odometer and main odometer, see page 101 and
page 106
Flexible service system (FSS), see page 138
Vehicle speed, see page 106
Coolant temperature gauge, see page 137
Engine oil level indicator, see page 141
2Audio systems, see page 108
Radio, seepage108
CD player, see page 109
Cassette player, see page 1103Navigation system, see page 116
4Malfunction message memory, see page 119
5Individual settings, see page 121
6Trip computer, see page 117
After start
After reset
Fuel tank content
7Telephone, see page 111
Press the è or ÿ button repeatedly until the
required system is displayed.
The display advances by one system each time the
button is pressed.
You may call up additional displays within some of these
categories by pressing the j or k button.
Page 120 of 399

117 Multifunction steering wheel, multifunction display
Te ch n i c a l
data Instruments
and controlsOperationDrivingInstrument
cluster displayPractical hints Car care Index Trip computer 1“AFTER START” — short distance memory
2“AFTER RESET” — long distance memory
3Estimated range remaining
4Distance covered “AFTER START” or
“AFTER RESET”
5Elapsed time “AFTER START” or “AFTER RESET”
6Average speed “AFTER START” or “AFTER RESET”
7Average fuel consumption “AFTER START” or
“AFTER RESET”
Press the button è or ÿ repeatedly until the
display (1, 2 or 3) appears.
Press the j or k button until the “AFTER START”
short distance memory (1), the “AFTER RESET” long
distance memory (2) and estimated range remaining
indicator (3) appears.
Pressing the è or ÿ button displays the next or
previous system.
Note:
The display (1) always appears the next time the trip
computer is called up.
P54.30-4643-27
Page 121 of 399

118 Multifunction steering wheel, multifunction display
Te ch n i c a l
data Instruments
and controlsOperationDrivingInstrument
cluster displayPractical hints Car care Index
To reset the short “AFTER START” (1) or long
“AFTER RESET” distance memory (2):
Call up the relevant display (1 or 2) using the j or
k button and press the reset knob on the instrument
cluster, see page 96, until the values are reset to “0”.Note:
The “AFTER START” trip odometer reading is
automatically reset after four hours of electronic key not
being in starter switch position 1 or 2.
Page 122 of 399

119 Multifunction steering wheel, multifunction display
Te ch n i c a l
data Instruments
and controlsOperationDrivingInstrument
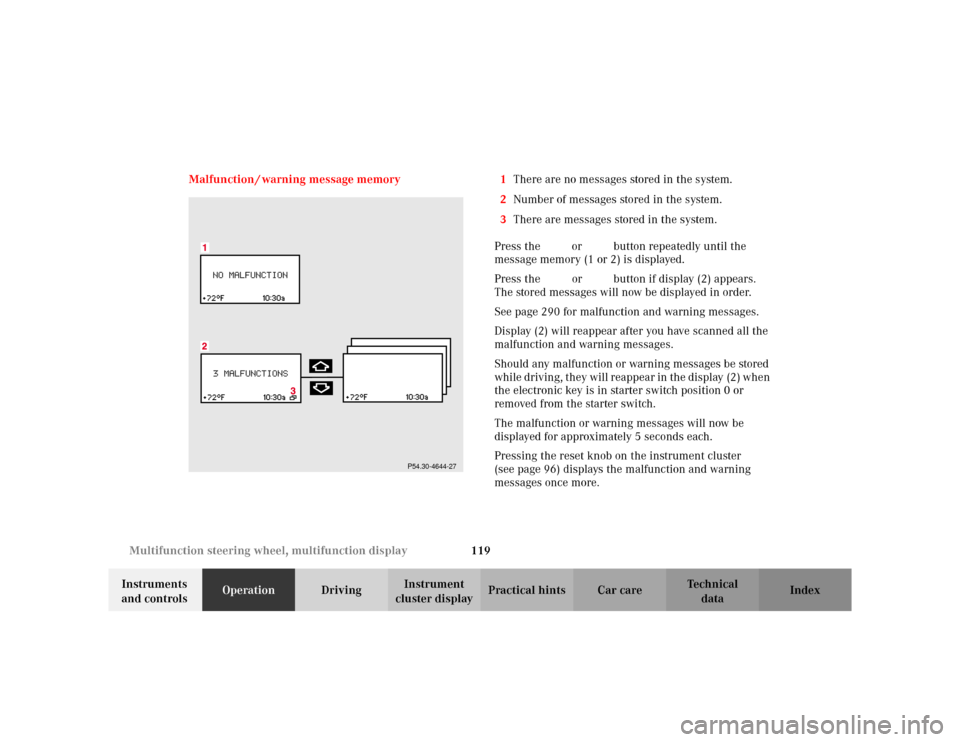
cluster displayPractical hints Car care Index Malfunction / warning message memory 1There are no messages stored in the system.
2Number of messages stored in the system.
3There are messages stored in the system.
Press the è or ÿ button repeatedly until the
message memory (1 or 2) is displayed.
Press the j or k button if display (2) appears.
The stored messages will now be displayed in order.
See page 290 for malfunction and warning messages.
Display (2) will reappear after you have scanned all the
malfunction and warning messages.
Should any malfunction or warning messages be stored
while driving, they will reappear in the display (2) when
the electronic key is in starter switch position 0 or
removed from the starter switch.
The malfunction or warning messages will now be
displayed for approximately 5 seconds each.
Pressing the reset knob on the instrument cluster
(see page 96) displays the malfunction and warning
messages once more.
P54.30-4644-27
Page 136 of 399

133 Multifunction steering wheel, multifunction display
Te ch n i c a l
data Instruments
and controlsOperationDrivingInstrument
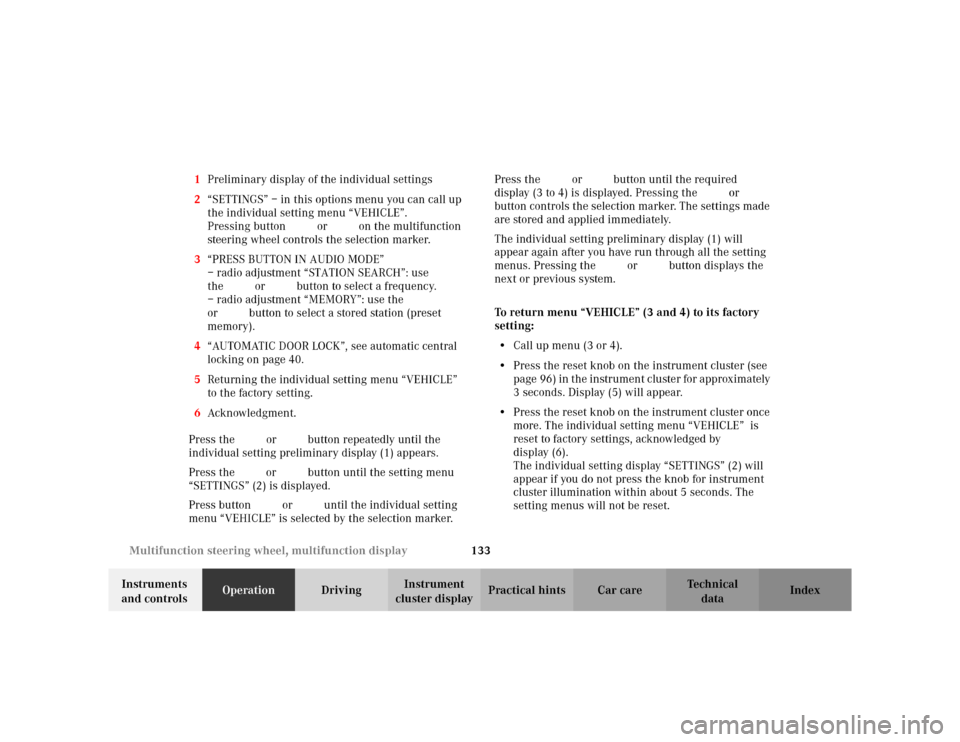
cluster displayPractical hints Car care Index 1Preliminary display of the individual settings
2“SETTINGS” – in this options menu you can call up
the individual setting menu “VEHICLE”.
Pressing buttonæ orç on the multifunction
steering wheel controls the selection marker.
3“PRESS BUTTON IN AUDIO MODE”
– radio adjustment “STATION SEARCH”: use
thej ork button to select a frequency.
– radio adjustment “MEMORY”: use the j
ork button to select a stored station (preset
memory).
4“AUTOMATIC DOOR LOCK”, see automatic central
locking on page 40.
5Returning the individual setting menu “VEHICLE”
to the factory setting.
6Acknowledgment.
Press the è or ÿ button repeatedly until the
individual setting preliminary display (1) appears.
Press the j or k button until the setting menu
“SETTINGS” (2) is displayed.
Press buttonæ orç until the individual setting
menu “VEHICLE” is selected by the selection marker.Press the j or k button until the required
display (3 to 4) is displayed. Pressing the æ orç
button controls the selection marker. The settings made
are stored and applied immediately.
The individual setting preliminary display (1) will
appear again after you have run through all the setting
menus. Pressing the è or ÿ button displays the
next or previous system.
To return menu “VEHICLE” (3 and 4) to its factory
setting:
•Call up menu (3 or 4).
•Press the reset knob on the instrument cluster (see
page 96) in the instrument cluster for approximately
3 seconds. Display (5) will appear.
•Press the reset knob on the instrument cluster once
more. The individual setting menu “VEHICLE” is
reset to factory settings, acknowledged by
display (6).
The individual setting display “SETTINGS” (2) will
appear if you do not press the knob for instrument
cluster illumination within about 5 seconds. The
setting menus will not be reset.
Page 184 of 399

181 Audio system
Te ch n i c a l
data Instruments
and controlsOperationDrivingInstrument
cluster displayPractical hints Car care Index We a t h e r B a n d
Press the “WB” key. The last weather band station is
tuned in.
Use buttons - to select a different station. If
the station cannot be received, the next available station
is selected automatically.
Press button or . The next available station is
tuned in. The message “WB NONE” appears if no station
can be received.
Station memory
Ten stations each in the AM and FM bands can be stored
via the alpha-numeric keypad. The button
corresponds to location 10. Weatherband (WB)
channels 1 to 7 are preset at the factory and can be
retrieved via the alpha-numeric keypad, but cannot be
changed.Storing stations automatically (Autostore)
Press the “AS” key until the
word “SEARCH” is displayed.
The ten strongest stations are
stored automatically, with
having the strongest
signal.
If less than 10 stations are available within receiving
range, only those will be stored.
Pressing a station selection button without a stored
station will not display a frequency for approximately
2 seconds. Thereafter the station selected last will be
displayed.
Note:
Autostore memory is in addition to the regular station
memory. Previously stored stations are not erased.
Briefly press “AS” to leave the Autostore and return to
manual presets. Press “AS” again to call up Autostore.
7PQRS
0OPR
Page 293 of 399

290 Malfunction and warning messages
Te ch n i c a l
data Instruments
and controlsOperation DrivingInstrument
cluster displayPractical hints Car care Index
Malfunction and warning messages in the
multifunction display
Malfunction and warning messages for the following
systems will be displayed immediately in the
multifunction display.
They are divided into three categories.
Category C1:
Messages of most immediate priority.
These cannot be cleared from the instrument cluster
using the reset knob on the instrument cluster (see
page 99).
Categories C2 and C3:
Messages of less immediate priority.
These can be cleared from the instrument cluster using
the reset knob on the instrument cluster (see page 99)
and are then stored in the malfunction message
memory. See page 119.Note:
Certain malfunction and warning messages are
accompanied by an audible signal.
Malfunction and warning messages in red are always
accompanied by an audible signal.
Temporary messages such as “TRUNK OPEN!” will not
be stored in the malfunction message memory.
Wa r n i n g !
All categories of messages contain important
information which should be taken note of and,
where malfunction indicated, addressed as soon as
possible at an authorized Mercedes-Benz Center.Failure to repair condition noted may cause
damage not covered by the Mercedes-Benz Limited
Warranty, or result in property damage or personal
injury.