2002 MERCEDES-BENZ C230 KOMPRESSOR COUPE Key program
[x] Cancel search: Key programPage 36 of 399

33 Central locking system
Te ch n i c a l
data Instruments
and controlsOperationDrivingInstrument
cluster displayPractical hints Car care Index Locking and unlocking with remote control
Unlocking:
Press transmit button Œ. All turn signal lamps blink
once to indicate that the vehicle is unlocked.
The remote control can be programmed for two kinds of
unlocking modes (see below):
Selective unlocking mode –
Press transmit button Œonce to unlock driver’s door
and fuel filler flap.
Press transmit button Πtwice to unlock all doors,
fuel filler flap, and trunk.
Global unlocking mode –
Press transmit button Œonce to unlock all doors,
fuel filler flap, and trunk.
Notes:
The presently active unlocking mode (selective or
global) can only be determined by unlocking the vehicle
with the remote control (see below for changing mode).If within 40 seconds of unlocking with the remote
control, neither door or trunk is opened, the electronic
key is not inserted in the starter switch, or the central
locking switch is not activated, the vehicle will
automatically lock.
Locking:
Press transmit button ‹ once. All turn signal lamps
blink three times to indicate that the vehicle is locked. If
they do not blink three times, a door or trunk is not
properly closed.
Note:
If the vehicle cannot be locked or unlocked by pressing
the transmit button, then it may be necessary to change
the batteries in the electronic key (if ok, battery check
lamp in electronic key will light briefly when pressing
transmit button) or to synchronize the remote control,
see pages 351 and 353.
Choosing global or selective mode on remote control
Press and hold transmit buttons‹ andŒ
simultaneously for five seconds to reprogram the
remote control. Battery check lamp will blink two times
indicating the completed mode change.
Page 94 of 399

91 Rear view mirrors
Te ch n i c a l
data Instruments
and controlsOperationDrivingInstrument
cluster displayPractical hints Car care Index Parking position exterior mirror
(only vehicles with memory function)
The passenger side exterior mirror can be adjusted and
programmed to assist the driver during parking
maneuvers (e.g. to observe the curb or other objects
close to the vehicle).
With the electronic key in starter switch position 2, and
the exterior rear view mirror switch in the passenger
side position, the passenger side mirror will be turned
downward when placing the gear selector lever in “R”
reverse.
Note:
For activating the mirror adjustment, see under
individual setting menu “CONVENIENCE” – “MIRROR
SETTING WHEN PARKING”, on page 134.
The passenger side mirror will return to its previous
position:
•immediately at speeds above approx. 6 mph
(10 km / h) – independent of the engaged gear,
•after 10 seconds when shifting gear selector lever
from “R” Reverse,
•by pressing the driver’s side mirror button%.To store passenger mirror parking position:
1. The vehicle must be stationary.
Turn the electronic key in starter switch to
position 1 or 2.
2. Select passenger side mirror& and adjust the
mirror to view the curb.
3. Push the memory button “M” (4).
4. Within 3 seconds push bottom of adjustment
button (3).
The mirror should not move.
Repeat the memory procedure if the mirror moves.
Note:
One stored parking position is available for each of the
two electronic keys.
This is only possible if you select “ON” in the menu,
“SETTINGS KEY-DEPENDENT”, see under individual
setting menu “CONVENIENCE” – “SETTINGS KEY-
DEPENDENT”, see page 134.
Page 100 of 399

97 Instrument cluster
Te ch n i c a l
data Instruments
and controlsOperationDrivingInstrument
cluster displayPractical hints Car care Index 1Knob for instrument cluster illumination,
seepage99
Reset knob for trip odometer, see page 101 and
individual settings, see page 121
2Tachometer
3Speedometer
4Left turn signal indicator lamp, see combination
switch on page 148
5Electronic stability program (ESP) warning lamp,
see page 288
6Indicator lamp without function. It illuminates with
the electronic key in starter switch position 2. It
should go out when the engine is running.
7Right turn signal indicator lamp, see combination
switch on page 148
8Indicator lamp without function. It illuminates with
the electronic key in starter switch position 2. It
should go out when the engine is running.9Multifunction display, see page 102
Malfunction and warning messages in the
multifunction display, see page 290
10Trip odometer, see page 101 and 106
11Main odometer, see page 106
12Display for program mode and gear range
indicators, page 249
13Malfunction/warning message memory,
seepage119
14Outside temperature indicator, see page 100
15Digital clock
To set the time, see individual settings on page 121
16Fuel gauge with reserve warning lamp, see page 286
Page 138 of 399

135 Multifunction steering wheel, multifunction display
Te ch n i c a l
data Instruments
and controlsOperationDrivingInstrument
cluster displayPractical hints Car care Index 1Preliminary display of the individual settings
2“SETTINGS” – in this options menu you can call up
the individual setting menu “CONVENIENCE”.
Pressing buttonæ orç on the multifunction
steering wheel controls the selection marker.
3“EASY-ENTRY FEATURE ACTIVATE”, see page 47.
4 “SETTINGS KEY-DEPENDENT”
if setting “ON” is selected, all settings selected in
the individual setting can be stored key-dependent
in memory. Memory function, see page 93.
5“MIRROR SETTING WHEN PARKING” – the
passenger side exterior mirror can be adjusted and
programmed to assist the driver during parking
maneuvers, see page 91.
6Returning the individual setting
menu “CONVENIENCE” to the factory setting.
7Acknowledgment.Press the è or ÿ button repeatedly until the
individual setting preliminary display (1) appears.
Press the j or k button until the setting menu
“SETTINGS” (2) is displayed.
Press buttonæ orç until the individual setting
menu “CONVENIENCE” is selected by the selection
marker.
Press the j or k button until the required
display (3 to 5) is displayed. Pressing the æ orç
button controls the selection marker. The settings made
are stored and applied immediately.
The individual setting preliminary display (1) will
appear again after you have run through all the setting
menus. Pressing the è or ÿ button displays the
next or previous system.
Page 224 of 399

221 Garage door opener
Te ch n i c a l
data Instruments
and controlsOperationDrivingInstrument
cluster displayPractical hints Car care Index Garage door opener
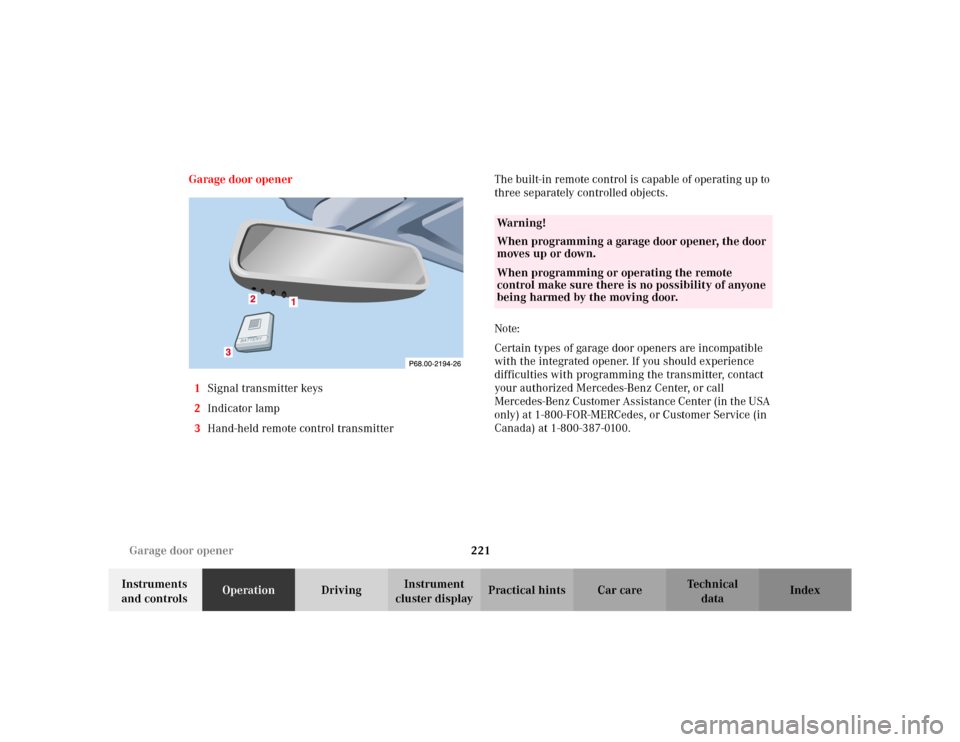
1Signal transmitter keys
2Indicator lamp
3Hand-held remote control transmitterThe built-in remote control is capable of operating up to
three separately controlled objects.
Note:
Certain types of garage door openers are incompatible
with the integrated opener. If you should experience
difficulties with programming the transmitter, contact
your authorized Mercedes-Benz Center, or call
Mercedes-Benz Customer Assistance Center (in the USA
only) at 1-800-FOR-MERCedes, or Customer Service (in
Canada) at 1-800-387-0100.
Wa r n i n g !
When programming a garage door opener, the door
moves up or down.When programming or operating the remote
control make sure there is no possibility of anyone
being harmed by the moving door.
Page 225 of 399

222 Garage door opener
Te ch n i c a l
data Instruments
and controlsOperationDrivingInstrument
cluster displayPractical hints Car care Index
For operation in the USA only: This device complies
with Part 15 of the FCC Rules. Operation is subject to
the following two conditions:
(1) This device may not cause harmful interference, and
(2) this device must accept any interference received,
including interference that may cause undesired
operation.
Any unauthorized modification to this device could void
to the user’s authority to operate the equipment.
Programming or reprogramming the integrated
remote control:
1. Turn electronic key in starter switch to position 1
or 2.
2. Hold the end of the hand-held transmitter of the
device you wish to train approximately 2 to 5 inches
(5 cm to 12 cm) away from the surface of the
integrated remote control located on the inside rear
view mirror, keeping the indicator lamp in view.3. Using both hands, simultaneously push the hand-
held transmitter button and the desired integrated
remote control button. Do not release the buttons
until completing step 4.
4. The indicator lamp on the integrated remote control
will flash, first slowly and then rapidly. When the
indicator lamp flashes rapidly, both buttons may be
released (the rapid flashing lamp indicates
successful programming of the new frequency
signal). To program the remaining two buttons,
follow steps 1 through 4.
Note:
If, after repeated attempts, you do not successfully
program the integrated remote control device to learn
the signal of the hand-held transmitter, the garage door
opener could be equipped with the “rolling code
feature”.
Page 227 of 399

224 Garage door opener
Te ch n i c a l
data Instruments
and controlsOperationDrivingInstrument
cluster displayPractical hints Car care Index
Canadian programming:
During programming, your hand-held transmitter may
automatically stop transmitting. Continue to press and
hold the integrated remote control transmitter button
(note steps 2 through 4 in the “Programming” portion)
while you press and re-press (“cycle”) your hand-held
transmitter every two seconds until the frequency
signal has been learned. The indicator lamp will flash
slowly and then rapidly after several seconds upon
successful training.Operation of remote control:
1. Turn electronic key in starter switch to position 1
or 2.
2. Select and press the appropriate button to activate
the remote control device. The integrated remote
control transmitter continues to send the signal as
long as the button is pressed – up to 20 seconds.
Erasing the remote control memory:
1. Turn electronic key in starter switch to position 1
or 2.
2. Simultaneously holding down the left and right side
buttons for approximately 20 seconds, or until the
control lamp blink rapidly, will erase the codes of all
three channels.
Page 253 of 399

250 Automatic transmission
Te ch n i c a l
data Instruments
and controlsOperationDrivingInstrument
cluster displayPractical hints Car care Index
Park position
The park position is to be used when parking the
vehicle. Engage only with the vehicle stopped.
The park position is not intended to serve as a
brake when the vehicle is parked. Rather, the
driver should always use the parking brake in
addition to placing the selector lever in park to
secure the vehicle.
Note:
The electronic key can only be removed from the
starter switch with the selector lever in
position “P”. With the electronic key removed, the
selector lever is locked in position “P”.
Reverse gear
Shift to reverse gear only with the vehicle
stopped.
Dependent on the program mode selector switch
position “S” or “W” the maximum speed in the
reverse gear is different. However, it is not
possible to change the program mode while in
reverse.Neutral
No power is transmitted from the engine to the
drive axle. When the brakes are released, the
vehicle can be moved freely (pushed or towed). Do
not engage “N” while driving except to coast
when the vehicle is in danger of skidding (e.g. on
icy roads, see page 264 for winter driving
instructions).
Important!
Coasting the vehicle, or driving for any other
reason with selector lever in “N” can result in
transmission damage that is not covered by the
Mercedes-Benz Limited Warranty.
The transmission automatically upshifts through
5th gear. Position “D” provides optimum driving
characteristics under all normal operating
conditions.