Page 87 of 399
84 Restraint systems
Te ch n i c a l
data Instruments
and controlsOperationDrivingInstrument
cluster displayPractical hints Car care Index
Installation of infant and child restraint systems
The anchorage rings (1) are located on the back side of
rear backrests.Prior to installing a tether strap, fold backrest forward
(page 215), guide tether strap through head restraints
and rear shelf. Be carefully that the tether strap is not
twisted.
Fold backrest back until it locks in place.
Fold up the anchorage rings (2).
P91.22-2077-26
Wa r n i n g !
Always lock backrest in its upright position when
rear seat bench is occupied by passengers, or the
extended cargo area is not in use. Check for secure
locking by pushing and pulling on the backrest.
Page 89 of 399

86 Restraint systems
Te ch n i c a l
data Instruments
and controlsOperationDrivingInstrument
cluster displayPractical hints Car care Index
To install a “LATCH” type child seat, the mounts (1)
must be folded forward until they lock in place. To do so,
grip inner side of mounts and fold forward. Install child
seat according to the manufacturer’s instructions.
The child seat must be firmly attached in the right and
left side mounting fittings (1).
To fold mounts (1) back, press down button (2) on each
mount and return mount into its catch.
Non-“LATCH” type child seats may also be used and are
capable of being installed using the vehicle’s seat belt
system. Install child seat according to the
manufacturer’s instructions.
Wa r n i n g !
The “LATCH” mounting fittings are intended for
children up to 22 kg (50 lbs) in weight.Children too big for child restraint systems must
ride in back seats using regular seat belts. Position
shoulder belt across chest and shoulder, not face or
neck. A booster seat may be necessary to achieve
proper belt positioning for children from 41 lbs. to
the point where a lap / shoulder belt fits properly
without one.Before installing the child seat, make sure the
mounting fittings (1) are folded out and locked in
place.Install child seat according to manufacturer’s
instructions.The child seat must be firmly attached in the right
and left side mounting fittings (1).An incorrectly mounted child seat may come loose
during an accident.Damaged or impact damaged child seats or child
seat mounting fittings must be replaced.Do not leave children unattended in the vehicle,
even if the children are secured in a child restraint
system.
Page 90 of 399
87 Restraint systems
Te ch n i c a l
data Instruments
and controlsOperationDrivingInstrument
cluster displayPractical hints Car care Index Steering wheel adjustment (manual)Unlocking:
Pull handle (1) out to its stop.
Adjusting:
Move steering wheel to the desired position.
Locking:
Push handle (1) in until it engages.
Important!
Do not drive the vehicle until you have properly locked
the steering column.
See “STEERING WHEEL ADJUST” on page 308 for
malfunction and warning messages in the multifunction
display.
Wa r n i n g !
Do not adjust the steering wheel while driving.
Adjusting the steering wheel while driving, or
driving without the adjustment locked could cause
the driver to lose control of the vehicle.
P46.15-2062-26
Page 91 of 399

88 Steering wheel adjustment
Te ch n i c a l
data Instruments
and controlsOperationDrivingInstrument
cluster displayPractical hints Car care Index
Steering wheel adjustment (electrical)
(optional)
To adjust the steering wheel position, turn the electronic
key in starter switch to position 1 or 2. With the driver’s
door open, the steering wheel can also be operated with
the electronic key removed or in starter switch
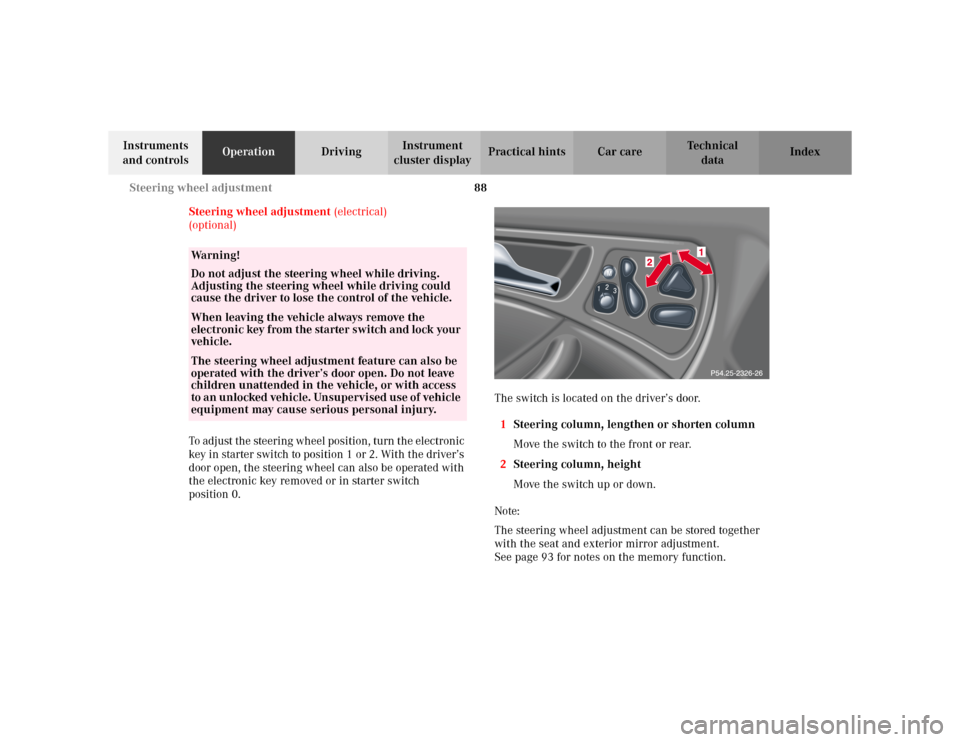
position 0.The switch is located on the driver’s door.
1Steering column, lengthen or shorten column
Move the switch to the front or rear.
2Steering column, height
Move the switch up or down.
Note:
The steering wheel adjustment can be stored together
with the seat and exterior mirror adjustment.
See page 93 for notes on the memory function.
Wa r n i n g !
Do not adjust the steering wheel while driving.
Adjusting the steering wheel while driving could
cause the driver to lose the control of the vehicle.When leaving the vehicle always remove the
electronic key from the starter switch and lock your
vehicle.The steering wheel adjustment feature can also be
operated with the driver’s door open. Do not leave
children unattended in the vehicle, or with access
to an unlocked vehicle. Unsupervised use of vehicle
equipment may cause serious personal injury.
Page 100 of 399

97 Instrument cluster
Te ch n i c a l
data Instruments
and controlsOperationDrivingInstrument
cluster displayPractical hints Car care Index 1Knob for instrument cluster illumination,
seepage99
Reset knob for trip odometer, see page 101 and
individual settings, see page 121
2Tachometer
3Speedometer
4Left turn signal indicator lamp, see combination
switch on page 148
5Electronic stability program (ESP) warning lamp,
see page 288
6Indicator lamp without function. It illuminates with
the electronic key in starter switch position 2. It
should go out when the engine is running.
7Right turn signal indicator lamp, see combination
switch on page 148
8Indicator lamp without function. It illuminates with
the electronic key in starter switch position 2. It
should go out when the engine is running.9Multifunction display, see page 102
Malfunction and warning messages in the
multifunction display, see page 290
10Trip odometer, see page 101 and 106
11Main odometer, see page 106
12Display for program mode and gear range
indicators, page 249
13Malfunction/warning message memory,
seepage119
14Outside temperature indicator, see page 100
15Digital clock
To set the time, see individual settings on page 121
16Fuel gauge with reserve warning lamp, see page 286
Page 102 of 399

99 Instrument cluster
Te ch n i c a l
data Instruments
and controlsOperationDrivingInstrument
cluster displayPractical hints Car care Index Activating instrument cluster display
The instrument cluster is activated by:
•Opening the door
1.
•Pressing button (1) on the instrument cluster
1.
•Turning the electronic key in starter switch to
position 1 or 2.
•Switching on the exterior lamps.
Instrument cluster illumination
The instrument cluster illumination is dimmed or
brightened automatically to suit daylight lighting
conditions.
The instrument cluster illumination will also be
adjusted when the vehicle’s exterior lamps are switched
on.
1 The instrument cluster is activated for approximately 30 seconds.
Display illumination, changing basic settings for driving
at dusk or in darkness:
Rotate adjusting knob (1) clockwise – instrument lamp
intensity increases.
Rotate adjusting knob (1) counterclockwise –
instrument lamp intensity decreases.
Note:
It is not possible to select a basic brightness setting in
daylight – the intensity is adjusted automatically.
Page 128 of 399

125 Multifunction steering wheel, multifunction display
Te ch n i c a l
data Instruments
and controlsOperationDrivingInstrument
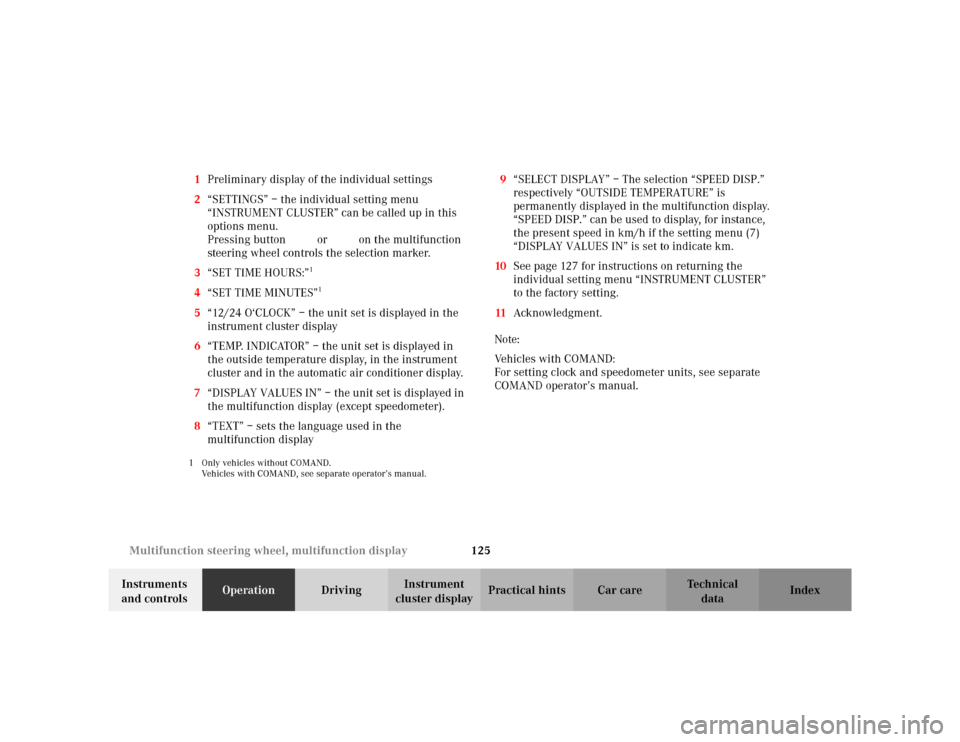
cluster displayPractical hints Car care Index 1Preliminary display of the individual settings
2“SETTINGS” – the individual setting menu
“INSTRUMENT CLUSTER” can be called up in this
options menu.
Pressing buttonæ orç on the multifunction
steering wheel controls the selection marker.
3“SET TIME HOURS:”
1
4“SET TIME MINUTES”
1
5“12/24 O‘CLOCK” – the unit set is displayed in the
instrument cluster display
6“TEMP. INDICATOR” – the unit set is displayed in
the outside temperature display, in the instrument
cluster and in the automatic air conditioner display.
7“DISPLAY VALUES IN” – the unit set is displayed in
the multifunction display (except speedometer).
8“TEXT” – sets the language used in the
multifunction display1 Only vehicles without COMAND.
Vehicles with COMAND, see separate operator’s manual.
9“SELECT DISPLAY” – The selection “SPEED DISP.”
respectively “OUTSIDE TEMPERATURE” is
permanently displayed in the multifunction display.
“SPEED DISP.” can be used to display, for instance,
the present speed in km/h if the setting menu (7)
“DISPLAY VALUES IN” is set to indicate km.
10See page 127 for instructions on returning the
individual setting menu “INSTRUMENT CLUSTER”
to the factory setting.
11Acknowledgment.
Note:
Vehicles with COMAND:
For setting clock and speedometer units, see separate
COMAND operator’s manual.
Page 135 of 399
132 Multifunction steering wheel, multifunction display
Te ch n i c a l
data Instruments
and controlsOperationDrivingInstrument
cluster displayPractical hints Car care Index
“VEHICLE” (audio and central locking system)
P54.30-4457-29