2002 MERCEDES-BENZ C230 KOMPRESSOR COUPE buttons
[x] Cancel search: buttonsPage 34 of 399

31 Central locking system
Te ch n i c a l
data Instruments
and controlsOperationDrivingInstrument
cluster displayPractical hints Car care Index Central locking system
Radio frequency and infrared remote control
The electronic key has an integrated radio frequency
and infrared remote control.
Due to the extended operational range of the remote
control, it could be possible to unintentionally lock or
unlock the vehicle by pressing the transmit button. If
one of the transmit buttons is pressed, the battery check
lamp lights up briefly – indicating that the batteries are
in order. See page 351 for checking batteries.
The vehicle doors, trunk and fuel filler flap can be
centrally locked and unlocked via remote control.
Opening and closing the windows and panorama
sliding/pop-up roof can only be done with the infrared
portion of the remote control. Aim transmitter eye at a
receiver (6 or 7), press and hold transmit button Œ
or ‹, seepage34.
If the electronic key is inserted in starter switch, the
vehicle cannot be locked or unlocked, and the trunk lid
cannot be opened with the remote control.1Transmit button
‹ Locking
ΠUnlocking
2Lamp for battery check (see page 351 for changing
batteries if it does not light up briefly)
3PANIC button
4Transmitter eye
5Locking tab for mechanical key
P80.35-2033-26
2
1
4
3
5
Page 36 of 399

33 Central locking system
Te ch n i c a l
data Instruments
and controlsOperationDrivingInstrument
cluster displayPractical hints Car care Index Locking and unlocking with remote control
Unlocking:
Press transmit button Œ. All turn signal lamps blink
once to indicate that the vehicle is unlocked.
The remote control can be programmed for two kinds of
unlocking modes (see below):
Selective unlocking mode –
Press transmit button Œonce to unlock driver’s door
and fuel filler flap.
Press transmit button Πtwice to unlock all doors,
fuel filler flap, and trunk.
Global unlocking mode –
Press transmit button Œonce to unlock all doors,
fuel filler flap, and trunk.
Notes:
The presently active unlocking mode (selective or
global) can only be determined by unlocking the vehicle
with the remote control (see below for changing mode).If within 40 seconds of unlocking with the remote
control, neither door or trunk is opened, the electronic
key is not inserted in the starter switch, or the central
locking switch is not activated, the vehicle will
automatically lock.
Locking:
Press transmit button ‹ once. All turn signal lamps
blink three times to indicate that the vehicle is locked. If
they do not blink three times, a door or trunk is not
properly closed.
Note:
If the vehicle cannot be locked or unlocked by pressing
the transmit button, then it may be necessary to change
the batteries in the electronic key (if ok, battery check
lamp in electronic key will light briefly when pressing
transmit button) or to synchronize the remote control,
see pages 351 and 353.
Choosing global or selective mode on remote control
Press and hold transmit buttons‹ andŒ
simultaneously for five seconds to reprogram the
remote control. Battery check lamp will blink two times
indicating the completed mode change.
Page 40 of 399

37 Central locking system
Te ch n i c a l
data Instruments
and controlsOperationDrivingInstrument
cluster displayPractical hints Car care Index If the vehicle has previously been locked from the
outside, opening a door from the inside will trigger the
alarm. When opening a door while the central locking
system is in the:
•selective unlocking mode, only that individual door
is unlocked. The remaining doors, the trunk and
fuel filler flap remain locked.
•global unlocking mode, all doors, the trunk and fuel
filler flap are unlocked.
Notes:
In case of a malfunction in the central locking system
the doors can be locked and unlocked individually.
To lock, push down lock buttons or turn mechanical key
in driver’s door lock to position 3. In addition lock the
trunk.To unlock, pull inside door handles or turn mechanical
key in driver’s door lock to position 2.
When unlocking the driver’s door with the mechanical
key, the exterior lamps will flash and the alarm will
sound.
To cancel the alarm, insert the electronic key in the
starter switch or press buttonŒ or‹ on the
electronic key.
Page 93 of 399

90 Rear view mirrors
Te ch n i c a l
data Instruments
and controlsOperationDrivingInstrument
cluster displayPractical hints Car care Index
Exterior rear view mirrors
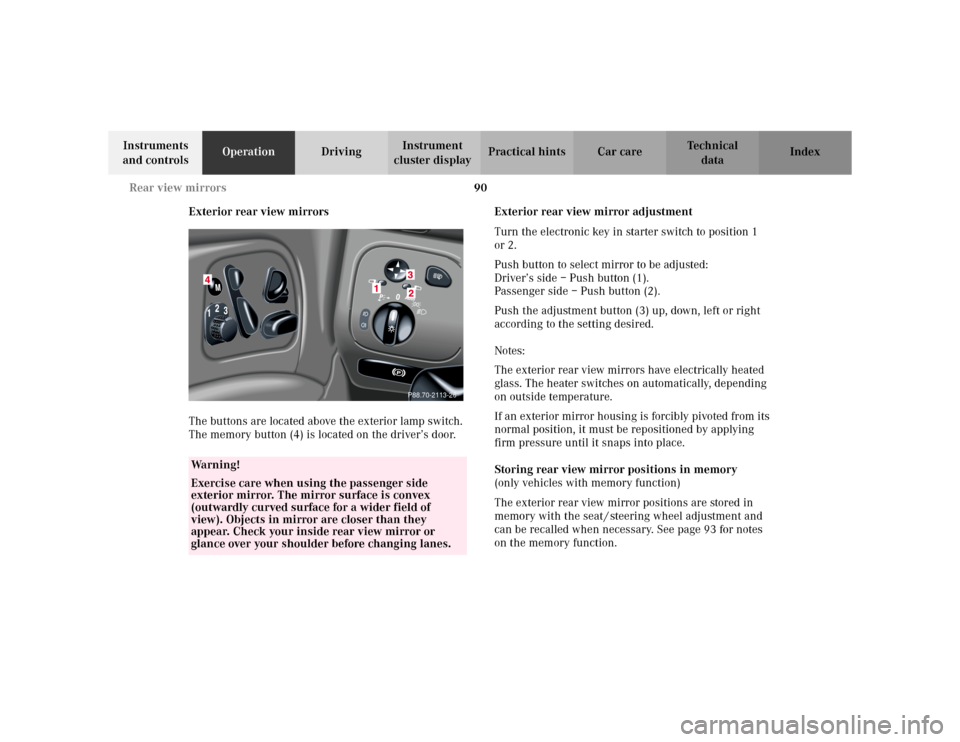
The buttons are located above the exterior lamp switch.
The memory button (4) is located on the driver’s door.Exterior rear view mirror adjustment
Turn the electronic key in starter switch to position 1
or 2.
Push button to select mirror to be adjusted:
Driver’s side – Push button (1).
Passenger side – Push button (2).
Push the adjustment button (3) up, down, left or right
according to the setting desired.
Notes:
The exterior rear view mirrors have electrically heated
glass. The heater switches on automatically, depending
on outside temperature.
If an exterior mirror housing is forcibly pivoted from its
normal position, it must be repositioned by applying
firm pressure until it snaps into place.
Storing rear view mirror positions in memory
(only vehicles with memory function)
The exterior rear view mirror positions are stored in
memory with the seat / steering wheel adjustment and
can be recalled when necessary. See page 93 for notes
on the memory function.
Wa r n i n g !
Exercise care when using the passenger side
exterior mirror. The mirror surface is convex
(outwardly curved surface for a wider field of
view). Objects in mirror are closer than they
appear. Check your inside rear view mirror or
glance over your shoulder before changing lanes.
P88.70-2113-26
Page 96 of 399

93 Memory function
Te ch n i c a l
data Instruments
and controlsOperationDrivingInstrument
cluster displayPractical hints Car care Index Memory function (optional)
The memory and stored position buttons are located on
the doors.
1Memory button, used to store selected positions
which can be retrieved by pressing
2Stored position button
Turn to position “1”, “2”, or “3”Together with the driver’s seat position you can store
the positions for steering wheel and exterior rear view
mirrors.
For the front passenger you can store the seat position.
Three stored positions for the driver’s seat are available
for each of the two electronic keys.
This is only possible if you select “ON” in the menu,
“SETTINGS KEY-DEPENDENT”, see under individual
setting menu “CONVENIENCE” – “SETTINGS KEY-
DEPENDENT”, see page 134.
Wa r n i n g !
Do not activate the memory function while driving.
Activating the memory function while driving
could cause the driver to lose control of the vehicle.
Page 106 of 399

103 Multifunction steering wheel, multifunction display
Te ch n i c a l
data Instruments
and controlsOperationDrivingInstrument
cluster displayPractical hints Car care Index Depending on your vehicle’s equipment, you may use
the buttons on the multifunction steering wheel to call
up, control and set the following systems in the
multifunction display:
1Trip odometer and main odometer, see page 101 and
page 106
Flexible service system (FSS), see page 138
Vehicle speed, see page 106
Coolant temperature gauge, see page 137
Engine oil level indicator, see page 141
2Audio systems, see page 108
Radio, seepage108
CD player, see page 109
Cassette player, see page 1103Navigation system, see page 116
4Malfunction message memory, see page 119
5Individual settings, see page 121
6Trip computer, see page 117
After start
After reset
Fuel tank content
7Telephone, see page 111
Press the è or ÿ button repeatedly until the
required system is displayed.
The display advances by one system each time the
button is pressed.
You may call up additional displays within some of these
categories by pressing the j or k button.
Page 160 of 399

157 Climate control
Te ch n i c a l
data Instruments
and controlsOperationDrivingInstrument
cluster displayPractical hints Car care Index Defrosting
Press the P button. The indicator lamp in the button
illuminates.
Switch off air recirculation, if selected. Press
buttonO, the indicator lamp in the button will go
out.
Close center air outlets.
Turn wheels (8, page 152) up to open left and right side
air outlets (9, page 152). Adjust side air outlets upward.
Pressing the switch again returns the system to the
previous setting.Windows fogged up on the inside
Switch off the economy mode, if selected. Press
buttonS. The indicator lamp in the button will go
out.
Switch off air recirculation, if selected. Press
buttonO. The indicator lamp in the button will go
out.
Set blower to the maximum blower speed.
Press the P button. The indicator lamp in the button
illuminates.
Increase temperature setting.
Open the side air outlets (9, page 152) and direct them
onto the side windows.
Windshield fogged up on the outside
Switch on the windshield wiper.
Close air outlet at dashboard top center.
Switch to manual mode.
Turn air distribution control switch to positionh
ork.
Page 169 of 399

166 Automatic climate control
Te ch n i c a l
data Instruments
and controlsOperationDrivingInstrument
cluster displayPractical hints Car care Index
Defrosting
Press the P button. The indicator lamp in the button
illuminates.
Maximum heated and automatically controlled amount
of air is directed to the defroster and windshield air
outlets.
Switch off air recirculation, if selected: Press
buttonO. The indicator lamp in the button will go
out.
Pressing the P button again returns the system to
the previous setting.Windows fogged up on the inside
Switch off the economy mode, if selected:
Press buttonS. The indicator lamp in the button will
go out.
Switch off air recirculation, if selected:
Press buttonO. The indicator lamp in the button will
go out.
Set blower to the maximum blower speed.
Increase temperature setting.
Open the side air outlets and direct them onto the side
windows.
Windshield fogged up on the outside
Switch on the windshield wiper.
Close air outlet at dashboard top center (7, page 161).
Switch to manual mode.
Turn air distribution control switch to positionh
ork.