Page 115 of 399

112
Multifunction steering wheel, multifunction display
Te ch n i c a l
data
Instruments
and controls Operation
DrivingInstrument
cluster display Practical hints Car care Index
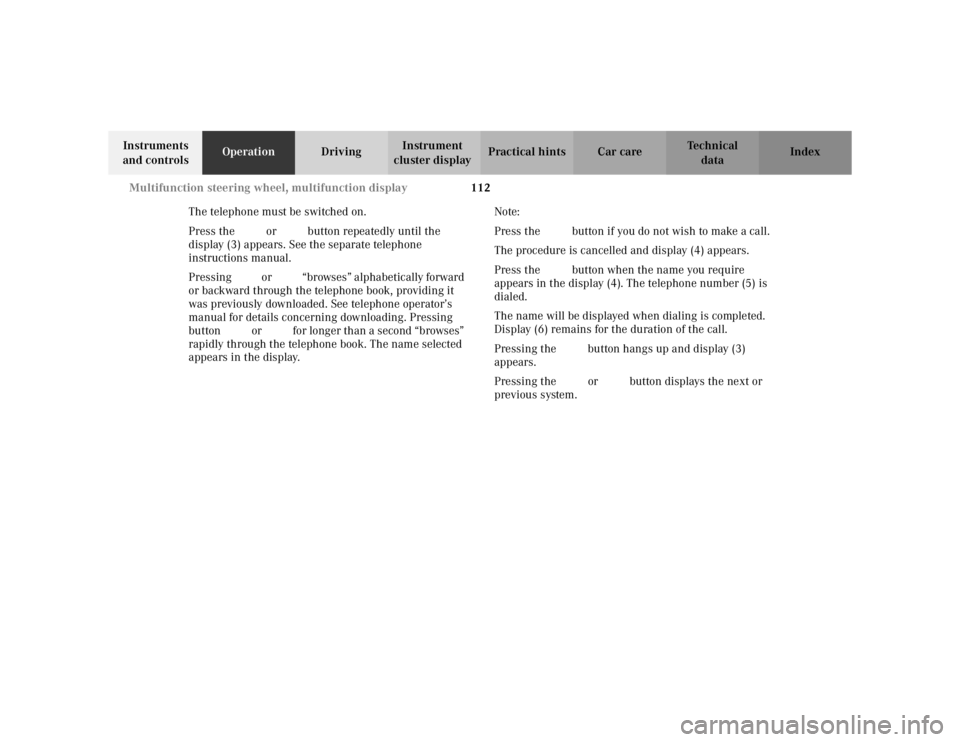
The telephone must be switched on.
Press the è or ÿ button repeatedly until the
display (3) appears. See the separate telephone
instructions manual.
Pressing j or k “browses” alphabetically forward
or backward through the telephone book, providing it
was previously downloaded. See telephone operator’s
manual for details concerning downloading. Pressing
button j or k for longer than a second “browses”
rapidly through the telephone book. The name selected
appears in the display. Note:
Press the
ì button if you do not wish to make a call.
The procedure is cancelled and display (4) appears.
Press the í button when the name you require
appears in the display (4). The telephone number (5) is
dialed.
The name will be displayed when dialing is completed.
Display (6) remains for the duration of the call.
Pressing the ì button hangs up and display (3)
appears.
Pressing the è or ÿ button displays the next or
previous system.
Page 116 of 399
113
Multifunction steering wheel, multifunction display
Te ch n i c a l
data
Instruments
and controls Operation
DrivingInstrument
cluster display Practical hints Car care Index
Redialing
1The telephone is ready for use.
2 Number or name stored in the redial memory.
3 Number in the redial memory — redialing has
commenced.
4 Dialing is completed and the name stored in the
telephone book is displayed or the number dialed
wi ll r em ai n dis played if n o n am e has bee n stor e. The
display remains for the duration of the call.
5 Signal strength:
Vehicles with audio system (in top right corner):
the higher the number, the stronger the signal
received from the net.
Vehicles with COMAND (in top left corner):
the higher the number of bars, the stronger the
signal received from the net.
6 Memory location numbers — the 10 most recently
dialed numbers are stored.
L0, most recently dialed number,
L1 to L9, previously dialed numbers.
7 Duration of call.
P54.30-3641-27
Page 117 of 399

114
Multifunction steering wheel, multifunction display
Te ch n i c a l
data
Instruments
and controls Operation
DrivingInstrument
cluster display Practical hints Car care Index
The telephone must be switched on.
Press the è or ÿ button repeatedly until the
display (1) appears.
Pressing the í button activates the redial memory
and the most recently dialed number is displayed.
Pressing the j or k button “browses” forward or
backward through the redial memory. The number
selected appears in the display.
Note:
Press the ì button if you do not wish to make a call.
The procedure is cancelled and display (1) appears. Press the
í button when the required number or
name appears in the display (2).
The telephone number (3) is dialed.
Once dialing is complete the name (4) is displayed if the
name is stored in the telephone book; failing that the
number dialed will remain displayed. The display
remains for the duration of the call.
Pressing the ì button hangs up and display (1)
appears.
Pressing the è or ÿ button displays the next or
previous system.
Page 118 of 399
115
Multifunction steering wheel, multifunction display
Te ch n i c a l
data
Instruments
and controls Operation
DrivingInstrument
cluster display Practical hints Car care Index
Incoming call
The telephone must be switched on.
1 “CALL” — you are being called.
2 Signal strength:
Vehicles with audio system (in top right corner):
the higher the number, the stronger the phone
signal received by the antenna.
Vehicles with COMAND (in top left corner):
the higher the number of bars, the stronger the
phone signal received by the antenna. Press the
í button to answer the call.
Press the ì button to hang up or if you do not wish
to answer the incoming call.
Page 139 of 399

136
Multifunction steering wheel, multifunction display
Te ch n i c a l
data
Instruments
and controls Operation
DrivingInstrument
cluster display Practical hints Car care Index
To return menu “CONVENIENCE” (3 to 5) to its
factory setting: • Call up menu (3 to 5).
• Press the reset knob on the instrument cluster, see
page 96, in the instrument cluster for approximately
3 seconds. Display (6) will appear.
• Press the reset knob on the instrument cluster once
more. The individual setting menu
“CONVENIENCE” is reset to factory settings,
acknowledged by display (7).
The individual setting display “SETTINGS” (2) will
appear if you do not press the reset knob on the
instrument cluster within about 5 seconds. The
setting menus will not be reset. Setting the audio volume
You can only adjust the volume of the system currently
in use.
Vehicles with COMAND system:
The volume setting for each system (audio, telephone,
navigation and voice recognition system) is stored
separately.
Setting button:
æ
increases the volume.
ç reduces the volume.
Page 145 of 399

142
Engine oil level indicator
Te ch n i c a l
data
Instruments
and controls Operation
DrivingInstrument
cluster display Practical hints Car care Index
One of the following messages will subsequently appear
on the indicator:
“ENGINE OIL LEVEL – O.K.”
No oil needs to be added.
“ENGINE OIL LEVEL – ADD 1.0 QUART”
(Canada: 1.0 L)
“ENGINE OIL LEVEL – ADD 1.5 QUART”
(Canada: 1.5 L)
“ENGINE OIL LEVEL – ADD 2.0 QUART”
(Canada: 2.0 L)
See “Adding engine oil level”, on page 318 for
instructions on adding engine oil.
“ENGINE OIL LEVEL – REDUCE OIL LEVEL”
Do not overfill the engine.
Excessive oil must be siphoned or drained off. It could
cause damage to the engine and catalytic converter not
covered by the Mercedes-Benz Limited Warranty. The “MEASURING NOT POSSIBLE” message will be
displayed if a proper oil level check cannot be
performed. The engine oil level check can be repeated
after a short while.
Notes:
See malfunction and warning messages on page 290
and page 299 if an engine oil level indicator appears on
the multifunction display when the engine is running.
The engine oil level cannot be checked while the engine
is running. The “ENGINE OIL LEVEL – NOT WHEN
ENGINE ON” message will appear.
Engine oil consumption
Engine oil consumption checks should only be made
after the break-in period. During the break-in period,
higher oil consumption may be noticed and is normal.
Frequent driving at high engine speeds results in
increased consumption.
Page 176 of 399

173
Audio system
Te ch n i c a l
data
Instruments
and controls Operation
DrivingInstrument
cluster display Practical hints Car care Index
Audio and telephone operation
These instructions are intended to help you become
acquainted with your Mercedes-Benz audio system.
They contain useful tips and a detailed description of
the user functions.
Operating safety
1Optional equipment
Dolby and the double-D symbol
Ù
are trademarks of Dolby
Laboratories Licensing Corporation. The Dolby noise reduction
system is manufactured under licence from Dolby Laboratories
Licensing Corporation.
Wa r n i n g !
In order to avoid distraction which could lead to an
accident, system settings should be entered with
the vehicle at standstill and systems should be
operated by the driver only when traffic conditions
permit. Always pay full attention to traffic
conditions first before operating system controls
while driving. Bear in mind that at a speed of just 30 mph
(approximately 50 km/h), your car is covering a
distance of 50 feet (approximately14 m) every
second.
Wa r n i n g !
Any alterations made to electronic components can
cause malfunctions.The radio, cassette deck, CD changer
1 and
telephone
1 are interconnected. Therefore, when
one of the components is defective or has not been
removed/replaced properly this may impair the
function of other components.
These malfunctions might seriously impair the
operating safety of your vehicle.We recommend that you have any service work or
alterations to electronic components done at an
authorized Mercedes-Benz Center.
Page 177 of 399
174
Audio system
Te ch n i c a l
data
Instruments
and controls Operation
DrivingInstrument
cluster display Practical hints Car care Index
Operating and display elements
1 On/off, volume, see page 176
2 Telephone mode selector, see page 190
3 Seek tuning, see page 180,
Track search (tape), see page 184,
Skipping tracks (CD), see page 188
Manual repeat dialing (telephone), see page 193 4
Radio mode selector, see page 179
5 Manual tuning, see page 180 and 180
Fast Forward/Reverse (tape), see page 184
Fast Forward/Reverse (CD), see page 189
Telephone book, see page 191
6 CD mode selector, see page 188
7 Tape mode selector, see page 182