Page 87 of 399
84
Restraint systems
Te ch n i c a l
data
Instruments
and controls Operation
DrivingInstrument
cluster display Practical hints Car care Index
Installation of infant and child restraint systems
The anchorage rings (1) are located on the back side of
rear backrests. Prior to installing a tether strap, fold backrest forward
(page 215), guide tether strap through head restraints
and rear shelf. Be carefully that the tether strap is not
twisted.
Fold backrest back until it locks in place.
Fold up the anchorage rings (2).
P91.22-2077-26
Wa r n i n g !
Always lock backrest in its upright position when
rear seat bench is occupied by passengers, or the
extended cargo area is not in use. Check for secure
locking by pushing and pulling on the backrest.
Page 89 of 399

86
Restraint systems
Te ch n i c a l
data
Instruments
and controls Operation
DrivingInstrument
cluster display Practical hints Car care Index
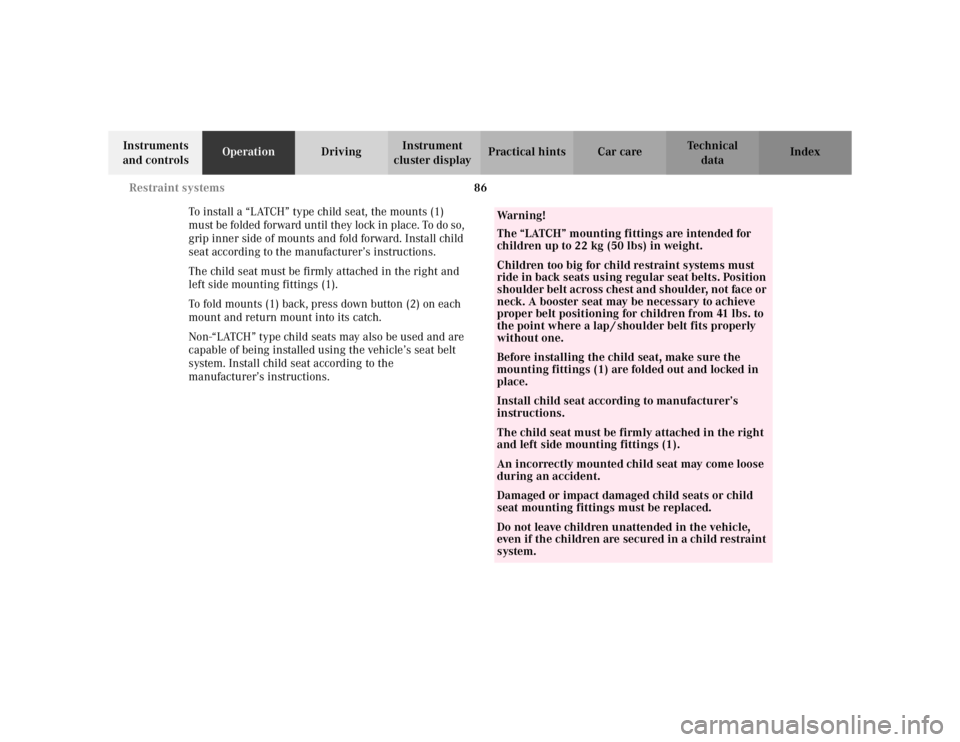
To install a “LATCH” type child seat, the mounts (1)
must be folded forward until they lock in place. To do so,
grip inner side of mounts and fold forward. Install child
seat according to the manufacturer’s instructions.
The child seat must be firmly attached in the right and
left side mounting fittings (1).
To fold mounts (1) back, press down button (2) on each
mount and return mount into its catch.
Non-“LATCH” type child seats may also be used and are
capable of being installed using the vehicle’s seat belt
system. Install child seat according to the
manufacturer’s instructions.
Wa r n i n g !
The “LATCH” mounting fittings are intended for
children up to 22 kg (50 lbs) in weight.Children too big for child restraint systems must
ride in back seats using regular seat belts. Position
shoulder belt across chest and shoulder, not face or
neck. A booster seat may be necessary to achieve
proper belt positioning for children from 41 lbs. to
the point where a lap / shoulder belt fits properly
without one.Before installing the child seat, make sure the
mounting fittings (1) are folded out and locked in
place.Install child seat according to manufacturer’s
instructions.The child seat must be firmly attached in the right
and left side mounting fittings (1).An incorrectly mounted child seat may come loose
during an accident.Damaged or impact damaged child seats or child
seat mounting fittings must be replaced.Do not leave children unattended in the vehicle,
even if the children are secured in a child restraint
system.
Page 91 of 399

88
Steering wheel adjustment
Te ch n i c a l
data
Instruments
and controls Operation
DrivingInstrument
cluster display Practical hints Car care Index
Steering wheel adjustment (electrical)
(optional)
To adjust the steering wheel position, turn the electronic
key in starter switch to position 1 or 2. With the driver’s
door open, the steering wheel can also be operated with
the electronic key removed or in starter switch
position 0. The switch is located on the driver’s door.
1 Steering column, lengthen or shorten column
Move the switch to the front or rear.
2 Steering column, height
Move the switch up or down.
Note:
The steering wheel adjustment can be stored together
with the seat and exterior mirror adjustment.
See page 93 for notes on the memory function.
Wa r n i n g !
Do not adjust the steering wheel while driving.
Adjusting the steering wheel while driving could
cause the driver to lose the control of the vehicle.When leaving the vehicle always remove the
electronic key from the starter switch and lock your
vehicle.The steering wheel adjustment feature can also be
operated with the driver’s door open. Do not leave
children unattended in the vehicle, or with access
to an unlocked vehicle. Unsupervised use of vehicle
equipment may cause serious personal injury.
Page 201 of 399

198
Interior equipment
Te ch n i c a l
data
Instruments
and controls Operation
DrivingInstrument
cluster display Practical hints Car care Index
The windows can also be opened and closed using: • the summer opening / convenience feature, see
page 34.
• the button O in the control panel of the climate
control, see page 158 or automatic climate control,
see page 167.
• the button e in the control panel of the
automatic climate control, see page 168. Synchronizing power windows
If the power supply was interrupted, (battery
disconnected or low), the windows cannot be opened or
closed by the express feature.
To resynchronize the express feature, pull switch until
the window is completely closed and hold for
approximately 1 second. Repeat procedure for each
window.
The automatic full opening and closing procedure of the
windows should now be restored.
Wa r n i n g !
When closing the windows, be sure that there is no
danger of anyone being harmed by the closing
procedure.In case of obstruction, the automatic reversal will
not operate if a door window is being closed by
pulling the switch to its resistance point and
holding it there, or when using the electronic key.The closing procedure can be immediately reversed
by either pressing or pulling the switch, or
pressing button
Œon the electronic key and
holding it.
When leaving the vehicle, always remove the
electronic key from starter switch, and lock your
vehicle. Do not leave children unattended in the
vehicle, or with access to an unlocked vehicle.
Unsupervised use of vehicle equipment can cause
serious personal injury.
Page 203 of 399

200
Interior equipment
Te ch n i c a l
data
Instruments
and controls Operation
DrivingInstrument
cluster display Practical hints Car care Index
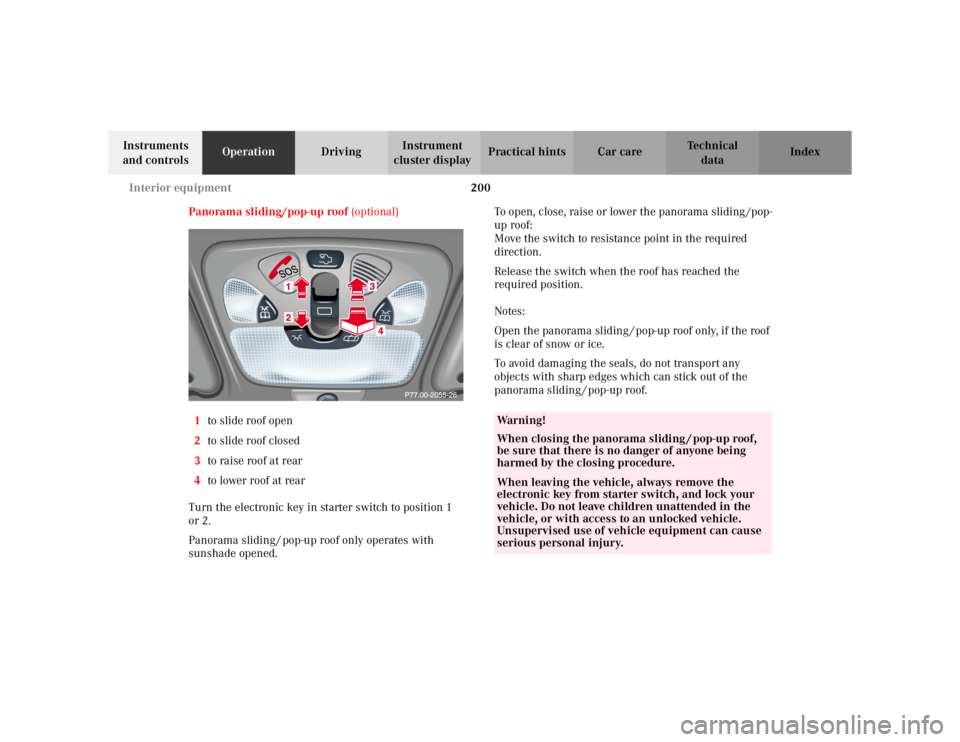
Panorama sliding/pop-up roof (optional)
1 to slide roof open
2 to slide roof closed
3 to raise roof at rear
4 to lower roof at rear
Turn the electronic key in starter switch to position 1
or 2.
Panorama sliding / pop-up roof only operates with
sunshade opened. To open, close, raise or lower the panorama sliding /pop-
up roof:
Move the switch to resistance point in the required
direction.
Release the switch when the roof has reached the
required position.
Notes:
Open the panorama sliding / pop-up roof only, if the roof
is clear of snow or ice.
To avoid damaging the seals, do not transport any
objects with sharp edges which can stick out of the
panorama sliding / pop-up roof.
Wa r n i n g !
When closing the panorama sliding / pop-up roof,
be sure that there is no danger of anyone being
harmed by the closing procedure.When leaving the vehicle, always remove the
electronic key from starter switch, and lock your
vehicle. Do not leave children unattended in the
vehicle, or with access to an unlocked vehicle.
Unsupervised use of vehicle equipment can cause
serious personal injury.
Page 204 of 399

201
Interior equipment
Te ch n i c a l
data
Instruments
and controls Operation
DrivingInstrument
cluster display Practical hints Car care Index
Opening the panorama sliding / pop-up roof
automatically
Move the switch past resistance point in direction (1)
and release. The roof will not open completely. Press
switch again to open it completely.
Stopping the sliding / pop-up roof:
Move the switch in any direction.
If the movement of the panorama sliding / pop-up roof is
blocked during the closing procedure, the roof will stop
and reopen slightly.
The panorama sliding/pop-up
roof can also be opened
and closed using the summer opening / convenience
feature, see page 34.
Notes:
The panorama sliding/pop-up roof can be opened or
closed manually should an electrical malfunction occur,
see page 354.
Wa r n i n g !
When closing the panorama sliding / pop-up roof,
be sure that there is no danger of anyone being
harmed by the closing procedure.The closing procedure of the panorama sliding/
pop- up roof can be immediately reversed by either
pressing or pulling the switch, or pressing
button Œon the electronic key and holding it.When leaving the vehicle, always remove the
electronic key from starter switch, and lock your
vehicle. Do not leave children unattended in the
vehicle, or with access to an unlocked vehicle.
Unsupervised use of vehicle equipment can cause
serious personal injury.
Page 216 of 399
213
Interior equipment
Te ch n i c a l
data
Instruments
and controls Operation
DrivingInstrument
cluster display Practical hints Car care Index
Lighter
1 Center console lighter
The lighter is located in the center console compartment
in front of the armrest, see page 208. Turn the electronic key in starter switch to position 1
or 2.
Push in lighter in (1); it will pop out automatically when
hot.
Note:
The lighter can be operated with electronic key in
starter switch position 1 or 2.
The lighter socket can be used to accommodate
electrical accessories up to a maximum 85 W.
Wa r n i n g !
Never touch the heating element or sides of the
lighter, they are extremely hot, hold at knob only.When leaving the vehicle always remove the
electronic key from the starter switch. Do not leave
children unattended in the vehicle, or with access
to an unlocked vehicle. Unsupervised use of vehicle
equipment may cause serious personal injury.
Page 243 of 399

240
Starter switch
Te ch n i c a l
data
Instruments
and controls Operation
DrivingInstrument
cluster display Practical hints Car care Index
Starter switch
0 The electronic key can be withdrawn in this position
only. The steering is locked when the electronic key
is removed from the starter switch. If necessary,
move steering wheel slightly to allow the locking
mechanism to engage.
In vehicles with automatic transmission, the
electronic key can be removed only with the selector
lever in position “P”. After removing the electronic key or with the electronic key in starter switch
position 0 or 1 the selector lever is locked in
position “P”.
1 Most electrical consumers can be operated. For
detailed information see respective subjects.
2 Driving position.
Gear selector lever is unlocked.
To move the selector lever out of position “P” firmly
depress the service brake pedal.
3 Starting position.
See page 242 for instructions on starting and turning off
the engine.
Wa r n i n g !
When leaving the vehicle always remove the
electronic key from the starter switch, and lock the
vehicle. Do not leave children unattended in the
vehicle, or with access to an unlocked vehicle.
Unsupervised use of vehicle equipment may cause
serious personal injury.