Page 120 of 248

6-10
Interior Comfort
Form No. 8Q42-EA-01F
Audio System
�Power Antenna
The antenna automatically rises when the
radio is turned on, and lowers when it is
turned off. It does not need to be removed
when leaving the vehicle.�Radio Reception
AM characteristics
AM signals bend around such things as
buildings or mountains and bounce off the
ionosphere. Therefore, they can reach
longer distances than FM signals. Because
of this, two stations may sometimes be
picked up on the same frequency at the
same time.
FM characteristics
An FM broadcast range is usually about
40—50 km (25
—30 miles) from the
source. Because of extra coding needed to
break the sound into two channels, stereo
FM has even less range than monaural
(non-stereo) FM.
Antenna
• To prevent damaging the antenna,
retract it before entering a car wash
facility or passing beneath a low
overhead clearance.
• Make sure no one is near the
antenna before turning on the radio
to prevent injury or damage to the
antenna.
CAUTION
Operating Tips for Audio
System
Ionosphere
Station 1 Station 2
FM Station
40—50 km
(25—30 miles)
J07L(02MY).book Page 10 Monday, June 11, 2001 4:52 PM
Page 134 of 248

to turn the radio on.
Band selection
Choose AM by pressing the AM button
( )")
6-24
Interior Comfort
Audio System
Form No. 8Q42-EA-01F
�Operating the Radio
Radio ON
Press a band selector button (or )
to turn the radio on.
Band selection
Choose AM by pressing the AM button
( ) and FM by pressing the FM1/2
button ( ).
The selected mode will be indicated. If
FM stereo is being received, "ST" will be
displayed. Tu n i n g
The radio has the following tuning
methods: Manual, Seek, Scan, Preset
channel, and Auto memory tuning. The
easiest way to tune stations is to set them
on preset channels.
Manual tuning
Turning the manual tuning knob will
change the frequency higher or lower.
Band selector buttons Display
Channel preset buttons Scan button
Auto memory
button
Manual tuning knob
Seek tuning:
Higher
frequency
Lower
frequency
NOTE
If the FM broadcast signal becomes
weak, reception automatically changes
from STEREO to MONO for reduced
noise, and the "ST" indicator will go
out.
NOTE
If the power supply is interrupted (fuse
blows or the battery is disconnected),
the preset channels will be canceled.
J07L(02MY).book Page 24 Monday, June 11, 2001 4:52 PM
Page 142 of 248

6-32
Interior Comfort
Audio System
Form No. 8Q42-EA-01F
�Operating the In-Dash CD Changer
Inserting the CD
The CD must be label-side up when
inserting. The auto-loading mechanism
will set the CD and begin play. There will
be a short lapse before play begins while
the player reads the digital signals on the
CD.
The disc number and the track number
will be displayed. Normal insertion
1. Press the load button ( ).
2. When "In" is displayed, insert the CD.
Inserting CDs into desired tray number
1. Press and hold the load button ( )
for about 2 seconds until a beep is
heard.
2. Press the channel preset button for the desired tray number within 5 seconds
after the beep is heard.
3. When "In" is displayed, insert the CD.
Display
CD slot
Disc-in indicator
CD ejectbutton
CD play button
Random button
Repeat button
Disc up button Scan
button
Fast-forward button
Reverse
button
Track up
button
Track down
button
Disc down
button
Load button
Power/Volume knob
NOTE
A CD cannot be inserted while the
display reads "WAIT". A beeping
sound can be heard during this waiting
time. Simultaneously pressing the
power/volume knob and the load
button ( ) for about 2 seconds will
turn this beeping sound ON or OFF.
NOTE
The CD can not be inserted to the
desired tray number if the number is
already occupied.
J07L(02MY).book Page 32 Monday, June 11, 2001 4:52 PM
Page 154 of 248
7-2
In Case of an Emergency
Form No. 8Q42-EA-01F
Parking in an Emergency
The hazard warning lights should always
be used when you stop on or near a
roadway.
The hazard warning lights warn other
drivers that your vehicle is a traffic hazard
and that they must take extreme caution
when near it.
Depress the hazard warning switch and all
four turn signals will flash at once.
Parking in an Emergency
NOTE
•The turn signals don
’t work when
the hazard warning lights are on.
• Check local regulations about the
use of hazard warning lights while
the vehicle is being towed. They
may forbid it.
Hazard warning flasher switch
J07L(02MY).book Page 2 Monday, June 11, 2001 4:52 PM
Page 189 of 248

8-19
Maintenance and Care
Owner Maintenance
Form No. 8Q42-EA-01F
�Inspecting Power Steering Fluid
Level
Inspect the fluid level at each engine oil
change. Add fluid if necessary; it does not
require periodic changing.
The level must be kept between the H and
L marks.
Visually examine the lines and hoses for
leaks and damage.
1. Park on a level surface, well off the
right-of-way, and set the parking brake
firmly.
2. Turn off the engine and allow it to cool.
•
Clutch fluid will damage painted
surfaces. If clutch fluid does get on
a painted surface, wipe it off
immediately.
• Using nonspecified clutch fluids
(page 10-4) will damage the system.
Mixing different fluids will also
damage it.
If the clutch system frequently
requires new fluid, it should be
inspected. Consult an Authorized
Mazda Dealer immediately.
NOTE
Low clutch fluid level may signal a
fluid leak. If you find a low fluid level,
have the clutch inspected.
CAUTIONPower Steering Fluid
To avoid damage to the power steering
pump, don
’t operate the vehicle for
long periods when the power steering
fluid level is low.
NOTE
Use specified power steering fluid
(page 10-4).
CAUTION
Full
Low
OK
Loosen
Tighten
J07L(02MY).book Page 19 Monday, June 11, 2001 4:52 PM
Page 201 of 248
8-31
Maintenance and Care
Owner Maintenance
Form No. 8Q42-EA-01F
Light Bulbs
Front-turn signal lights/Parking lights
Side-marker lights Interior light
Trunk lights/
License plate lights
High-mount brake light
Rear-turn signal lights Brake lights/Taillights Reverse lights
Headlights
J07L(02MY).book Page 31 Monday, June 11, 2001 4:52 PM
Page 204 of 248
8-34
Maintenance and Care
Owner Maintenance
Form No. 8Q42-EA-01F
�Replacing a Bulb (Front)
To replace the fog light bulbs, contact an Authorized Mazda Dealer.
�Replacing a Bulb (Interior)
Side-marker lights
Front-turn signal lights/Parking lights
Interior light
J07L(02MY).book Page 34 Monday, June 11, 2001 4:52 PM
Page 205 of 248
8-35
Maintenance and Care
Owner Maintenance
Form No. 8Q42-EA-01F
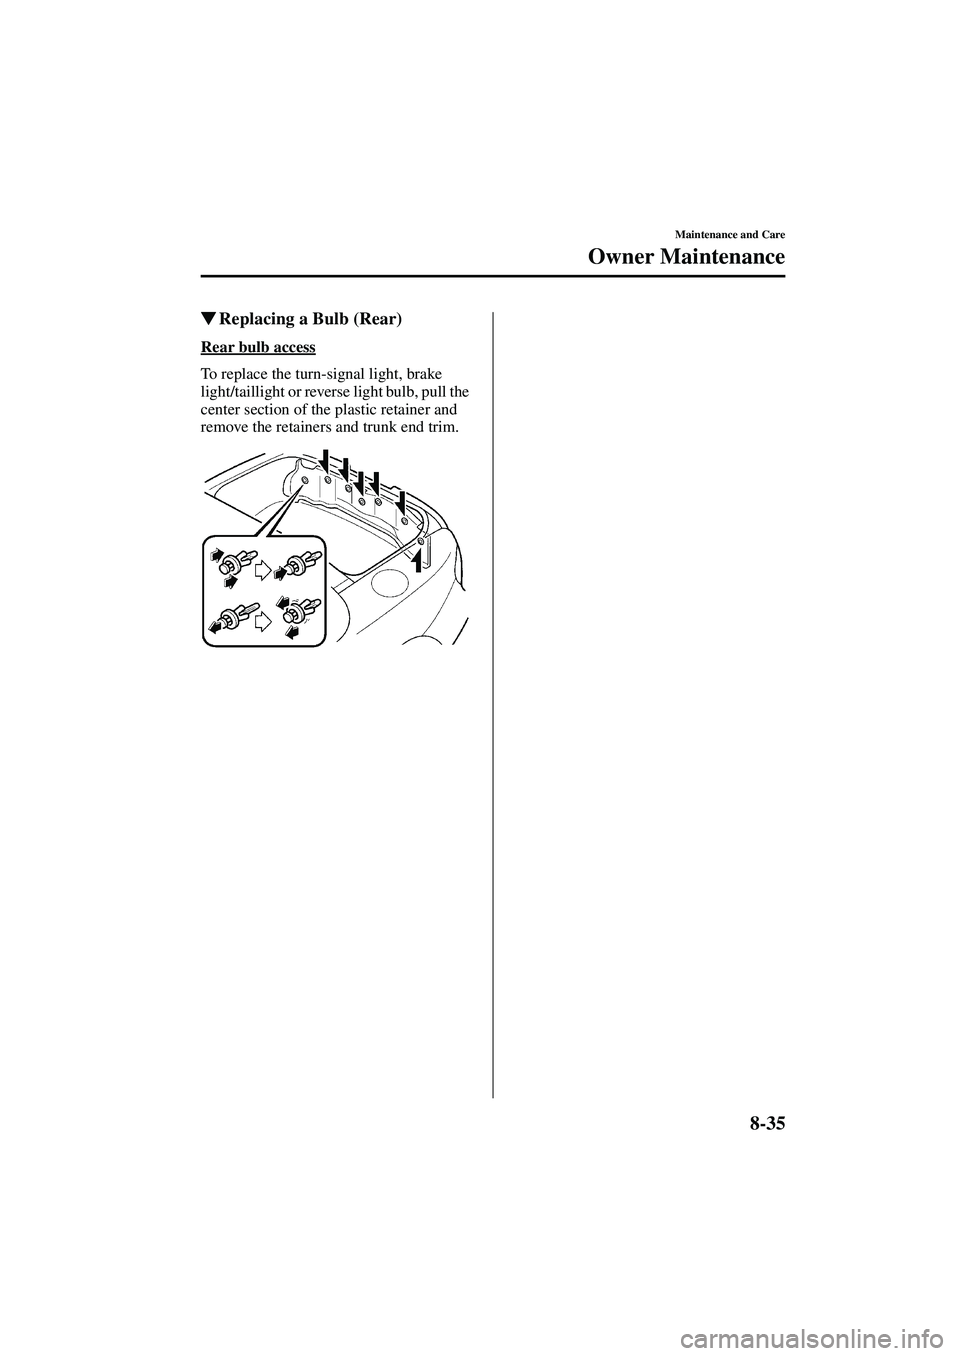
�Replacing a Bulb (Rear)
Rear bulb access
To replace the turn-signal light, brake
light/taillight or reverse light bulb, pull the
center section of the plastic retainer and
remove the retainers and trunk end trim.
J07L(02MY).book Page 35 Monday, June 11, 2001 4:52 PM