Page 125 of 248

6-15
Interior Comfort
Audio System
Form No. 8Q42-EA-01F
•A new CD may have rough edges on its
inner and outer perimeters. If a disc
with rough edges is used, proper
setting will not be possible and the CD
player/changer will not play the CD.
Remove the rough edges in advance by
using a ball-point pen or pencil as
shown above. To remove the rough
edges, rub the side of the pen or pencil
against the inner and outer perimeter of
the CD.
• When driving over uneven surfaces, the
sound will jump.
• The CD player/changer has been
designed to play CDs bearing the
identification logo as shown. No other
discs can be played. •
Be sure never to touch the signal
surface when handling the CDs. Pick
up a CD by grasping the outer edge or
the edge of the hole and the outer edge.
• Do not stick paper or tape on the CD.
Avoid scratching the reverse side (the
side without a label).
• Dust, finger smudges, and dirt can
decrease the amount of light reflected
from the signal surface, thus affecting
sound quality. If the CD should
become soiled, gently wipe it with a
soft cloth from the center of the CD to
the edge.
• Do not use record sprays, antistatic
agents, or household spray cleaners.
Volatile chemicals such as benzine and
thinner can also damage the surface of
the CD and must not be used. Anything
that can damage, warp, or fog plastic
should never be used to clean CDs.
• CDs, like traditional audio records, are
made of plastic. To avoid warping,
keep the CDs in their cases and do not
store them where they will be exposed
to direct sunlight.
• The CD player/changer ejects the CD if
the CD is inserted upside down. Also
dirty and/or defective CDs may be
ejected.
J07L(02MY).book Page 15 Monday, June 11, 2001 4:52 PM
Page 126 of 248
6-16
Interior Comfort
Audio System
Form No. 8Q42-EA-01F
•8 cm (3 in) CDs and CD accessories
(e.g. 8 cm disc adapter) cannot be used
in the CD player/changer.
• Do not insert cleaning discs in the CD
player/changer.
• Do not insert any disc with a peel-off
or seal on it.
J07L(02MY).book Page 16 Monday, June 11, 2001 4:52 PM
Page 127 of 248

6-17
Interior Comfort
Audio System
Form No. 8Q42-EA-01F
Power/Volume/Sound Controls ............................................................................................. 6-18
Clock ..................................................................................................................................... 6-22
Operating the Radio ........................................................................................................... .... 6-24
Operating the Cassette Tape Player ....................................................................................... 6-26
Operating the Mini Disc (MD) Player ................................................................................... 6-28
Operating the Compact Disc (CD) Player ............................................................................. 6-30
Operating the In-Dash CD Changer ...................................................................................... 6-32
Error Indications ............................................................................................................. ....... 6-35
Audio Set
CD PlayerIn-dash CD Changer
Cassette Tape Player Mini Disc (MD) PlayerIllustration is of a representative audio unit.
J07L(02MY).book Page 17 Monday, June 11, 2001 4:52 PM
Page 128 of 248
6-18
Interior Comfort
Audio System
Form No. 8Q42-EA-01F
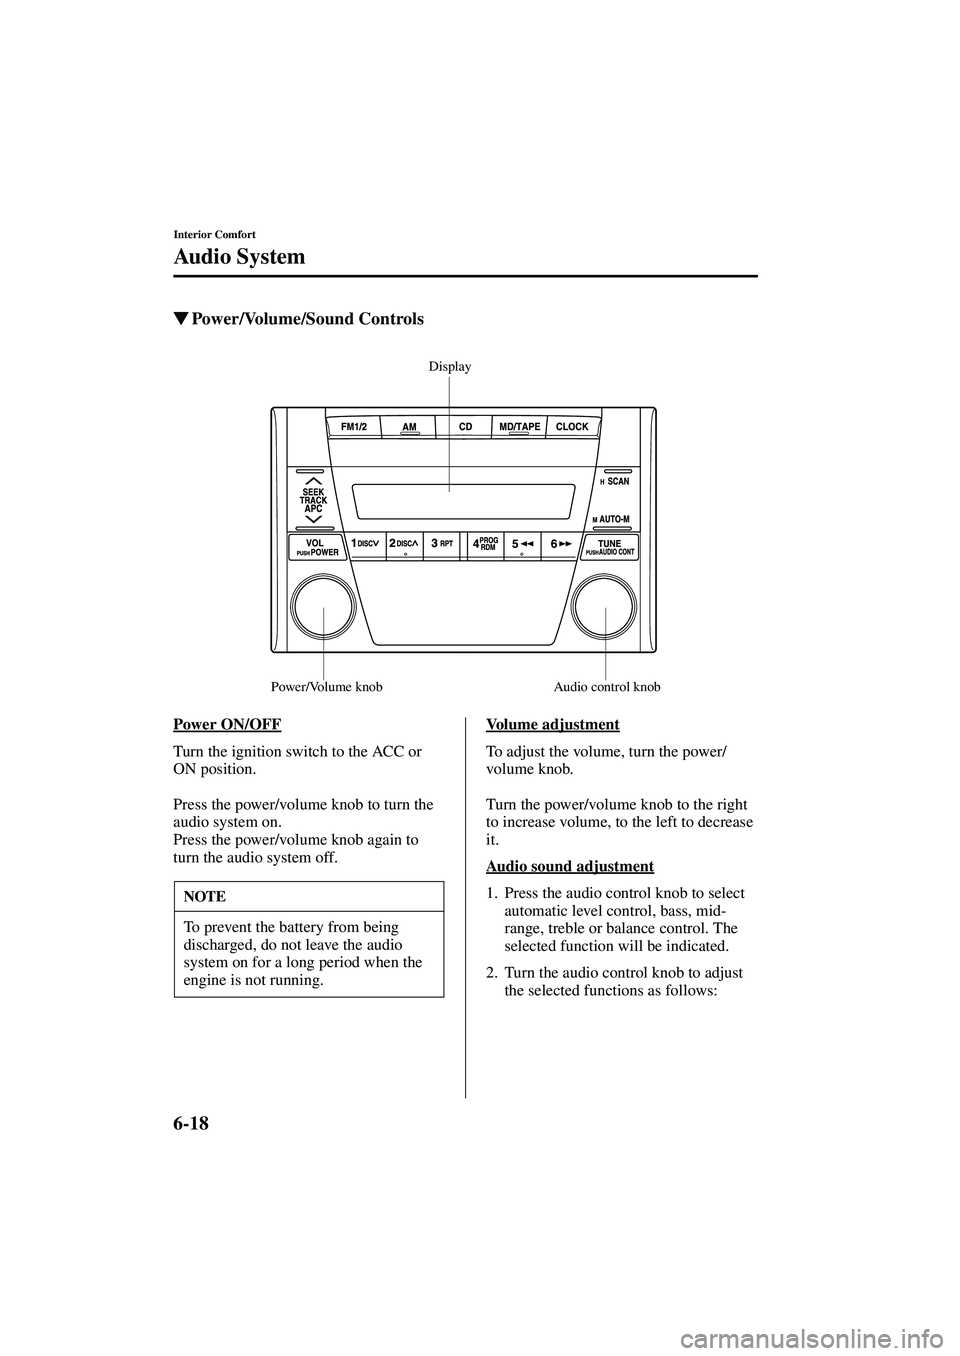
�Power/Volume/Sound Controls
Power ON/OFF
Turn the ignition switch to the ACC or
ON position.
Press the power/volume knob to turn the
audio system on.
Press the power/volume knob again to
turn the audio system off. Vo l u m e a d j u s t m e n tTo adjust the volume, turn the power/
volume knob.
Turn the power/volume knob to the right
to increase volume, to the left to decrease
it.
Audio sound adjustment
1. Press the audio control knob to select
automatic level control, bass, mid-
range, treble or balance control. The
selected function will be indicated.
2. Turn the audio control knob to adjust the selected functions as follows:
Display
Audio control knob
Power/Volume knob
NOTE
To prevent the battery from being
discharged, do not leave the audio
system on for a long period when the
engine is not running.
J07L(02MY).book Page 18 Monday, June 11, 2001 4:52 PM
Page 129 of 248
6-19
Interior Comfort
Audio System
Form No. 8Q42-EA-01F
With automatic level control
*Depending on the mode selected, the
indication changes.Without automatic level control
Indication Turn Left Turn Right
Select mode Select mode
Decrease bass Increase bass
Decrease
treble Increase
treble
Shift the sound
to the left Shift the sound
to the right
Indication Turn Left Turn Right
Decrease bass Increase bass
Decrease
mid-range Increase
mid-range
Decrease
treble Increase
treble
Shift the
sound
to the left Shift the
sound
to the right
NOTE
About 5 seconds after selecting any
mode, the volume function will be
automatically selected. To reset
automatic level control, bass, mid-
range, treble and balance, press the
audio control knob for 2 seconds. The
unit will beep and "CL" will be
displayed.
J07L(02MY).book Page 19 Monday, June 11, 2001 4:52 PM
Page 130 of 248
6-20
Interior Comfort
Audio System
Form No. 8Q42-EA-01F
Automatic Level Control (ALC)
The automatic level control is a feature
that automatically adjusts audio volume
and sound quality according to the vehicle
speed.
The volume increases in accordance with
the increase in vehicle speed, and
decreases as vehicle speed decreases.
The following seven modes are available.
Select the desired mode according to use.Turn the audio control knob to select the
desired mode. The selected mode will be
indicated.
Mode
UseVo l u m e
change
ALC does not
operate. No change
Use when the
convertible
top is up.
Three levels
are available. Minimum
Medium
Maximum
Use when the
convertible
top is down.
Three levels
are available. Minimum
Medium
Maximum
J07L(02MY).book Page 20 Monday, June 11, 2001 4:52 PM
Page 131 of 248
6-21
Interior Comfort
Audio System
Form No. 8Q42-EA-01F
J07L(02MY).book Page 21 Monday, June 11, 2001 4:52 PM
Page 132 of 248

6-22
Interior Comfort
Audio System
Form No. 8Q42-EA-01F
�Clock
Setting the time
The clock can be set at any time when the
ignition switch is in the ACC or ON
position.
1. To adjust the time, press the clock
button ( ) for about 2 seconds
until a beep is heard.
The clock ’s current time will flash.
2. To advance the hours, press the hour set button ( ). To advance the
minutes, press the minute set button
( ) while the time is flashing.
3. Press the clock button ( ) again to start the clock. Exact hour adjustment 1. To set the exact hour, press the clock
button ( ) for about 2 seconds
until a beep is heard.
The clock ’s current time will flash.
2. Press the clock button ( ) again and the time will be adjusted as
follows:
(Example)
12:01 —12:29
→12:00
12:30 —12:59
→1:00
Display Clock button
Hour set
button
Minute set
button
NOTE
If the power supply to the unit is
interrupted (if the fuse blows or the
vehicle ’s battery is disconnected), the
clock will need to be reset.
J07L(02MY).book Page 22 Monday, June 11, 2001 4:52 PM
 CDs and CD accessories
(e.g. 8 cm disc adapter) cannot be used
in the CD player/changer.
• Do not insert cleaning discs in th")


The automatic level control is a feature
that automatically adjusts audio volume
and sound quality according to")
.book Page 21 Monday, June 11, 2001 4:52 PM")