Page 105 of 287

Replacing the battery
The transmitter is powered by one coin type three-volt lithium battery
CR2032 or equivalent. Typical operating range will allow you to be up to
10 meters (33 feet) away from your vehicle. A decrease in operating
range can be caused by:
²weather conditions
²nearby radio towers
²structures around the vehicle
²other vehicles parked next to the vehicle
To replace the battery:
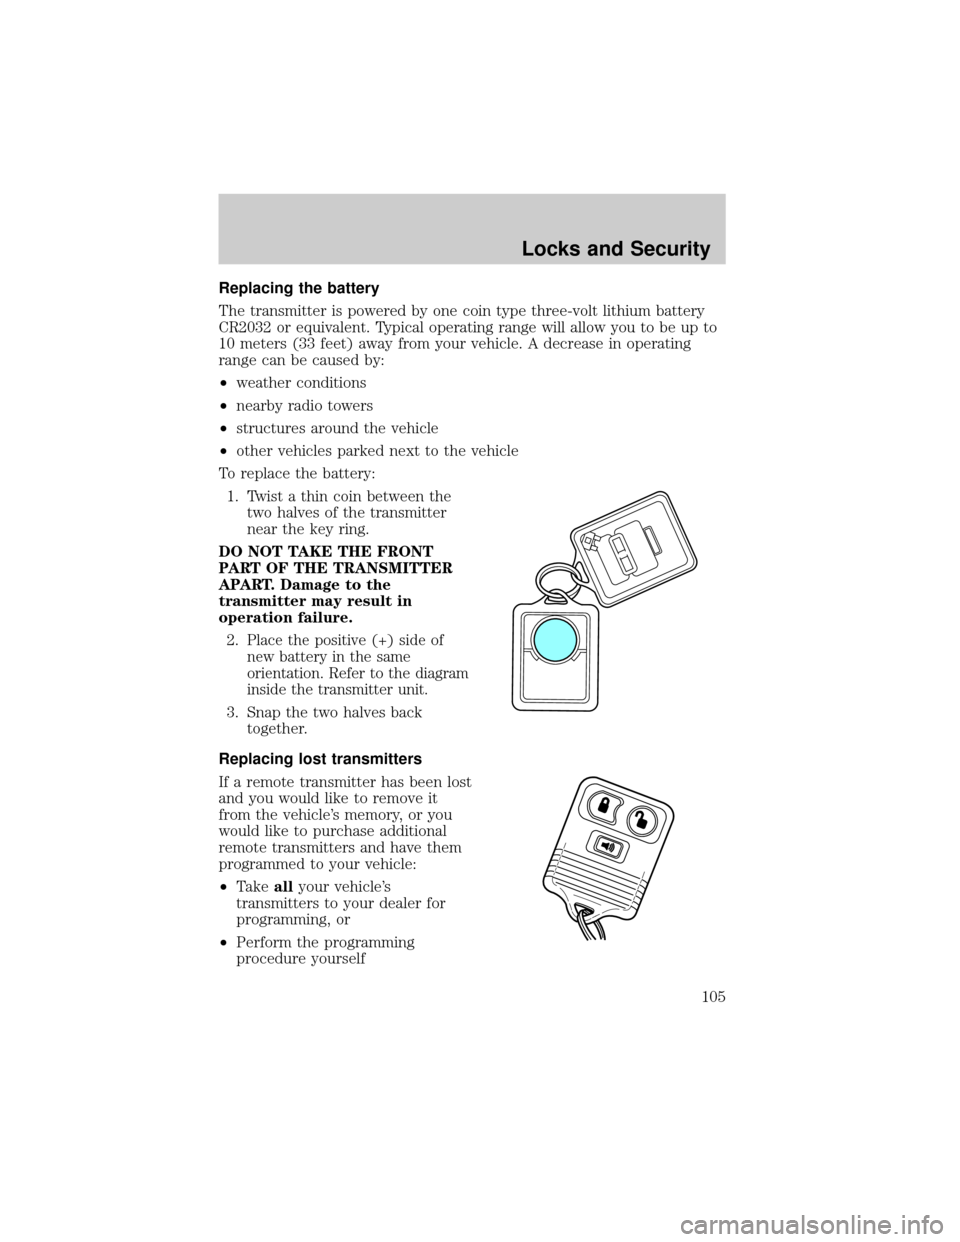
1. Twist a thin coin between the
two halves of the transmitter
near the key ring.
DO NOT TAKE THE FRONT
PART OF THE TRANSMITTER
APART. Damage to the
transmitter may result in
operation failure.
2.
Place the positive (+) side of
new battery in the same
orientation. Refer to the diagram
inside the transmitter unit.
3. Snap the two halves back
together.
Replacing lost transmitters
If a remote transmitter has been lost
and you would like to remove it
from the vehicle's memory, or you
would like to purchase additional
remote transmitters and have them
programmed to your vehicle:
²Takeallyour vehicle's
transmitters to your dealer for
programming, or
²Perform the programming
procedure yourself
Locks and Security
105
Page 109 of 287

If your keys are lost or stolen you
will need to do the following:
²Use your spare key to start the
vehicle. or
²Have your vehicle towed to an
authorized Mazda dealership. .
The key codes will need to be
erased from your vehicle and new key codes will need to be re-coded.
Replacingcoded keycan be very costly and you may want to store an
extra programmed key away from the vehicle in a safe place to prevent
an unforeseen inconvenience.
WARNING: If an unprogrammed key is used in the ignition it
will cause a ªNO STARTº condition.
Programming spare keys
A maximum of eight keys can be coded to your vehicle. Only
SecuriLockykeys can be used. To program acoded keyyourself, you
will need two previously programmedcoded keys(keys that already
operate your vehicle's engine) and the new unprogrammed key(s) readily
accessible for timely implementation of each step in the procedure.
If two previously programmed coded keys are not available, you must
bring your vehicle to your dealership to have the spare coded key(s)
programmed.
NOTE:Please read and understand the entire procedure before you
begin.
NOTE:This procedure must be completed within the specified times. If
not completed within the specified time period, the reprogramming
procedure must be restarted from the beginning.
Locks and Security
109
Page 112 of 287
Pull lever up to adjust seatback.
Using the manual lumbar support (if equipped)
Turn the lumbar support control
clockwise to increase firmness.
Turn the lumbar support control
counterclockwise to increase
softness.
REAR SEATS
Center facing jump seat (2 door SuperCab) (if equipped)
To open, pull inboard and down on the seat handle.
To stow the seat, pull seat bottom back to the fully upright position.
WARNING: Do not install a child seat in a center facing jump
seat.
Seating and Safety Restraints
112
Page 113 of 287

Center facing jump seat (4 door CabPlus) (if equipped)
To open, pull seat assembly down,
then raise seatback.
To stow the seat, fold seat back
down and raise seat assembly to the
fully upright position.
WARNING: Do not install a
child seat in a center facing
jump seat.
SAFETY RESTRAINTS
Safety restraints precautions
WARNING: Always drive and ride with your seatback upright
and the lap belt snug and low across the hips.
WARNING: To reduce the risk of injury, make sure children sit
where they can be properly restrained.
WARNING: Never let a passenger hold a child on his or her lap
while the vehicle is moving. The passenger cannot protect the
child from injury in a collision.
WARNING: All occupants of the vehicle, including the driver,
should always properly wear their safety belts, even when an
air bag (SRS) is provided.
WARNING: It is extremely dangerous to ride in a cargo area,
inside or outside of a vehicle. In a collision, people riding in
these areas are more likely to be seriously injured or killed. Do
not allow people to ride in any area of your vehicle that is not
equipped with seats and safety belts. Be sure everyone in your
vehicle is in a seat and using a safety belt properly.
Seating and Safety Restraints
113
Page 127 of 287

WARNING: Modifications to the front end of the vehicle,
including frame, bumper, front end body structure, tow hooks
and snow plows may effect the performance of the air bag
sensors increasing the risk of injury. Do not modify the front
end of the vehicle.
WARNING: Additional equipment may effect the performance
of the air bag sensors increasing the risk of injury. Consult your
authorized Mazda dealership before installation of additional
equipment.
WARNING: The front passenger air bag is not designed to offer
protection to occupants in the center front seating position.
Children and air bags
For additional important safety
information, read all information on
safety restraints in this guide.
WARNING: Children must
always be properly restrained.
Accident statistics suggest that
children are safer when
properly restrained in the rear
seating positions than in the
front seating position. Failure
to follow these instructions
may increase the risk of injury
in a collision.
WARNING: Air bags can kill or injure a child in a child seat
NEVER place a rear-facing child seat in front of an active air
bag. If you must use a forward-facing child seat in the front
seat, move the seat all the way back and secure it properly.
Seating and Safety Restraints
127
Page 141 of 287

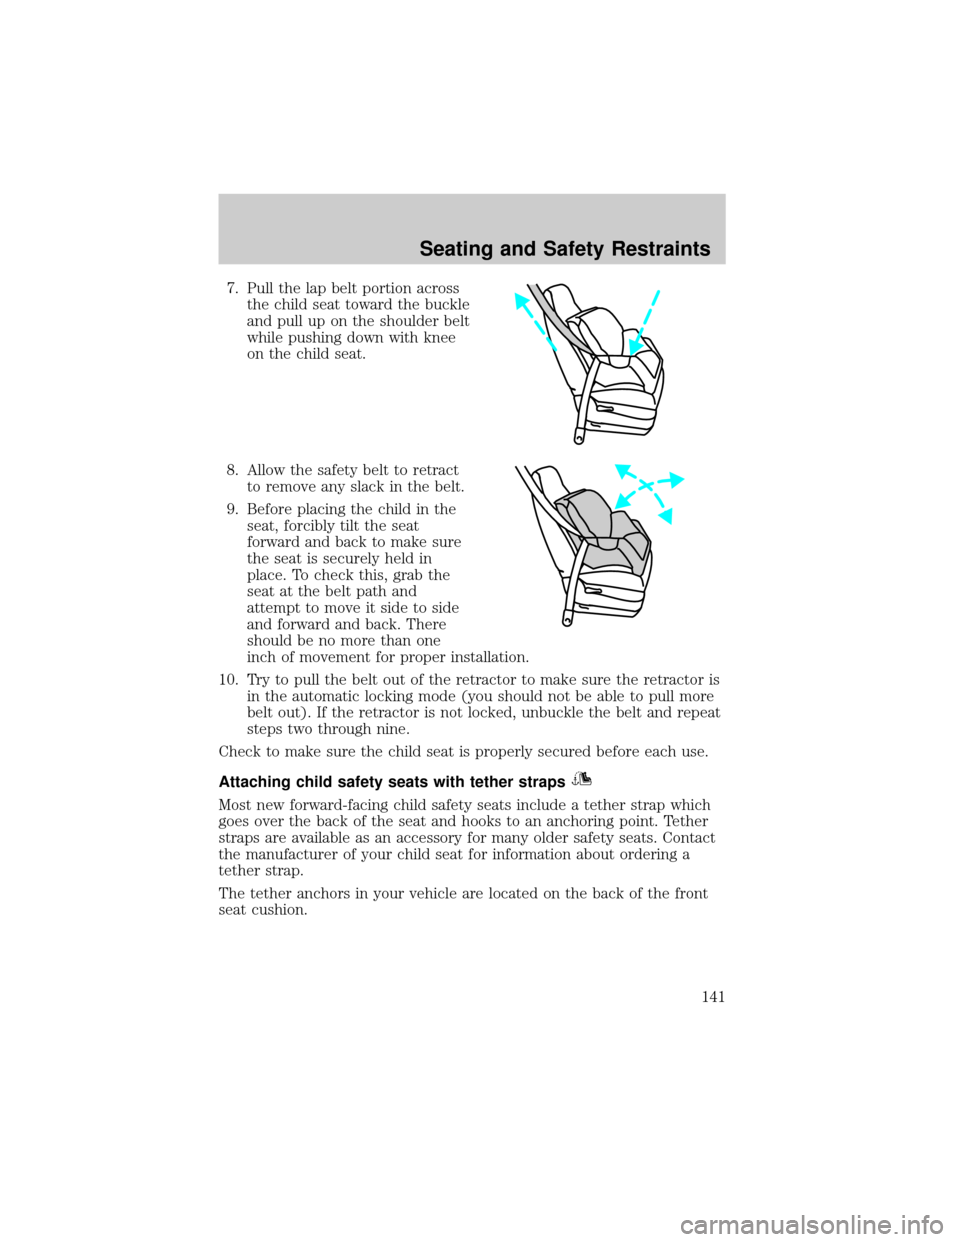
7. Pull the lap belt portion across
the child seat toward the buckle
and pull up on the shoulder belt
while pushing down with knee
on the child seat.
8. Allow the safety belt to retract
to remove any slack in the belt.
9. Before placing the child in the
seat, forcibly tilt the seat
forward and back to make sure
the seat is securely held in
place. To check this, grab the
seat at the belt path and
attempt to move it side to side
and forward and back. There
should be no more than one
inch of movement for proper installation.
10. Try to pull the belt out of the retractor to make sure the retractor is
in the automatic locking mode (you should not be able to pull more
belt out). If the retractor is not locked, unbuckle the belt and repeat
steps two through nine.
Check to make sure the child seat is properly secured before each use.
Attaching child safety seats with tether straps
Most new forward-facing child safety seats include a tether strap which
goes over the back of the seat and hooks to an anchoring point. Tether
straps are available as an accessory for many older safety seats. Contact
the manufacturer of your child seat for information about ordering a
tether strap.
The tether anchors in your vehicle are located on the back of the front
seat cushion.
Seating and Safety Restraints
141
Page 160 of 287

Drive± Not shown on the display. Activate by pressing the transmission
control switch on the end of the gearshift lever with the gearshift in
the
(Overdrive) position. The TCIL will illuminate on the instrument
cluster. Transmission operates in gears one through four. Drive (O/D
OFF) provides more engine braking than
(Overdrive) and is useful
whenever driving conditions (i.e., city traffic, hilly terrain, etc.) cause the
transmission to excessively shift between
(Overdrive) and other
gears. Deactivate
(Overdrive) when:
²driving with a heavy load.
²towing a trailer up or down steep hills.
²additional engine braking is desired. If towing a trailer, refer to
Driving while you towin theTrailer Towingsection.
To return to
(Overdrive) mode, press the transmission control
switch. The TCIL will no longer be illuminated.
Each time the vehicle is started, the transmission will automatically
return to normal
(Overdrive) mode.
2 (Second)
Use 2 (Second) to start-up on
slippery roads or to provide
additional engine braking on
downgrades.
1 (First)
Use 1 (First) to provide maximum
engine braking on steep
downgrades. Upshifts can be made
by shifting to 2 (Second) or to
(Overdrive). Selecting 1 (Low) at
higher speeds causes the transmission to shift to a lower gear and will
shift to 1 (First) after the vehicle decelerates to the proper vehicle
speed.
Forced Downshifts
To gain acceleration in(Overdrive) or Drive (O/D OFF) when
passing another vehicle, push the accelerator to the floor. The
transmission will downshift to the appropriate gear: fourth, third, second
or first gear.
Driving
160
Page 169 of 287

Allow more stopping distance and drive slower than usual. Consider
using one of the lower gears.
DRIVING THROUGH WATER
Do not drive quickly through standing water, especially if the depth is
unknown. Traction or brake capability may be limited and if the ignition
system gets wet, your engine may stall. Water may also enter your
engine's air intake and severely damage your engine.
If driving through deep or standing water is unavoidable, proceed very
slowly. Never drive through water that is higher than the bottom of the
hubs (for trucks) or the bottom of the wheel rims (for cars).
Once through the water, always try the brakes. Wet brakes do not stop
the vehicle as effectively as dry brakes. Drying can be improved by
moving your vehicle slowly while applying light pressure on the brake
pedal.
Driving through deep water where the transmission vent tube is
submerged may allow water into the transmission and cause
internal transmission damage.
VEHICLE LOADING
Before loading a vehicle, familiarize yourself with the following terms:
²Base Curb Weight:Weight of the vehicle including any standard
equipment, fluids, lubricants, etc. It does not include occupants or
aftermarket equipment.
²Payload:Combined maximum allowable weight of cargo, occupants
and optional equipment. The payload equals the gross vehicle weight
rating minus base curb weight.
²GVW (Gross Vehicle Weight):Base curb weight plus payload
weight. The GVW is not a limit or a specification.
²GVWR (Gross Vehicle Weight Rating):Maximum permissable total
weight of the base vehicle, occupants, optional equipment and cargo.
The GVWR is specific to each vehicle and is listed on the Safety
Certification Label on the driver's door pillar.
²GAWR (Gross Axle Weight Rating):Carrying capacity for each axle
system. The GAWR is specific to each vehicle and is listed on the
Safety Certification Label on the driver's door pillar.
²GCW (Gross Combined Weight):The combined weight of the
towing vehicle (including occupants and cargo) and the loaded trailer.
Driving
169