Page 2 of 248
Seating and Safety Restraints 102
Seating 102
Safety restraints 106
Air bags 121
Child restraints 128
Driving 136
Starting 136
Brakes 140
Traction control/AdvanceTrac 143
Transmission operation 146
Vehicle loading 150
Trailer towing 151
Recreational towing 154
Roadside Emergencies 156
Hazard flasher switch 157
Fuses and relays 158
Changing tires 165
Jump starting 169
Wrecker towing 175
Customer Assistance 176
The dispute settlement board 179
Utilizing the mediation/arbitration 182
Getting assistance outside the U.S. and Canada 182
Ordering additional owner's literature 183
Reporting safety defects (U.S. only) 185
Cleaning 186
Cleaning your vehicle 186
Underbody preservation 191
Table of Contents
2
Page 6 of 248

BREAKING-IN YOUR VEHICLE
There are no particular guidelines for breaking-in your vehicle. During
the first 1 600 km (1 000 miles) of driving, vary speeds frequently. This is
recommended to give the moving parts a chance to break in.
SPECIAL NOTICES
Emission warranty
The New Vehicle Limited Warranty includes Bumper-to-Bumper
Coverage, Safety Restraint Coverage, Corrosion Coverage, and 7.3L
Power Stroke Diesel Engine Coverage. In addition, your vehicle is eligible
for Emissions Defect and Emissions Performance Warranties. For a
detailed description of what is covered and what is not covered, refer to
theWarranty Guidethat is provided to you along with your Owner's
Guide.
Special instructions
For your safety, your vehicle is fitted with sophisticated electronic
controls.
By operating other electronic equipment (e.g. mobile telephone
without exterior aerial) electromagnetic fields can occur which
can cause malfunctions of the vehicle electronics. Therefore you should
observe the instructions of the equipment manufacturers.
Please read the sectionAir bagin theSeating and safety
restraintschapter. Failure to follow the specific warnings and
instructions could result in personal injury.
Rear facing child or baby seats shouldNEVERbe used in front
of a passenger side air bag.
Introduction
6
Page 8 of 248
These are some of the symbols you may see on your vehicle.
Vehicle Symbol Glossary
Safety Alert
See Owner's Guide
Fasten Safety BeltAir Bag-Front
Air Bag-SideChild Seat
Child Seat Installation
WarningChild Seat Tether
Anchorage
Brake SystemAnti-Lock Brake System
Brake Fluid -
Non-Petroleum BasedTraction Control
Master Lighting SwitchHazard Warning Flasher
Fog Lamps-FrontFuse Compartment
Fuel Pump ResetWindshield Wash/Wipe
Windshield
Defrost/DemistRear Window
Defrost/Demist
Power Windows
Front/RearPower Window Lockout
Introduction
8
Page 9 of 248
Vehicle Symbol Glossary
Child Safety Door
Lock/Unlock
Interior Luggage
Compartment Release
Symbol
Panic AlarmEngine Oil
Engine CoolantEngine Coolant
Temperature
Do Not Open When HotBattery
Avoid Smoking, Flames,
or SparksBattery Acid
Explosive GasFan Warning
Power Steering FluidMaintain Correct Fluid
LevelMAX
MIN
Emission SystemEngine Air Filter
Passenger Compartment
Air FilterJack
Check fuel capLow tire warning
Introduction
9
Page 56 of 248

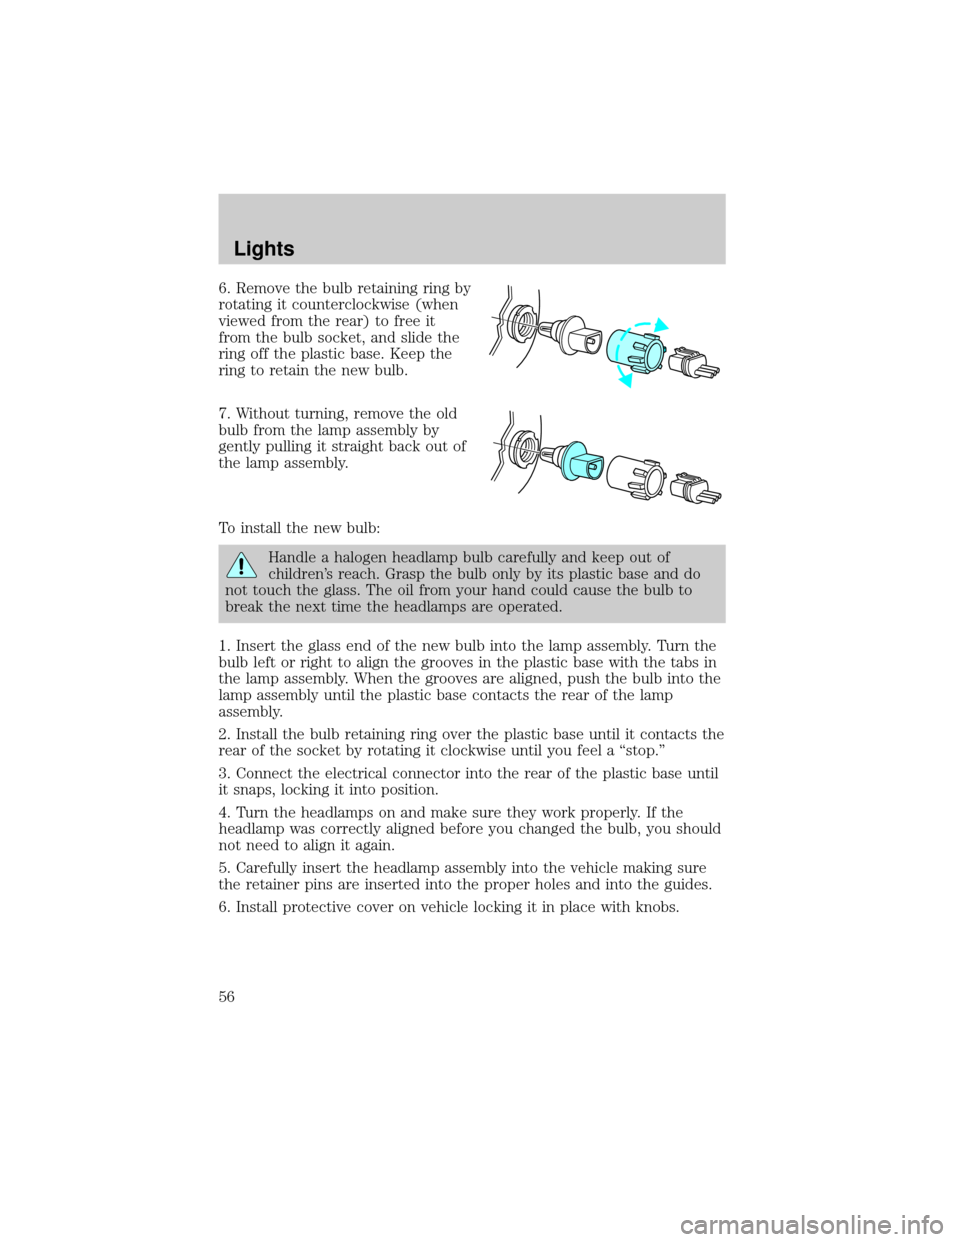
6. Remove the bulb retaining ring by
rotating it counterclockwise (when
viewed from the rear) to free it
from the bulb socket, and slide the
ring off the plastic base. Keep the
ring to retain the new bulb.
7. Without turning, remove the old
bulb from the lamp assembly by
gently pulling it straight back out of
the lamp assembly.
To install the new bulb:
Handle a halogen headlamp bulb carefully and keep out of
children's reach. Grasp the bulb only by its plastic base and do
not touch the glass. The oil from your hand could cause the bulb to
break the next time the headlamps are operated.
1. Insert the glass end of the new bulb into the lamp assembly. Turn the
bulb left or right to align the grooves in the plastic base with the tabs in
the lamp assembly. When the grooves are aligned, push the bulb into the
lamp assembly until the plastic base contacts the rear of the lamp
assembly.
2. Install the bulb retaining ring over the plastic base until it contacts the
rear of the socket by rotating it clockwise until you feel a ªstop.º
3. Connect the electrical connector into the rear of the plastic base until
it snaps, locking it into position.
4. Turn the headlamps on and make sure they work properly. If the
headlamp was correctly aligned before you changed the bulb, you should
not need to align it again.
5. Carefully insert the headlamp assembly into the vehicle making sure
the retainer pins are inserted into the proper holes and into the guides.
6. Install protective cover on vehicle locking it in place with knobs.
Lights
56
Page 88 of 248

KEYS
The vehicle is equipped with a master key and valet key lock system.
The master key will access doors, trunk, glove box, ignition and remote
trunk release. The valet key (marked ªvaletº) will access doors and
ignition only. Before using this key, lock the trunk remote control to
disable theTrunk remote controlon the drivers door, then lock the
glove compartment with your master key.
POWER DOOR LOCKS
Press control to unlock or lock all
doors.
Smart locks
With the key in the ignition, in any switch position, and either the
driver's or passenger's door open, the doors cannot be locked using the
power door lock switches.
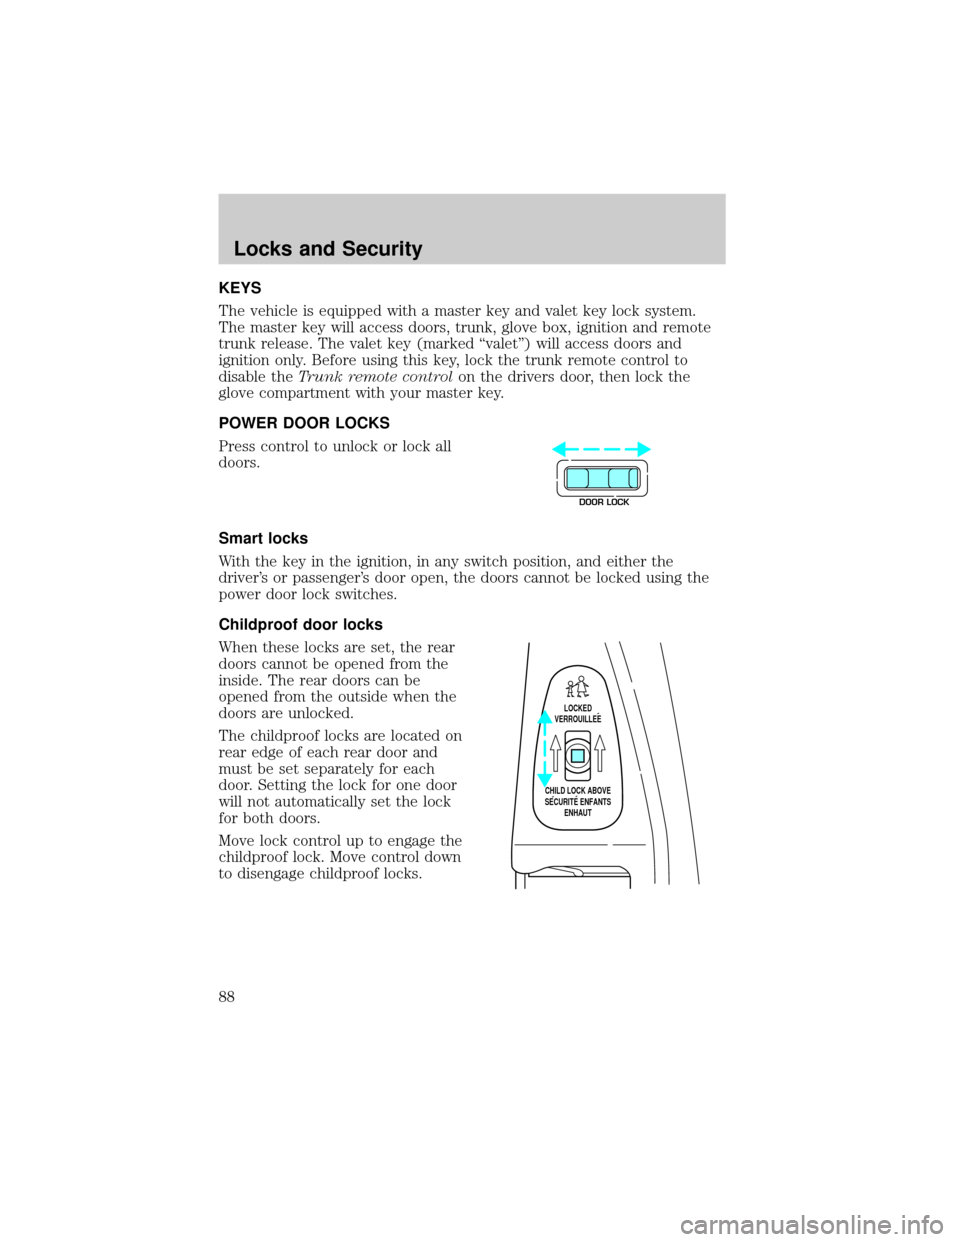
Childproof door locks
When these locks are set, the rear
doors cannot be opened from the
inside. The rear doors can be
opened from the outside when the
doors are unlocked.
The childproof locks are located on
rear edge of each rear door and
must be set separately for each
door. Setting the lock for one door
will not automatically set the lock
for both doors.
Move lock control up to engage the
childproof lock. Move control down
to disengage childproof locks.
DOOR LOCK
LOCKED
VERROUILLEE
CHILD LOCK ABOVE
SECURITE ENFANTS
ENHAUT
Locks and Security
88
Page 89 of 248

INTERIOR LUGGAGE COMPARTMENT RELEASE
Your vehicle is equipped with a mechanical interior luggage compartment
release handle that provides a means of escape for children and adults in
the event they become locked inside the luggage compartment.
Adults are advised to familiarize themselves with the operation and
location of the release handle.
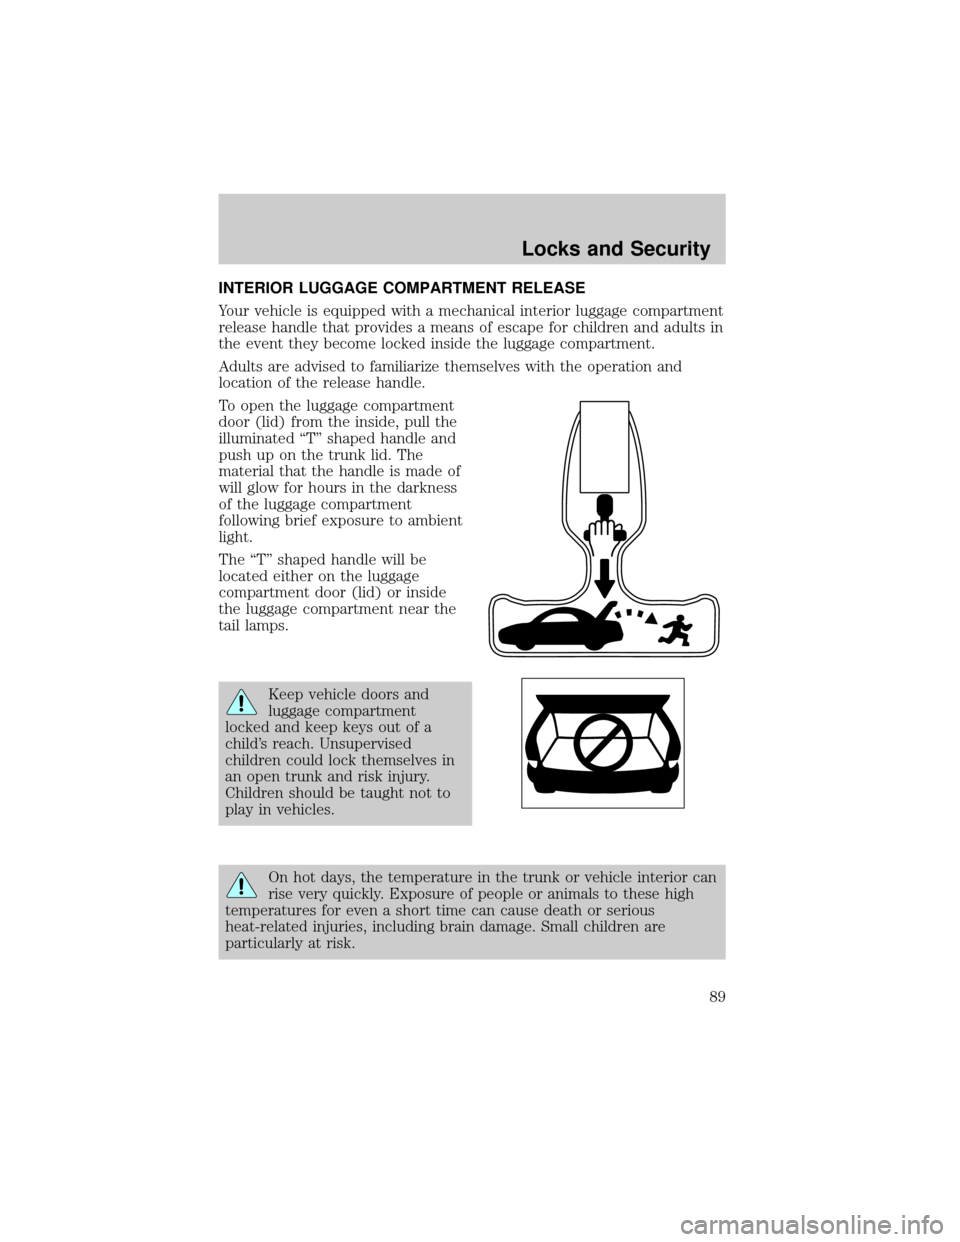
To open the luggage compartment
door (lid) from the inside, pull the
illuminated ªTº shaped handle and
push up on the trunk lid. The
material that the handle is made of
will glow for hours in the darkness
of the luggage compartment
following brief exposure to ambient
light.
The ªTº shaped handle will be
located either on the luggage
compartment door (lid) or inside
the luggage compartment near the
tail lamps.
Keep vehicle doors and
luggage compartment
locked and keep keys out of a
child's reach. Unsupervised
children could lock themselves in
an open trunk and risk injury.
Children should be taught not to
play in vehicles.
On hot days, the temperature in the trunk or vehicle interior can
rise very quickly. Exposure of people or animals to these high
temperatures for even a short time can cause death or serious
heat-related injuries, including brain damage. Small children are
particularly at risk.
Locks and Security
89
Page 108 of 248

Driver's seat position sensor
The driver's seat position sensor allows your Personal safety system to
tailor the deployment level of the driver dual-stage air bag based on seat
position. The system is designed to help protect smaller drivers sitting
close to the driver air bag by providing a lower air bag output level.
Passenger occupant classification sensor (OCS) (if equipped)
If your vehicle is equipped with this feature, there will be a label located
under the front passenger seat which is marked ªOCSº. Alternatively, you
may take your vehicle to any Ford or Lincoln Mercury dealer for
assistance.
For air bags to do their job they must inflate with great force, and this
force can pose a potentially deadly risk to occupants that are very close
to the air bag when it begins to inflate. For some occupants, like infants
in rear-facing child seats, this occurs because they are initially sitting
very close to the air bag. For other occupants, this occurs when the
occupant is not properly restrained by seat belts or child safety seats and
they move forward during pre-crash braking. The most effective way to
reduce the risk of unnecessary injuries is to make sure all occupants are
properly restrained. Accident statistics suggest that children are much
safer when properly restrained in the rear seating positions than in the
front.
Air bags can kill or injure a child in a child seat.NEVERplace a
rear-facing child seat in front of an active air bag. If you must
use a forward-facing child seat in the front seat, move the seat all the
way back.
Always transport children 12 years old and under in the back
seat and always properly use appropriate child restraints.
The passenger occupant classification sensor can automatically turn off
the passenger front air bag and side air bag (if equipped). The system is
designed to help protect small (child size) occupants from air bag
deployments when they are improperly seated or restrained in the front
passenger seat contrary to proper child-seating or restraint usage
recommendations. Even with this technology, parents areSTRONGLY
encouraged to always properly restrain children in the rear seat. The
sensor also turns off the air bag(s) when the passenger seat is empty to
prevent unnecessary replacement of the air bag(s) after a collision.
Seating and Safety Restraints
108